go back to JFF

14 January 2010

Archives November 2008 : New Item

JFF New Item :
Citric Acid Pickle

When I started making jewelry I used Sparex as my pickle solution. However, I found I was sensitive to the fumes and strong odor of the solution. Upon doing research, I found that there are two natural alternatives, white vinegar and citric acid. Since I already had the vinegar, I decided to try it first. While it worked, I found out rather quickly that hot vinegar has a foul odor.

I then decided to give the citric acid a shot. I ordered some citric acid from one of our suppliers to try. It worked great. While it’s not as fast as sparex, it still works quickly and I have yet to notice a smell at all.

Citric Acid is naturally occurring in many fruits and vegetables and is important to the basic metabolic functions of almost all living things. It is used in the food industry as a natural preservative and as an environmentally safe cleaning agent in soaps and laundry detergents. However, citric acid can also be used as a natural alternative to Sparex, PH Down, and other sodium bisulfate solutions.

Citric Acid Pickle comes in a concentrated powder form and should be used in a ratio of 1 part citric acid to 7 parts water. For example 1/2 cups (4 oz) citric acid to 3 1/2 cups (28 oz) water. While a stronger solution of 1:5 or weaker 1:10 works well also. The solution is most effective warm.

Use caution with the citric acid pickle, although it is naturally occurring and safe in foods, contact with dry citric acid or with concentrated solutions can result in skin and eye irritation.
The citric acid pickle is sold by the pound for $4.50*.

*prices may change without notice

13 January 2010

Archives November 2008 : Question & Answer

Q :
What is the difference between soft, half hard, and full hard wire?

A:
All metals have a property called hardness. Hardness is the characteristic of the metal that resists bending. Soft metals are pliable and easy to bend. Hard metals are stiff and hard to bend. The hardness of metals can be changed by heat treating the metal in a process called annealing or by simply bending the wire in a process called work hardening.

Wire, like all metals, will have this same hardness property. Historically, numbers (0, 1, 2, 3, or 4) were used as labels to define the hardness of the wire. The numbers correlated to the number of times that the wire was pulled through the draw plate. The wire becomes harder or stiffer after each time it is drawn through the drawplate. A hardness of 0 meant that the wire was drawn only one time and was as soft and pliable as possible. A hardness of 4 meant that the wire was drawn five or more times and the wire was as stiff and hard as possible.

Currently the designations 0, 1, 2, 3, and 4 no longer correlate to the number of times that the wire was drawn because the hardness of the wire can be changed by heat treating the wire. Practically, most jewelry wire is sold now as either dead soft, half-hard, or hard, with dead soft being wire manufactured with a hardness of 0, half-hard being wire manufactured with a hardness of 2, and fully hardened wire being wire with a hardness of 4.

Dead soft wire can be easily bent and is excellent for making rounded shapes including a spiral. The disadvantage of using soft wire is that the finished piece can be bent out of shape if not properly handled. Soft metal is best when soldering, as the heat from soldering process will anneal the metal and will soften the temper.

Half-hard wire is slightly stiffer than dead soft wire. It is excellent for making tight, angular bends, for making loops in wire, and for wrapping wire around itself. Finished pieces made with half-hard wire are often more permanent than pieces made with soft wire. Half-hard wire is good for handmade ear wires, wire wrapped jewelry and wire sculpture.

Hard wire is very stiff and tends to spring back after being bent. This can make it harder to work with when using a jig. Although the wire components made out of hard wire are difficult to make, they will be very permanent. Hard wire is good for making springs and pins.

As mentioned above, the hardness of the metal can be changed. Many times the various processes of jewelry making will harden or soften the metal. Hardening the metal can be accomplished by bending, hammering, coiling, twisting, tumbling, or by any other manipulations to the metal. This process is called work hardening. Work hardening is an actual physical change to the molecular structure of the metal. The molecules move closer and closer together becoming more and more brittle, eventually breaking the metal.

Heat treating or annealing the metal will soften the temper of the metal and prevent the metal from breaking, ultimately relaxing the molecules. During the annealing process, the metal is uniformly heated to a temperature that is lower than the melting point or soldering temperature. Therefore, soldering will anneal the metal as well.

12 January 2010

Archives November 2008 : Jeweler of the Month

Jeweler of the Month :
Kathy Kinev

Bio
I was born in Minneapolis, Minnesota but my family moved to Atlanta when I was 2. I worked with my hands at an early age, learning needlework and constantly drawing. At the age of 18, I went to Georgia State University to major in painting. As part of my curriculum I had to take a 3-D class. I chose metalworking over pottery. I went downstairs to study under Richard Mafong and I never went back up!!! Once my hands touched metal, I never went back to painting. I got my bachelor’s degree Fine Arts; Jewelry Design and Silversmithing.

While I was getting my BFA, I worked for three different jewelers in the Atlanta area and started Jewel Creations in my closet. I graduated and moved Jewel Creations Inc. to a location in Buckhead. I became a Graduate Gemologist and became a Fellow of the Gemological Association of Great Britain in the late 80's.

I discovered granulation and chain making while at GSU and this interest continued while I became a professional store owner/ jeweler. I had been interested in granulation since I saw a piece of John Paul Miller’s at a GSU exhibit. It was a fabulous spider made of 18K gold with enamel and granulation. I found out about Jean Stark and took classes with her at Wild Acres in North Carolina.

What was your first piece?
I think that the first piece of jewelry I made it a sun face pendant that I chased in class at GSU. I wear it often!

Who are your jewelry Heroes?
My jewelry heroes are Jean Stark, John Paul Miller, Peter Lacovara, Jasper Gaunt, Ancient Egyptians, Greeks and Etruscans. Actually, I have too many to list!

What is your design inspiration?
My design inspiration comes from the natural world, ancient motifs and I like to design clean, elegant jewelry with an emphasis on craftsmanship. Sometimes these designs come to me in my dreams. I have around 1000 books and a small selection of them is about granulation and ancient metalsmithing. I refer to these often! I also love to travel to Europe and study jewelry of other cultures.

What is your favorite part of making jewelry?
I love all parts of making jewelry! Working in metal involves working with earth, air, fire, and water. The experience is very elemental and basic. The tools are also very elemental and basic- almost the same as what was accomplished with 2000 years ago.
What is on your bench now?
I have four granulated birds to finish, three waxes to carve, a platinum chain that needs to be finished and a silver pendant that also needs to be finished.

What is your most indispensable tool?
My hands.

11 January 2010

Archives November 2008 : Tool of the Month

Tool of the Month :
3M Radial Bristle Discs

The first piece I ever made was an intricate pierced rose pendant. The design had tiny crevices and holes that I just could not clean up. I tried so many different techniques from bristle brushes with compounds to tiny escapement files to thrumming with string charged with Tripoli and rouge. But all I was getting was a mess! So, I gave up.

About one year later, we got this little colorful, flower-like wheels from 3M. The tiny little fingers were conformable and flexible. They could reach into tiny intricate areas to sand and polish without using a compound. I decided to try them out, I mean what could it hurt? I was shocked, not only did they clean up my pendants, but the different grits provided a great uniform finish.

The 3M Radial Bristle Discs have highly flexible bristles that can easily get into small grooves and areas with fine detail. The fine fingers accommodate the shape of whatever they are brushing against, so they even work well on curved or flat surfaces. The radial bristle discs are cool running and long lasting. They can be used on most metals.

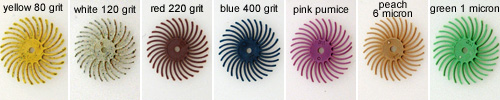
To use, stack the individual discs on a miniature screw top mandrel, you can use one disc or as many as you can fit on the mandrel to increase the surface area to be polished. They work best when you stack between three to six discs at a time. The discs must be mounted so they rotate as shown in the picture to the right.

The wheels have the abrasive compound embedded into the bristles, so there is no need to add polishing compound. Each disc is color coded to denote the seven grits that are available. The grits range from a coarse, 80 grit to a high polish, 1 micron.

JFF carries the 3/4" diameter wheels in packs of 1 dozen. Other sizes and grits are available by special order only.

I now use the 3M radial wheels on just about every project. From solder seams with tight angles to flat surfaces, the radial wheels leave a consistent uniform finish on high and low areas. I have found stacking three to six discs works best and I prefer using the coarser grits (yellow, white, red and blue). Don't get me wrong, the finer wheels work great also!

08 January 2010

Archives October 2008 : Questions & Answers

Q :
What do the sizes of the sawblades signify? How do I know what size blade I need?

A :
Saw blades are sized by the teeth per inch, the more teeth per inch, the finer the blade. Furthermore, standard saw blades are codified in a simple numbering system, the lower the number, the finer the blade and the more teeth per inch. For example, a #5 is finer than a #7.

The numbering for jeweler's saw blades is based off of the standard code; however, they are so fine compared to other types of saw blades, the numbering continues by counting the number of zeros. The finer the blade, the more zeros. The sizes from fine to coarse are as follows : 8/0, 7/0, 6/0, 5/0, 4/0, 3/0, 2/0, 0, 1, 2, 3, 4, 5, 6, 7, and 8. The fraction blade sizes, such as 3/0 are spoken "three oh," three zero," or "three ought."

Because the jewelers saw blades are so fine, they tend to break rather easily. While correct sawing form is very important, choosing the appropriate size blade for the job will help reduce the number of broken blades. Ideally, you should choose a blade that has 2 1/2 teeth per the thickness of the metal you plan to cut. Since it is very difficult to measure the teeth against the edge of sheet metal or wire, many charts are made to help, like the one below. Keep in mind the chart lists the largest blade for the gauge of metal, if you are sawing an intricate design you may want to use a finer blade.

07 January 2010

Archives October 2008 : Jeweler of the Month

Jeweler of the Month :
Julia Woodman

Bio
Julia grew up on a North Carolina Farm, where she was introduced to art at an early age, including, drawing, knitting, crocheting, embroidery, and ceramics. Julia went onto Fashion School in New York, where she studied fashion pattern making and sewing. Following her marriage, Julia moved around the world with her army officer husband, Dick, and her two children. To keep herself busy, Julia became accomplished in needle point and in 1968 was commissioned to produce the dining chair seat covers for the North Carolina governor's mansion.

Upon Dick's retirement, they moved to Atlanta, GA. Julia enrolled in the School of Art and Design at Georgia State University. Taking only a few credit hours a quarter, nearly twelve years later, Julia received her BFA and MFA in metalsmithing under the tutelage of Richard Mafong. During this time, Julia also took metalsmithing workshops at the Penland School of Crafts from many masters, including Heikki Seppa. While at GSU, she won first place in the Presidential medallion Design competition in 1990 and won first place in the National Student Sterling Design competition twice. Following her schooling in Atlanta, Julia won a Fulbright Scholarship to spend a year studying in Finland at the Lahti Polytechnic Design Institute, Upper Goldsmith School, where she became the first American to be certified a Finnish master silversmith.

Today, Julia teaches at Spruill Center for the Arts, Chastain Arts Center and specialized workshops at Penland School of Crafts and Florida Society of Goldsmiths. She has won several national awards and her work is in private collections throughout the US and in the permanent collection of the Victoria & Albert Museum, London, England and the High Museum of Art, Atlanta, Georgia.

What was your first piece?
My very first piece was a cuff bracelet, made of 6 bread & butter knives and one gravy ladle. (pictured to the right)

Who are your jewelry heroes?
Heikki Seppa and Camillia Okim

What is your design inspiration?
I use nature primarily and many times I take pictures of old masters, maybe early 20th century, turn them upside down and draw the negative spaces. I then manipulate them using tracing paper.

What is your favorite part of making jewelry?
My favorite part of the execution of my pieces is the design, then figuring out how to put the thing together.

What is on your bench now?
On my bench now are hooks I've designed for an enormous necklace for Barbara Becker Simon to hang up on her studio wall. (she'll be happy to know I'm working on it)

What is your most indispensible tool?
My favorite tool is a no brainer, its my 50 ton hydraulic press. I need all the help I can get.

06 January 2010

Archives October 2008 : Tool of the Month

Tool of the Month :
Magnifiers

So the Tool of the Month is more of a category than an individual tool and at first glance isn't all that exciting. But having magnification helps to bring your jewelry work to the next level of quality. The common thought is when you can't see something and you need magnification in the form of glasses or an OptiVisor® that it means you are getting old. This is not the case! Magnification is necessary. Using an OptiVisor® or another form of magnification in jewelry making will not only save your eyes, but will help to improve the quality of your jewelry.

Magnifiers are used during everyday jewelry work, such as : sawing, filing, soldering, beading, etc.. When purchasing these type magnifiers it is important to determine your comfortable working distance (how far away from your eyes are your hands and the piece when you are working). While we often think a high magnification is desirable, you may end up 4 inches away from your work!

The higher the magnification power, the closer your working distance will be. Most people have a 10 inch to 14 inch working distance. Keep in mind if you already wear reading glasses, using the magnifier in addition to the glasses, will change the working distance and power.

There are many different styles of magnifiers, and OptiVisor® is the most common and the most versatile. It is a head magnifier and can be worn with or without prescription or safety glasses. The OptiVisor® lenses are very durable mode of specially ground, polished glass. OptiVisors® are available in six different powers/viewing distances. Lens plates can be changed fairly easily and are available separately. Various accessories are available for the OptiVisor® , including the OptiLoupe for added magnification and the VisorLight which clips onto the visor for added light. The OptiVisor® is $32.75*.

The Telesight magnifier is a binocular type magnifier with prismatic plastic lenses housed in lightweight frames. The clip-on style (below left) attaches around the frame of your glasses and will flip out of the way when not in use. The half frame style (below right) has the lenses attached permanently to lensless-glasses for those who do not wear glasses, the lenses will also flip up. The Telesight is available in five powers/viewing distances.

The Telesight clip-on ranges in price from $32.95 to $35.95*.
The Telesight half-frame ranges in price from $37.95 to $41.95*.


The OpticAid is an economy magnifier with a single lens clip-on that flips up when not in use. The light weight lenses are coated in plastic for added durability and are available in four different powers/viewing distances. The OpticAid is $20.50*.


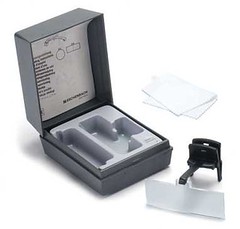
Eschenbach is a German company that makes premium quality optics. The Eschenbach clip on magnifier is available in three different powers/viewing distances. The lenses are made of high quality fiberglass and filled plastic. The optics of this magnifier are far superior to any other magnifier JFF carries. A lightweight frame is available for the Eschenbach lens to attach to for those who do not wear glasses. The Eschenbach clip-on magnifier is $86.90* and the frame is $18.75*.

Choosing a magnifier can be a tough decision, we suggest to come into JFF and try on the different magnifiers. Everyone's eyes are different, so the magnifier that works best for one person may not be right for you. We'll be happy to help you find the right magnifier that works best for YOU.

*prices may change without notice