Q: Why does silver tarnish?
A: Tarnish is a thin layer or film that forms over copper, brass, silver, aluminum and other semi-reactive metals as their outermost surface undergoes a chemical reaction. While silver is almost completely resistant to oxygen, other chemicals in the air, such as sulfur, creates a chemical reaction forming Silver Sulfide on the surface. The reaction occurs slowly, first with a thin sulfide layer causing the surface to yellow. As time proceeds, the layer will turn a dull gray or black.
Tarnish will also appear when sterling objects are in direct contact with skin. While everyone's body chemistry varies. Sulfur is found in skin oils and also in many cosmetics causing the rate of tarnish to increase dramatically.
How do I prevent tarnish?
The only sure fire way is to exclude sulfur from reacting from the surface of the metal, which would include keeping the metal piece in an air tight case filled with an inert gas which is virtually impossible! But here are some more reasonable options:
Rhodium Plating: through an electrolytic process a thin layer of rhodium (an expensive member of the platinum family) is applied to the surface of the silver. This layer is super hard and super white in color, resembling chrome. The downsides to rhodium plating are:
1. The color difference. The rich, warm white color of silver is replaced by the cold blue-white color of rhodium.
2. The plating layer is very thin and will wear with time.
3. Besides the cost of equipment for plating, rhodium is an expensive solution.
Coating the surface with Lacquer or Wax: Using a Lacquer or wax to seal the polished metal surface from exposure to air is a reasonable option if the piece will not be worn or used. However, in cases of wear or use, the areas of exposure to the skin or abrasion will quickly rub off the protective layer.
Periodic Cleaning: I sell my jewelry and I offer purchase of a polishing cloth to keep jewelry clean. The polishing cloth has a polishing chemical imbedded in the fabric. Assuming the wearer uses the cloth on a consistent basis (ie weekly), tarnish will be prevented or the slight effects (yellowing) will be removed. However, if the cloth is washed, the chemical is removed from the fabric and is no longer useful. Other possibilities are gels with brushes; small, home ultrasonic machines and steam cleaners; polishing on buffing machines.
Tarnish Removers: These are chemicals that the jewelry can be dipped into to instantly remove the tarnish. While these work almost instantly, the way the chemical works is that it eats away at the surface, removing the tarnish. So keeping this in mind, the surface of the metal is being eaten away, so if the metal is left in too long, it will eventually ruin or disintegrate the piece. Keeping this in mind, any polishing compounds on the surface of the metal preventing tarnish are now removed and the silver will tarnish at a higher rate (sometimes within hours) if not polished with a polishing cloth or on a buff shortly thereafter.
Using Argentium Silver: Argentium Silver is a new sterling silver alloy made with germanium. Germanium oxidizes preferentially to the silver and copper in Argentium Silver, to form a transparent germanium oxide surface layer. The alloy is not completely resistant to tarnish, but will slow the process of tarnish. Germanium causes the silver to react differently than normal sterling silver; so if you choose to use this, make sure you do your research! (At this time JFF does not carry Argentium)
19 July 2010
16 July 2010
Archives October 2009 : Jeweler of the Month
Jeweler of the Month:
Atlanta Contemporary Jewelry Show Artists
Atlanta Contemporary Jewelry Show Artists
To keep you on your toes, this month we're doing this section a little different. Usually we focus only on one jeweler. But, this weekend is the Atlanta Contemporary Jewelry Show and because we have all this great talent coming to Atlanta, we thought it would be a great opportunity to focus on the jewelers in the show!
*this event has already past, however, the 4th anual ACJS show will be November 5 & 6, 2010
Bio
The Atlanta Contemporary Jewelry Show - fostering an understanding and appreciation of artist designed and made contemporary fine craft jewelry in Atlanta through the presentation of work by the country's most accomplished jewelry artists.
Founded in 2007 by jewelry artists Leigh Griffin and Debra Lynn Gold, the 3rd Annual Atlanta Contemporary Jewelry Show presents 25 world renown jewelry artists and their masterful works on November 6th and 7th at the Defoor Centre. Each artist is selected for their creations of unique, wearable art jewelry representing a wide range of styles, materials, and techniques. The work ranges from elegantly traditional to edgy, sculptural, one-of-a-kind pieces.
Don't miss this opportunity to attend the show and meet these artists from across the country here for two days ~ at one incredible show.
A Meet the Artists Wine Reception hosted by the Spruill Center for the Arts takes place Friday evening from 6 PM to 9 PM - included with admission.
Please visit the website for more information about the show and about each one of this years participating artists
www.AtlantaContemporaryJewelryShow.com
Location: The Defoor Centre, 1710 Defoor Avenue NW, Atlanta,
GA. 30318
Hours: Friday, November 6th 10 AM to 9 PM
(Meet the artists at a wine reception from 6 PM to 9 PM sponsored by Spruill Center for the Arts)
Saturday, November 7th 10:00 am to 6:00 pm
Tickets: $5.00 at the door


15 July 2010
Archives October 2009 : Tool of the Month
Tool of the Month:
Bench Block
Bench Block
A steel bench block, I must say is not the most exciting tool on the surface. No pun intended. The bench block is smooth, flat, usually square hunk of steel commonly used to hammer on. However, this little block can be a SUPER time saver. But before I share some of my time-saving secrets, let me tell you a little about steel blocks in general.
The traditional bench block or bench anvil, should have at least one polished surface and one crisp edge. It is useful to have one rounded edge, for projects not requiring a sharp angle. Basic tasks include flattening wire, bending, riveting, and general hammering. In proper use, the hammer never strikes the block directly, which would make a dent. If a blemish occurs, the block should be sanded a polished to its original state. (Which I must say is not a lot of fun!)
The steel quality of your bench block is very important. Tool steel is well-suited to be made into tools, as it has a distinctive hardness, resistance to abrasion, and its ability to hold a cutting edge. While tool steel is susceptible to rust, the hardness can't be beat! Stainless steel is a good alternative as it does not stain, corrode or rust as easily as ordinary steel (it stains less, but is not stain-proof). However, stainless steel is a softer steel alloy than tool steel and your standard silversmithing hammers. Meaning if the hammer slips and hits the bench block, you have a larger, more significant dent to remove in your bench block! To inhibit rust, store your bench block covered with a cloth soaked in a little oil.
JFF carries two styles of bench blocks.

The Utility Anvil is made of stainless steel on one side and has a nylon block on the opposite side. The steel side has a mirror finish. It has a rubber base to "soften" the hammer blow sound. These bench blocks are round and come in two different sizes:
- 2" diameter is $22.80
- 3 1/2" diameter is $34.45
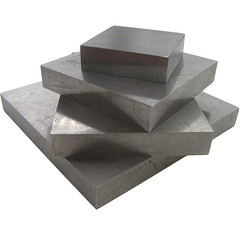 The Steel Bench Blocks are made of case-hardened tool steel. They are ground flat with all edges being sharp. These blocks are square and come in four sizes:
- 2 1/2" x 2 1/2" block is $12.95
- 4" x 4" block is $20.00
- 6" x 4" block is $27.00
- 6" x 6" block is $32.80
- Have you ever been trying to sand something flat and you just cant get it perfect? Place the sand paper on top of the bench block, grit surface facing up, and sand away.
- The flat surface is a great place to layout your work.
- Many times I have a couple projects going on at the same time on my bench. To keep organized I section off my bench block to keep the components separated but easily accessible.
- Are you trying to see if the edge you are filing is flat? Place the edge perpendicular to the block and look for any light between the metal and the block. If you see light, time to break back out the file!
- While I'm setting stones, I keep a small bench block with my stones on it. If I'm bezel setting, I have a flat surface to wrap my bezel around the stone. If I'm setting faceted stones, I keep them table side down and I can easily measure & remeasure my stones. As an extra bonus the raised surface keeps me from accidentally knocking the stones into my sweeps drawer.
- Do you have another useful tip for using your bench block? Please leave comments on our blog to share your bench block tips and tricks!
14 July 2010
Archives September 2009 : New Item
JFF New Item
The tube wringer is an odd sort of tool that has recently stumbled into the jewelry industry. Designed to work on any tube, this tool will squeeze out the last drop of paint, caulk, glue, caviar, anchovy paste, resin, make-up, or tooth paste. If it comes in a tube, a tube wringer will get it out.
"Ok, so why is this at JFF Jeweler Supply?" you ask. Well, this is also great for creating corrugated sheet metal. The popularity of corrugated accents on jewelry has grown recently, and this makes it super easy to do! It works best with thin copper and sterling silver sheet, 24-30 gauge works best. The most obvious benefit of corrugating metal is the great texture; however, it also makes light-weight metal more structurally sound. The tube wringer/metal corrugator is $22.95.

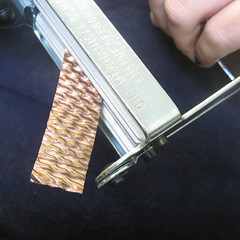 The corrugator is really easy to use. Just lay your metal between the two rollers and turn the crank. Depending on how hard you clamp down will determine how deep the corrugation will go.
To get the cross-hatched corrugated texture pictured to the right. Just pass the metal through one direction and then pass through a second time at a slight angle and with a lighter hold. Voila!
13 July 2010
Archives September 2009 : Jeweler of the Month
Jeweler of the Month:
Amy Rowe
Amy Rowe
Bio
Amy graduated from Auburn University in 1992, and put her Aerospace Engineering degree to good use at McDonnell Douglas. She was a diligent worker, but Amy soon discovered her passion was creating things, not calculating coefficients. After leaving the aerospace field, Amy began her own custom home building company at 22. As a top builder in the Atlanta market, she honed her creative skills while helping her clients express their personalities through the design of their living spaces.
While searching for additional ways to nourish her creative spirit, Amy discovered silversmithing, a medium that combines problem solving and artistic expression. Her first class was at Spruill Center for the Arts with Helen Blythe-Hart. Amy doesn't sketch or plan out her designs before she fires up her torch. Instead, she lets the materials guide her in the creation of each piece. This spontaneous and organic approach results in very special designs that are never repetitive.
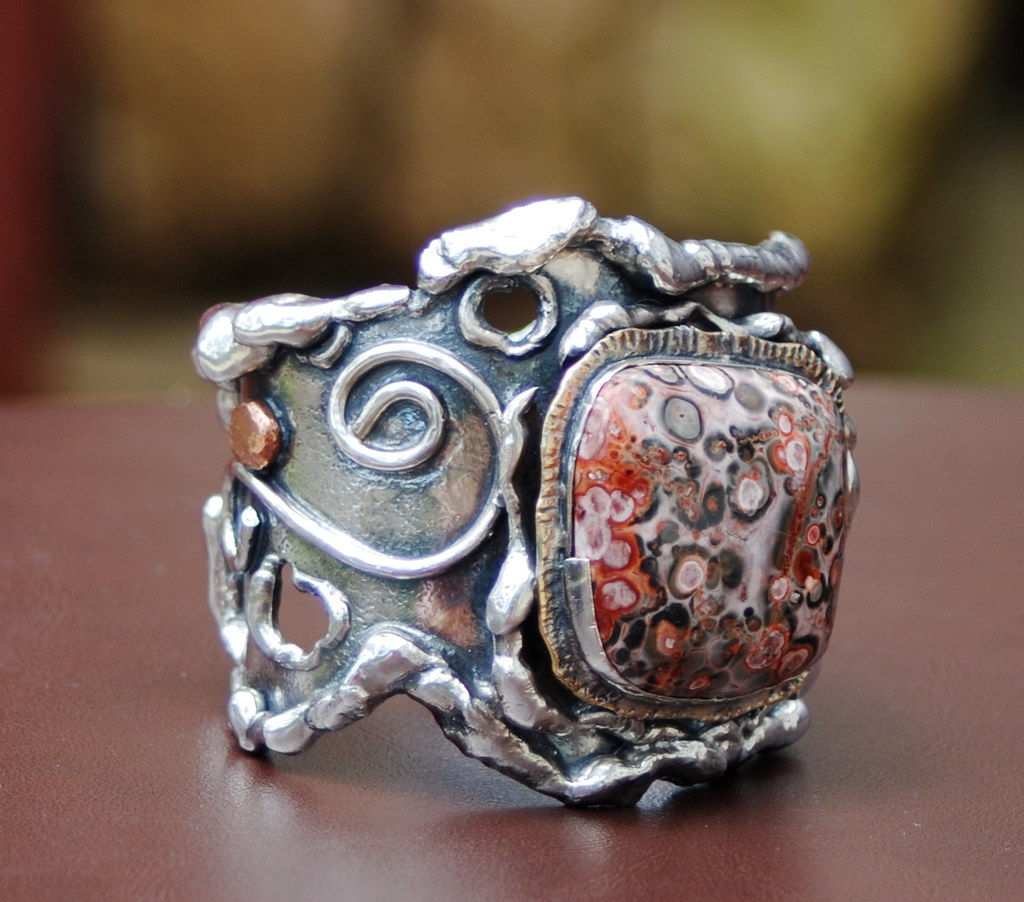
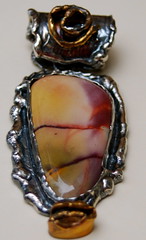 The signature rolled edge of an EllaKay piece is only one way in which Amy's work is unique. Her use of a variety of metals and stones ensures that each and every item she creates is more than just striking jewelry.
What was your first piece?
Her first piece of jewelry was a ring with purple glass that she still keeps and wears often.
What is your creative process?
I start with a stone and make a bezel with burned edges. There may be a total of 50 bezels made up with stones and from there I put them together to make large statement necklaces, pendants, cuffs or rings. I really enjoy working with sterling silver and have added bronze,copper and gold to some designs because of the warmth that it adds to the piece. My favorite part of jewelry making is putting the pieces together and coming up with a harmonious design. When the colors come together and they flow this is most exciting.
What is your favorite part of making jewelry?
The most favorite part of my jewelry are the juicy Nancy Antley Creation's stones. She has the most beautiful, bright, bold unusual stones.
Who are your jewelry heroes?
My jewelry hero is Helen Blythe-Hart because of her boldness in design and her attention to detail.
What is on your bench now?
What is on my bench now is a gorgeous necklace with bubble gum pink stones mixed with these crazy brownish pink graphic stones. I am anxiously awaiting an order of hot pink topaz to put with this piece.
Where does your design inspiration come from?
My inspiration comes from travel and shapes and colors in nature and architecture. One of my favorite architects is
 Gaudi from Spain and much inspiration was drawn from a 2 week trip with a girlfriend to Spain. Also, I enjoy the Southwest and the beach as well. After arriving home from a trip I go straight to my studio and start punching out ideas that have come from the awakening of the spirit that the trip has evoked.
What is your most indispensable tool?
The most indispensable tool is a difficult question as these tools are all so wonderful and every time I go to JFF Dallas introduces something that is even better than the last. I would have to say that I love the mini torch though. It is so fun and liberating to fire it up and start sculpting.
12 July 2010
Archives September 2009 : Tool of the Month
Tool of the Month:
Escapement Files
Escapement Files
I have always loved cute, teeny, tiny, miniature things. Ever
 since I was a child, I would collect little trinkets that really had no use in life. Now that I'm a so-called adult, while I still love miniatures my mind always asks..."can you really use this?" And I attempt to resist, but I always end up with a lot of tiny things with no practical use. But when I saw the teeny-tiny size of escapement files, I had a million uses for them almost immediately. As soon as I brought them home I was using the small shapes and angles on anything and everything that I couldn't get a standard or needle file into.
Escapement files are generally narrower and shorter than standard needle files but follow the same fineness grading as needle and hand files. They were originally created for use in clock and watchmaking when forming the escapement, a part of a watch that controls the motion of the wheel-work and other parts. These files are used for the most delicate and precise filing requirements.
Escapement files have a square handle and are always 5-1/2" (14cm) long, from the file tip to handle end. Several types of escapement files are available in different cut lengths, for example, you can order a barrette escapement file in 40mm or 55mm. For escapement files, the mm measurement always refers to the cut length, not the tip to tip length. The image below displays the various file shapes that are available. (please note any files with an * are special order only, and are not kept in stock at JFF)

The files are available individually or in 12 piece sets, in either a #2 or #4 cut. Individually prices range from approximately $12 to $22 (price is dependent on the shape and cut of the file). The sets are approximately $170.
* please note: prices are subject to change without notice
09 July 2010
Archives July/August 2009 : Question and Answer
Q: How do you read a Vernier Caliper?
A: One of the most difficult parts of using a Vernier Caliper is reading it accurately. Before I explain how to do this, let me go over the parts of the Caliper first.
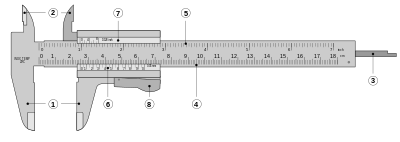
1. Outside jaws: used to measure external diameter or width of an object
2. Inside jaws: used to measure internal diameter of an object
3. Depth probe: used to measure depths of an object or a hole
4. Main scale: gives measurements of up to one decimal place(in cm).
5. Main scale: gives measurements in fraction(in inch)
6. Vernier gives measurements up to two decimal places(in cm)
7. Vernier gives measurements in fraction(in inch)
8. Retainer: used to block movable part to allow the easy transferring a measurement
Ok, now you know the parts of the caliper...so how do I use it?!
 First, find open the caliper and close down the outside jaws onto the item to be measured. Make sure the item side are on the same plane as the caliper, if it lays in wonky your measurement will be off.
Second, look for where the 0 mark of the sliding vernier scale lines up on the fixed main scale. In this case, it is before the 2.4 cm mark. So, the first reading is 2.4
cm.
Next, find the mark on the vernier scale that most closely lines up with one of the marks on the main scale. Here, 6.5 and 7.5 are very close, but 9.0 lines up exactly with one of the marks on the fixed scale. This value is the number of
hundredths of centimeters (or tenths of millimeters). So, the second reading is 0.070 cm.
Finally, add the two values together to get the total reading: 2.4 cm + 0.070 cm = 2.470 cm.
A: One of the most difficult parts of using a Vernier Caliper is reading it accurately. Before I explain how to do this, let me go over the parts of the Caliper first.
1. Outside jaws: used to measure external diameter or width of an object
2. Inside jaws: used to measure internal diameter of an object
3. Depth probe: used to measure depths of an object or a hole
4. Main scale: gives measurements of up to one decimal place(in cm).
5. Main scale: gives measurements in fraction(in inch)
6. Vernier gives measurements up to two decimal places(in cm)
7. Vernier gives measurements in fraction(in inch)
8. Retainer: used to block movable part to allow the easy transferring a measurement
Ok, now you know the parts of the caliper...so how do I use it?!
First, find open the caliper and close down the outside jaws onto the item to be measured. Make sure the item side are on the same plane as the caliper, if it lays in wonky your measurement will be off.Second, look for where the 0 mark of the sliding vernier scale lines up on the fixed main scale. In this case, it is before the 2.4 cm mark. So, the first reading is 2.4
cm.
Next, find the mark on the vernier scale that most closely lines up with one of the marks on the main scale. Here, 6.5 and 7.5 are very close, but 9.0 lines up exactly with one of the marks on the fixed scale. This value is the number of
hundredths of centimeters (or tenths of millimeters). So, the second reading is 0.070 cm.
Finally, add the two values together to get the total reading: 2.4 cm + 0.070 cm = 2.470 cm.
Subscribe to:
Posts (Atom)