
22 December 2009
11 December 2009
Archives August 2008 : Tool of the Month
Tool of the Month : Drawplate
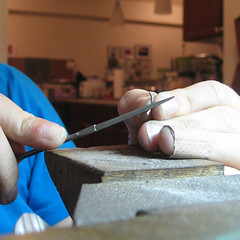
I recently began an apprenticeship with a local jeweler and goldsmith and have been working with many tools I never thought I would ever touch, except maybe to unpack from a box and place on a shelf. A few weeks ago, I was asked to draw down some gold wire using a draw plate. Typically, the suggestion of using a draw plate immediately would stir a reaction of disgust and plain laziness. "Why in the world would I need to draw down my wire, when I can just buy it in the gauge I need?!" I decided to keep an open mind and try it as I was curious to see how difficult it REALLY was. I annealed the wire, filed a point on one end and started pulling the wire through the draw plate. It was a breeze, and, I can't believe I'm saying this, fun!
A drawplate is a bar of hardened steel with holes of decreasing size. Each hole is shaped like a funnel, having the larger opening at the back end. Typically a drawplate will have 20 to 30 holes with sizes ranging within a 2 to 3 millimeter span. A draw plate is used in conjunction with heavy duty pliers called draw tongs that have a coarse jaw and a curved handle for a strong grip.
Draw plates are extremely versatile. They are typically used for reducing round wire to the size you need, but they also:
- reduce the outside diameter of tubing (this also makes the tubing walls thicker, which can be especially advantageous in tube setting).
- aid in making head pins and rivets.
- draw round wire into square or any other shape you can imagine (this also works for tubing).
 image courtesy of : http://handmadecontemporaryjewellery.com
Draw plates are available in a multitude of shapes. The most common shape is round, however; JFF also carries square and half-round. We can special order drawplates in other shapes as well.
The quality and price of drawplates vary drastically. The best quality drawplate is made of hardened steel and has A quality tungsten carbide inserts in the holes. The A quality tungsten carbide has a high polish finish and leaves the wire shiny and smooth after each pass through the draw plate, however; a tungsten carbide draw plate is expensive (upwards of $120). Be careful when purchasing tungsten carbide draw plates, as there are many imitators with more attractive price tags. These are not finished to a high polish and have pits and will cause unwanted problems.
A hardened tool steel draw plate is also a good choice, but after the drawing process, the wire is usually dull. It is also more difficult to draw the wire through the plate than the aforementioned tungsten draw plate. The tool steel drawplates range in price from $50 to $100.
Steel draw plates that have not been hardened, or are not tool steel, are not recommended for reducing the size of wire, because the hole will actually deform during the drawing process. They are, however; excellent for making head pins and rivets. These steel draw plates are priced around $15.
Archives July 2008 : Question & Answers
Q: Why are the measurements on a ring mandrel different than a finger sizer?
A: Ring mandrels are typically engraved with the sizes and then hardened. The hardening process causes the steel to expand and shrink along the mandrel, so that the engraved sizes are no longer 100% accurate. Unfortunately, the engraving cannot occur after the hardening process. And if the ring mandrel is not hardened, any hammering that occurs on it will change the shape and size of the mandrel as well.
To deal with this problem, it is always best to have a finger sizer along with a ring mandrel and check the sizes on your ring mandrel with your finger sizer for comparison.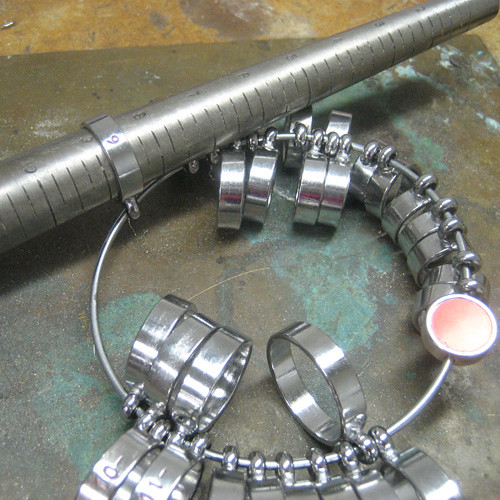
Archives July 2008 : Jeweler of the Month
Jeweler of the Month :
Judy Parady
Judy Parady
 Bio
BioWhen I was in high school, I worked in a Buckhead boutique that sold rock and roll clothing, hash pipes, and lots of hippie jewelry
 including some very nice Native American turquoise pieces. The manager encouraged me to take a jewelry class at community arts center so I could learn to repair some of the vintage work. After that I was hooked, and enrolled in the GSU program.
My Bachelor of Visual Arts degree from Georgia State University is in Jewelry Design and Silversmithing where I studied with Jem Freyaldenhoven and Richard Mafong. I've studied with other notables in the art world, but after all these years I've discarded almost all of their influences, except for the passion.
I make art in other mediums, too - sculpture, paintings, and drawings.
What was your first piece?
My first finished piece of jewelry, which I still have, was a big, gloppy cast ring featuring a really ugly teal green and orange agate. In retrospect, I don't think the teacher at the community art center knew very much about jewelry making or design. He showed us how to make wax models using soft brown sculptor's wax. There was no way to control the detail or scale. Somehow, that experience did not deter me from further exploration.
Who are your jewelry heroes?
In college, I related very closely to Jem Freyaldenhoven. His primary influence was for quality craftsmanship and personal, authentic design. I miss him still.
 I also enjoy the work of Robert Lee Morris and Ted Muehling, both for design and business savvy.
What is your design inspiration?
The mother of desing is always nature. I especially look at plants for texture, color, form and proportion.
What is your favorite part of making jewelry?
My favorite part of making jewelry is wearing it. Women jewelers definitely have an advantage when it comes to "test driving" new designs.
I also very much enjoy teaching jewelry making. So much so that I hold classes in my studio.
What is on your bench now?
I have a couple custom jobs - wedding things, and a big moonstone ring. But, I am most excited about new opportunities to place my jewelry in galleries and stores.

I just shipped a dozen pieces to a great jewelry gallery in Seattle and am currently preparing for work in the Signature Shop here in Atlanta.
What is your most indispensible tool?
Sadly, it is in my Optivisors.
My most beloved tool is a little brass ruler from the old Jewelers Supply Co that was located in downtown while I was in college.
I know there are massive changes in the industry with CadCam devices, laser welders, and the like. However, for the studio jeweler I think the biggest improvements are in finishing products like the bristle wheels from 3M. They remove oxides, while preserving texture and detail.
09 December 2009
Archives July 2008 : Tool of the Month
Teborg Round Nose Pliers
Lindstrom pliers have long been the nicest and best round nose pliers to own. If you didn't already have a pair, they were on your wish list. Not only because of their small size, but also because they were made of premium Swedish steel and were hand finished to perfection. Even though these features did not come cheap, nothing compared.

Recently, Lindstrom was bought out and is now being manufactured in France and Spain. The pliers are also being made with a lap joint, instead of the stronger, more durable, box joint. And, to top it off the price has INCREASED!! The changes in finishing and size were also surprising.
We are sad to see a company with such a wonderful reputation as Lindstrom find it necessary to lower their quality to stay competitive; however, with these changes, Hans wanted to find a replacement for the Linstrom quality.
Teborg Pliers! They are manufactured in Sweden and are made out of Swedish steel. They are hand finished and are as small, if not smaller than the original Lindstrom round nose pliers. The tip of the pliers measure .7mm and gradually increases to the base, measuring 4.5mm. The length of the nose is 19mm. The finishing of the pliers is immaculate and feels similar to that of the original Lindstrom pliers, but they do not have the price tag of the Lindstrom pliers.

08 December 2009
Archives June 2008 : Tool of the Month
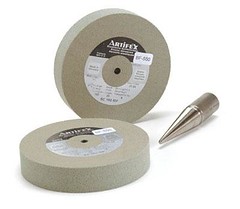
Artifex Wheel
Most people can barely walk out of the door without Dallas suggesting a tool that will and does make your project or life easier. The Artifex wheel is one of those tools that ALL of us (Hans included) are sold on!
The Artifex wheel is a German-made, rubber and silicon carbide bonded wheel. It will grind and de-bur very quickly, while it leaves behind a smooth, matte finish. Artifex wheels are bonded so they will not grind away into nothing and do not create a lot of dust like most other silicone based wheels. The Artifex wheel works great on silver, gold, platinum, and even steel!
The wheels are available in three different grits: Fine (250), Medium (150), and Coarse (80). However, we suggest using the Medium for most projects. The wheels are 4 inches in diameter and will fit on most polishing motors. They are also available on an inside ring arbor, in the Fine and Medium grits only. Artifex wheels are not available for the flext-shaft as of yet, but here's hoping!
16 November 2009
Celebrating Julia Woodman
On November 12, 2009 many local Atlanta jewelry artists & students met at 7pm at the High Museum of Art in Atlanta for a very special occasion. To celebrate Julia Woodman and the High Museum's recent acquisition of her Woven Majesty silver tea service. Many of Julia's fans, friends, students and colleagues met for this evening special evening planned by the Georgia Goldsmith Group.
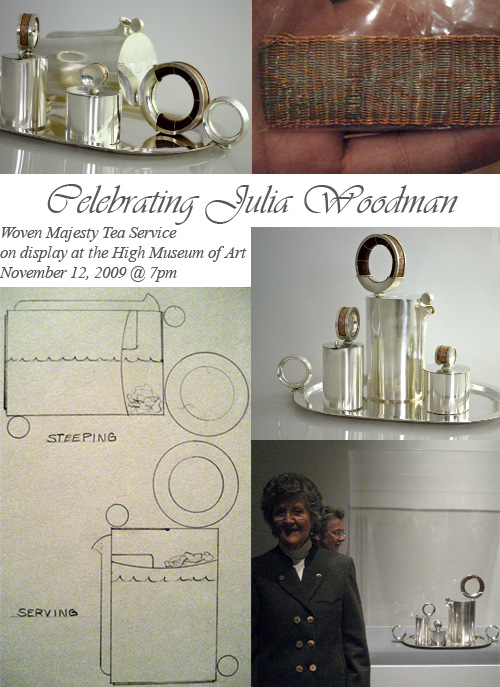 The photos above clockwise from top left: The Woven Majesty Tea Service in steeping position; an upclose photo of the weaving pattern on the handles on the vessels; The Woven Majesty Tea Service in serving position; Julia and her Tea Service Exhibit; Julia's drawing explaining the inner workings of the tea pot.
Julia shared with us many stories of making the Woven Majesty tea service. The teapot was the original piece, created in 1991, with the completion of the service commissioned by the High Museum in 2008. The service was completed and put on display September 2009.
There are many aspects of this teapot and service that brought up questions from the group and further discussion, including the woven handles of the service and the steeping mechanism on the inside of the pot.
The handles and vessels are adorned with card weaving of copper and fine silver (show above). "It is an ancient Viking technique found on their burial ships. The Vikings used wool not metal - I just thought it would be fun in metal. The wood is paduk, the same color as copper." Julia Wooman
The teapot has two feet on bottom region on the side of the handle for the pot to rest while steeping. A strainer is installed inside the upper portion of the teapot making it possible to separate the tea leaves from the hot steeped tea when raised upright in the serving position.
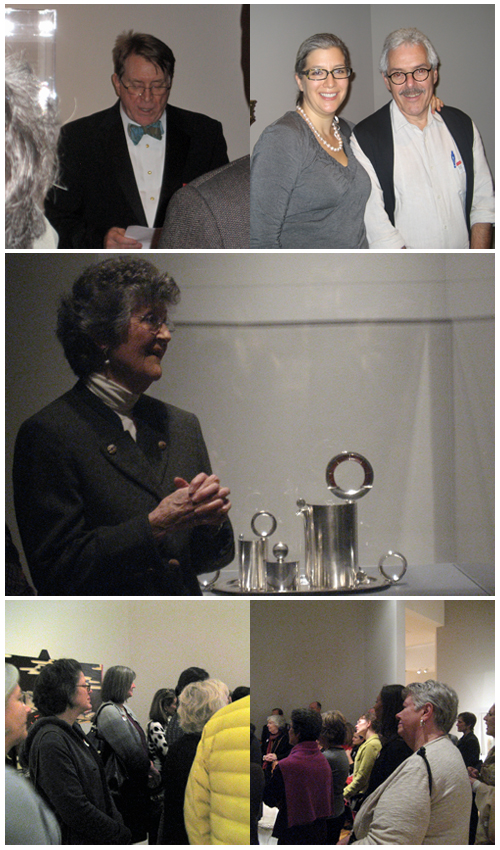 The photos above from top left clockwise: Georgia Goldsmith Group's President Alan Bremer introducing Julia Wooman; Maggie Glezer & her husband (Maggie set up the whole talk and celebration, Thank you!); Julia speaking about her process; Julia's students, friends, and family.
Lastly I want to share with you all an interview I did with Julia last year. Julia was selected as our Jeweler of the Month for JFF Jeweler Supply's October 2008 Newsletter. Go here to read the article.
The photos above clockwise from top left: The Woven Majesty Tea Service in steeping position; an upclose photo of the weaving pattern on the handles on the vessels; The Woven Majesty Tea Service in serving position; Julia and her Tea Service Exhibit; Julia's drawing explaining the inner workings of the tea pot.Julia shared with us many stories of making the Woven Majesty tea service. The teapot was the original piece, created in 1991, with the completion of the service commissioned by the High Museum in 2008. The service was completed and put on display September 2009.
There are many aspects of this teapot and service that brought up questions from the group and further discussion, including the woven handles of the service and the steeping mechanism on the inside of the pot.
The handles and vessels are adorned with card weaving of copper and fine silver (show above). "It is an ancient Viking technique found on their burial ships. The Vikings used wool not metal - I just thought it would be fun in metal. The wood is paduk, the same color as copper." Julia Wooman
The teapot has two feet on bottom region on the side of the handle for the pot to rest while steeping. A strainer is installed inside the upper portion of the teapot making it possible to separate the tea leaves from the hot steeped tea when raised upright in the serving position.
The photos above from top left clockwise: Georgia Goldsmith Group's President Alan Bremer introducing Julia Wooman; Maggie Glezer & her husband (Maggie set up the whole talk and celebration, Thank you!); Julia speaking about her process; Julia's students, friends, and family.Lastly I want to share with you all an interview I did with Julia last year. Julia was selected as our Jeweler of the Month for JFF Jeweler Supply's October 2008 Newsletter. Go here to read the article.
02 November 2009
Tool of the Month
Tool of the Month :
Bench Block
Bench Block
A steel bench block, I must say is not the most exciting tool on the surface. No pun intended. The bench block is smooth, flat, usually square hunk of steel commonly used to hammer on. However, this little block can be a SUPER time saver. But before I share some of my time-saving secrets, let me tell you a little about steel blocks in general.
The traditional bench block or bench anvil, should have at least one polished surface and one crisp edge. It is useful to have one rounded edge, for projects not requiring a sharp angle. Basic tasks include flattening wire, bending, riveting, and general hammering. In proper use, the hammer never strikes the block directly, which would make a dent. If a blemish occurs, the block should be sanded a polished to its original state. (Which I must say is not a lot of fun!)
The steel quality of your bench block is very important. Tool steel is well-suited to be made into tools, as it has a distinctive hardness, resistance to abrasion, and its ability to hold a cutting edge. While tool steel is susceptible to rust, the hardness can't be beat! Stainless steel is a good alternative as it does not stain, corrode or rust as easily as ordinary steel (it stains less, but is not stain-proof). However, stainless steel is a softer steel alloy than tool steel and your standard silversmithing hammers. Meaning if the hammer slips and hits the bench block, you have a larger, more significant dent to remove in your bench block! To inhibit rust, store your bench block covered with a cloth soaked in a little oil.
JFF carries two styles of bench blocks.
 The Utility Anvil is made of stainless steel on one side and has a nylon block on the opposite side. The steel side has a mirror finish. It has a rubber base to "soften" the hammer blow sound. These bench blocks are round and come in two different sizes:
- 2" diameter is $22.80
- 3 1/2" diameter is $34.45
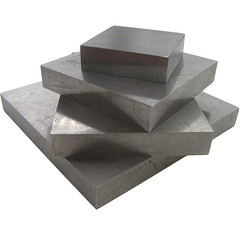 The Steel Bench Blocks are made of case-hardened tool steel. They are ground flat with all edges being sharp. These blocks are square and come in four sizes:
- 2 1/2" x 2 1/2" block is $12.95
- 4" x 4" block is $20.00
- 6" x 4" block is $27.00
- 6" x 6" block is $32.80
- Have you ever been trying to sand something flat and you just cant get it perfect? Place the sand paper on top of the bench block, grit surface facing up, and sand away.
- The flat surface is a great place to layout your work.
- Many times I have a couple projects going on at the same time on my bench. To keep organized I section off my bench block to keep the components separated but easily accessible.
- Are you trying to see if the edge you are filing is flat? Place the edge perpendicular to the block and look for any light between the metal and the block. If you see light, time to break back out the file!
- While I'm setting stones, I keep a small bench block with my stones on it. If I'm bezel setting, I have a flat surface to wrap my bezel around the stone. If I'm setting faceted stones, I keep them table side down and I can easily measure & remeasure my stones. As an extra bonus the raised surface keeps me from accidentally knocking the stones into my sweeps drawer.
- Do you have another useful tip for using your bench block? Please leave comments to share your bench block tips and tricks!
If you would like to receive more information like this please sign up for the JFF Monthly Email Newsletter!
09 September 2009
shhh...it's a sneak peak
It's about that time for the September newsletter to be sent out. I just wanted to give you a heads up of things to look forward to...
Tool of the Month: Escapement Files
The tiny files you never knew you were missing.
Jeweler of the Month: Amy Rowe
Beautiful eye catching, conversation starting silver jewelry.

.........................................................
Also, don't forget to become a fan on facebook! We now have 100 fans!!!
Tool of the Month: Escapement Files
The tiny files you never knew you were missing.
Jeweler of the Month: Amy Rowe
Beautiful eye catching, conversation starting silver jewelry.
.........................................................
Also, don't forget to become a fan on facebook! We now have 100 fans!!!
14 August 2009
New Items!
When purchasing pricey steel tools like the pepe disc cutter or the pepe dapping sets, we at JFF will suggest purchasing a brass mallet to preserve the life of your steel tools. However, we never have a source for these hammers. Until now!
These brass mallets feature a solid brass head secured to a smooth hardwood handle. They weigh in at 1 lb and 2 lbs, priced $22.95 and $32.50 respectively. The heavy brass head gives the user a nice "dead blow" effect without the bounce back which assures better performance when dapping and stamping.

13 August 2009
July & August Newsletter
The July & August Newsletter has been mailed out! Check your email box!
A lot of exciting things in this newsletter!
A lot of exciting things in this newsletter!
- Tool of the Month: Vernier Calipers
- Jeweler of the Month: Heather Trundle
- New Item: Liver of Sulfur Gel
- Question & Answer: How do you read a vernier caliper?
10 August 2009
Welcome to the internet age
The past few years JFF has been falling behind on the internet bandwagon. Only 4 years ago did the company purchase a point of sale computer system. We have four computers, with no internet connection.
In July 2008, I convinced Hans, the owner of JFF, my boss and my dad, to purchase a computer to create a catalog and run a website. So we now have internet connected to ONE computer while I do research for a catalog of over 7,000 items that we carry.
Today, it is August 10, 2009, about one year and one month since we have had internet. I am almost done with all the research on the catalog and have started a monthly email newsletter. Yet, we still have no internet presence. I am bothered by this. I am still learning how to design a website and then make it work on the internet, so I'm going to use what I do know.
As many of you know I have my own company on the side, in which I design and make jewelry, Christina Kober Designs. While I still don't have my own website....yet, I have quite an online presence. I have an etsy store, a facebook fan page, a twitter page, a blog, and finally a flickr account. So why not do the same for JFF Jeweler Supply!
I am so excited to introduce JFF Jeweler Supply's Blog and Facebook Fan Page!!! Please become a fan and follow our blog! I will post updates about new items, store closings, and any other relevant information.
Subscribe to:
Posts (Atom)