go back to JFF
Showing posts with label tool of the month. Show all posts

15 July 2010

Archives October 2009 : Tool of the Month

Tool of the Month:
Bench Block

A steel bench block, I must say is not the most exciting tool on the surface. No pun intended. The bench block is smooth, flat, usually square hunk of steel commonly used to hammer on. However, this little block can be a SUPER time saver. But before I share some of my time-saving secrets, let me tell you a little about steel blocks in general.

The traditional bench block or bench anvil, should have at least one polished surface and one crisp edge. It is useful to have one rounded edge, for projects not requiring a sharp angle. Basic tasks include flattening wire, bending, riveting, and general hammering. In proper use, the hammer never strikes the block directly, which would make a dent. If a blemish occurs, the block should be sanded a polished to its original state. (Which I must say is not a lot of fun!)

The steel quality of your bench block is very important. Tool steel is well-suited to be made into tools, as it has a distinctive hardness, resistance to abrasion, and its ability to hold a cutting edge. While tool steel is susceptible to rust, the hardness can't be beat! Stainless steel is a good alternative as it does not stain, corrode or rust as easily as ordinary steel (it stains less, but is not stain-proof). However, stainless steel is a softer steel alloy than tool steel and your standard silversmithing hammers. Meaning if the hammer slips and hits the bench block, you have a larger, more significant dent to remove in your bench block! To inhibit rust, store your bench block covered with a cloth soaked in a little oil.

JFF carries two styles of bench blocks.
The Utility Anvil is made of stainless steel on one side and has a nylon block on the opposite side. The steel side has a mirror finish. It has a rubber base to "soften" the hammer blow sound. These bench blocks are round and come in two different sizes:
  • 2" diameter is $22.80
  • 3 1/2" diameter is $34.45
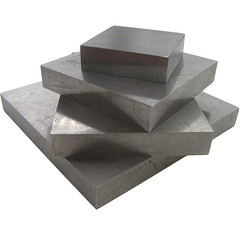
The Steel Bench Blocks are made of case-hardened tool steel. They are ground flat with all edges being sharp. These blocks are square and come in four sizes:
  • 2 1/2" x 2 1/2" block is $12.95
  • 4" x 4" block is $20.00
  • 6" x 4" block is $27.00
  • 6" x 6" block is $32.80
I know you have been waiting to hear my secret uses:
  • Have you ever been trying to sand something flat and you just cant get it perfect? Place the sand paper on top of the bench block, grit surface facing up, and sand away.
  • The flat surface is a great place to layout your work.
  • Many times I have a couple projects going on at the same time on my bench. To keep organized I section off my bench block to keep the components separated but easily accessible.
  • Are you trying to see if the edge you are filing is flat? Place the edge perpendicular to the block and look for any light between the metal and the block. If you see light, time to break back out the file!
  • While I'm setting stones, I keep a small bench block with my stones on it. If I'm bezel setting, I have a flat surface to wrap my bezel around the stone. If I'm setting faceted stones, I keep them table side down and I can easily measure & remeasure my stones. As an extra bonus the raised surface keeps me from accidentally knocking the stones into my sweeps drawer.
  • Do you have another useful tip for using your bench block? Please leave comments on our blog to share your bench block tips and tricks!
* please note prices are subject to change without notice

12 July 2010

Archives September 2009 : Tool of the Month

Tool of the Month:
Escapement Files

I have always loved cute, teeny, tiny, miniature things. Ever since I was a child, I would collect little trinkets that really had no use in life. Now that I'm a so-called adult, while I still love miniatures my mind always asks..."can you really use this?" And I attempt to resist, but I always end up with a lot of tiny things with no practical use. But when I saw the teeny-tiny size of escapement files, I had a million uses for them almost immediately. As soon as I brought them home I was using the small shapes and angles on anything and everything that I couldn't get a standard or needle file into.

Escapement files are generally narrower and shorter than standard needle files but follow the same fineness grading as needle and hand files. They were originally created for use in clock and watchmaking when forming the escapement, a part of a watch that controls the motion of the wheel-work and other parts. These files are used for the most delicate and precise filing requirements.

Escapement files have a square handle and are always 5-1/2" (14cm) long, from the file tip to handle end. Several types of escapement files are available in different cut lengths, for example, you can order a barrette escapement file in 40mm or 55mm. For escapement files, the mm measurement always refers to the cut length, not the tip to tip length. The image below displays the various file shapes that are available. (please note any files with an * are special order only, and are not kept in stock at JFF)


The files are available individually or in 12 piece sets, in either a #2 or #4 cut. Individually prices range from approximately $12 to $22 (price is dependent on the shape and cut of the file). The sets are approximately $170.

* please note: prices are subject to change without notice

06 July 2010

Archives July/August 2009 : Tool of the Month

Tool of the Month:
Vernier Caliper

Many times customers will purchase wire and sheet and ask how will they know what gauge the metal is, if it were to get mixed up. While the Browne & Sharpe Gauge (also known as the "gauge gauge") is made especially for measuring the thickness of wire and sheet, vernier calipers are a great alternative. While most are a bit more pricey than the B&S gauge, they are much more versatile.

Calipers are a basic measuring tool used in MANY different fields, from a machinists precision tool to a device used to measure body fat in a doctor's office. Calipers are a kind of device used to measure the distance between two opposing sides. The tips of the caliper are adjusted to fit across the points to be measured, the caliper is then removed and the distance read by measuring between the tips with a measuring tool, such as a ruler.

Vernier calipers are a specialized type of caliper that includes not only the measuring tool built into the caliper but a vernier scale for a more precise measurement. A vernier scale is a sliding secondary scale that is used to indicate where the measurement lies when it is in between two of the marks on the main scale.

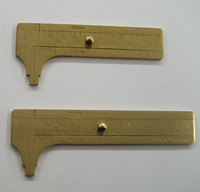
Brass Sliding Caliper
The most basic vernier caliper used in jewelry is the brass sliding gauge. This brass caliper measures external dimensions in metric only (millimeters), and is slightly less precise than a proper vernier caliper. But it is inexpensive and quick to use, therefore handy for general use and great for your first caliper. It also can be used to check for rightness of an angle. The brass millimeter gauge has a small knob on the main sliding scale for easy sliding when measuring. They come in two different lengths, 60mm and 80mm, priced at $9.40 and $11.50, respectively.

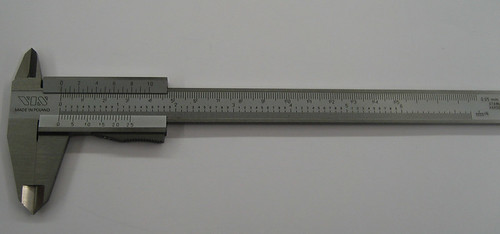
Vernier Caliper
Other than measuring external dimensions, the standard vernier caliper has a few more measuring capabilities than the brass sliding gauge. They have an upper jaw to measure internal dimensions (like the inside diameter of tubing) and a slender depth probe, attached to the moveable head and slides along the center of the body of the caliper, that will measure deep groves and areas that would prove difficult to measure otherwise. The standard vernier caliper also includes both metric and inch measurements on the upper and lower part of the scale. It also has a locking feature to easily set your measurement and then scribe a measured line onto your project. The Vernier Caliper that JFF carries is a steel bodied caliper with a smooth track, made in Poland. It is priced at $69.75.


Dial Caliper
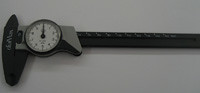
An improvement to the Vernier Caliper is a Dial Caliper. The dial measures in small increments for precision measuring. Usually only in one scale, inch or metric. However, the dial is much easier to read and has the same measuring capabilities as the Vernier Caliper. The Dial Caliper has a hard plastic body and is made in Switzerland, priced at $38.70. This caliper in particular does not have a locking mechanism, as the hard plastic body is not enough to leave a scribe line.


Digital Caliper
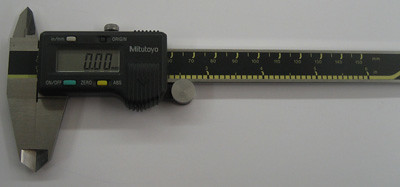
The easiest to read, and most accurate caliper is the Digital Caliper. This caliper has replaced most all other measuring tools in my jewelry studio (except of course a ruler). The Digital Caliper is the bees knees and the "Rolls Royce" of calipers. While it has a large digital screen for reading the measurement, it also has the capability to switch from inches to millimeters with the press of a button. The Digital Caliper has all the same measuring and locking features at the Vernier Calipers, but takes out the guess work of accurate measuring. The Mitutoyo Digital Caliper is made in Japan with a steel body and measures to the 0.01mm and 0.0005", making this the most precise Caliper. The Mitutoyo comes in two different sizes, 4" (100mm) and 6" (150mm), priced at $129 and $139, respectively.

29 June 2010

Archives June 2009 : Tool of the Month

Tool of the Month:
Divider

This month I am kicking off a series on precision tools, beginning with the divider. Although, a lot of us don’t like to say what we do is precise or measured. A lot of the time, no matter how organic or random the design, jewelry really is tedious and precise. From setting stones to measuring the size of a ring, jewelry-making is an exact procedure.

Dividers, often called spring dividers, spring calipers and divider calipers, are a style of caliper. Calipers are a kind of device used to measure the distance between two opposing sides. The tips of the caliper are adjusted to fit across the points to be measured, the caliper is then removed and the distance read by measuring between the tips with a measuring tool, such as a ruler. While a divider can measure distance, it is most often used to mark metal. The divider has two sharpened legs held in tension with a spring with a threaded rod that controls the distance between the tips.

When I first learned of dividers, I was in a jewelry class at Spruill and I was thoroughly confused by the name. I did recognize the tool but I knew it as a compass from my trigonometry class in high school. Or was it geometry? I don’t remember, but it was a math class none the less!

Unlike my compass with a steel pointed end and a pencil on the other, the divider had two steel pointed ends. My confusion continued as we used the tool, not to draw a circle, but to draw a straight line. Using a small steel ruler to find the exact width, the divider was set and locked into that distance. Guiding along the edge of the metal with one side of the divider, a precisely measures parallel line was lightly scribed into the surface of the metal. The line was then used to guide the saw blade along and cut (to the best of your ability) a straight line. AND if your sawing skills weren’t quite straight the lightly scribed line was still there to use as a guide to file away excess metal. INGENIOUS! No more using a ruler to make small tick marks in pencil/pen/sharpie that are hopefully parallel to then draw a (cross your fingers) straight line. Which then you will saw along the straight line only to find your sweaty fingers from the nerve-wrackingly tedious procedure, has wiped away your line!

Dividers have multitudes of other uses:
  • quickly measuring the size of a bur compared to the size of a stone
  • finding center on a circle
  • drawing a precise circle
  • drawing layouts with arcs
  • holding a measurement
  • creating a grid pattern for tight stone setting, i.e. pavé
  • scribing a straight line on round wire
  • compare sizes from one object to another
  • drawing a straight line for layout when stamping
  • marking lines for mitered corners on boxes and settings
  • layout for wax work
  • inscribing a line as a guide for filing
Spring dividers have a numeric designation (3”, 4”, 6”, etc.) describing the size of the divider or the maximum distance the legs will open. This, in turn, describes the maximum radius of a circle that it will inscribe. For example, a 3” divider will inscribe a 6” circle. A silversmith may use a large 6” divider. But size is an important factor, using a large 6” divider will be too awkward and clumsy to control for smaller more precise applications, such as lay out for stone setting.

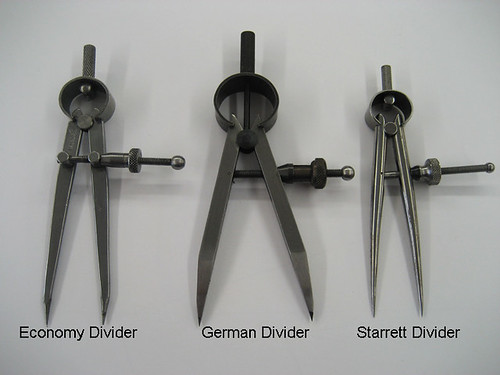
JFF carries three choices for dividers, while they are all 3”, their price, quality, and leg size set them apart. The economy divider is made Indian made. The stainless steel legs are thin and rectangular at the top and round down to a small point at the tip. The economy divider has a small adjustment wheel to lock the legs in place. They are $6.95, making them the perfect option for a beginner metalsmith.

The German made dividers are a very sturdy square leg construction, made of tool steel. They have a smoother action adjustment than the economy divider. However the legs are quite wide and bulky causing them less useful in tight spaces. However, the German divider has a quick change feature unique to itself. When tension is released from the setting wheel, the legs can be quickly adjusted to the approximate position desired. The setting wheel can then be slid back into place for fine tuning and locking the legs into the precise location. These dividers are $11.25.

The Starrett is an American made, tool steel divider. Starrett is known for their quality precision tools, and this 3” divider is proof. The finish on the thin, round legs is top notch. The fully round legs lend themselves to many small applications. They are especially great for wax work, as the legs will not scrape the wax as the square legs will. They also have a smooth action adjustment with no wobble and the legs line up true when fully together. The Starrett dividers are $54.15.

24 June 2010

Archives May 2009 : Tool of the Month

Tool of the Month:
Hammers & Mallets

Anyone who has talked to me in JFF knows how much I LOVE hammers. When I first started making jewelry, I tried out different hammers and played with the different effects they made on metal. But I didn’t know the difference from a steel embossing hammer and a cross peen hammer. This article will hopefully help to describe the different hammers and explain what each does. And maybe even help with purchasing your first, second or twentieth hammer!

When shopping for a new hammer it helps to know what the desired effect you are looking for. Hammers and mallets are made from different materials and come in various shapes. The material will determine whether you are

1. hardening the metal without stretching or thinning it out.
2. moving the metal with the intent to change the thickness and shape.

The different shape and head sizes of hammers will determine the direction the metal will move and stretch and how quickly this will occur.

Before I go into detail about the different kind of hammers, I want to define a few words that will be used throughout.

Peening: hammering with the purpose of spreading the surface of the metal. Also hardening the surface in the process.

Sinking: also known as embossing, doming, dishing or dapping. This process forces silver down into a surface that is curved, cupped, domed or stretched.

Raising: sheet metal is formed into a bowl or other hollow object by repeated sequences of hammering on a stake, stretching the metal over the stake to create the desired convex shape.

Planishing: after a piece of metal has been roughly formed by techniques such as sinking or raising, the surface will have irregular indentations and bumps. To remove these imperfections, the piece is hammered between a flat or slightly curved hammer and a steel block or planishing stake.

Cross Peen hammer: this is a category of hammers. Many of the hammers I will describe have a cross peen face, meaning it has a wedge-shaped surface that is perpendicular to the handle of the hammer.

Mallets
Mallets are great for shaping and forming metal around a mandrel without stretching or leaving behind hammer marks on the surface of the metal. This is possible because they are made of a softer material than the metal you are hammering. The face of a mallet will have a flat or slightly convex striking surface on both sides.
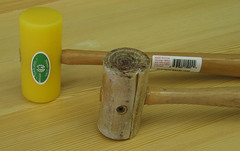
Plastic & Rawhide Mallets
Traditionally, a mallet is made of wood, but have since been replaced by the longer lasting and somewhat heavier plastic and rawhide mallets. A rawhide or plastic mallet is an endlessly useful hammer and is essential in your arsenal of jewelry tools. The plastic mallet is $15.45 and the rawhide mallet is $18.45.
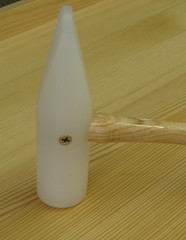
Horn & Nylon Forming Mallet
Another traditional mallet was made of the solid end of a cow’s horn. The natural conical shape of the horn was great for general forming with the larger flat end and more specific shaping and bending with the blunt point on the other end. As you can imagine obtaining a horn mallet is rather difficult these days, but plastic versions are more readily available today. The nylon forming mallet has a round, slightly convex face for normal striking on one end, the other face is a cross peen. This replaces a steel cross peen hammer and is great for raising and sinking when stretching and marking the metal is not the desired effect. The nylon forming mallet is $10.50.

Dead Blow Mallet
Dead blow mallets have become a popular in jewelry-making in the past few years. The head of these hammers are commonly hollow and filled with sand or shot, which absorbs the impact of a strike, reducing the bounce-back. This also produces a stronger, more powerful blow that will move the metal much faster. The mallet is constructed of polyurethane, which will minimize marring and marking on the surface of the metal. Dead blow mallets come in 10oz and 18oz weights, priced at $23.50 and $28.50 respectively.

Brass Mallet
Striking a steel hammer on a steel tool will eventually balloon out the top of the tool, which is not usually a desired effect when you spend $100+ on the tool. Therefore, a brass mallet is really the ticket. The brass is softer than the steel and will not damage the tool. When using a brass mallet for this task a 1-2 lb weight is good.

Brass mallets are also used by repair jewelers to shape and resize a ring, typically when the plastic or rawhide mallet is not enough. The brass will slightly mark the metal (less than a steel hammer) while stretching and forming quicker than the plastic or rawhide mallets. These hammers are much lighter than the ones mentioned above and are priced at $7.10.

Steel Hammers
There are a variety of different size, shape, and weight of steel hammers. Steel hammers are a valuable tool in jewelry-making, the quality, weight and shape of the hammer will determine what it is best suited for. Care of your steel hammers is also imperative.

Good quality steel hammers are made of hardened tool steel, making them an easy target for rust. While stainless steel seems like the obvious fix because it doesn’t rust, the alloys that make stainless create a softer steel than tool steel. Therefore, taking care of your hammers by oiling them and protecting them from moisture while not in use is very important. To store my hammers, I wipe oil on the faces of the hammer and store them in old socks.

If you decide to use a steel hammer to strike your steel tools, keep those hammers separate from the hammers that come in direct contact with your metal. Steel is much stronger than the metals jewelers use (silver, gold, brass, copper, etc), transferring any pits, marks, or dull spots that are on the surface hammer to the metal. Keeping your steel hammers that come into contact with your metal polished and smooth will leave you with less clean up.

Ball Peen Hammer
A jeweler’s ball peen hammer looks just like any other hardware store ball peen hammer, however it’s usually slightly smaller. These hammers have one flat, planishing end and one round, sinking end. Ball peen hammers are used for flattening, shaping or removing dents. Ball peen hammers come in two different quality ranges, the economical chrome plated hammers range in price from $4-$8, while the solid steel Vaughan hammers, pictured to the left are $16.75 for 4oz and $17.75 for 8oz.

Chasing Hammer
Chasing hammers were originally made for chasing and repoussé. The hammer has one large smooth, flat, planishing face that is used for striking the chasing tool, and a small round, embossing end for riveting or peening. Chasing hammers offer two different types of handles, a rounded-style or pistol-style handle. The difference in handles is more essential in chasing and repoussé work, as the ratio of weight of the hammer head to the handle is important for balance.
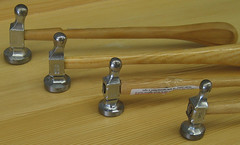
The idea being that while chasing, the hammer should make an easy rhythm or bounce with the chasing tool, the wrist working as a pivot point creating little to no added work to the jeweler. The rounded handle balances smaller hammer heads, where as the pistol style handle balances a larger head. These German chasing hammers are priced between $33 and $50.

Lightweight, inexpensive chasing hammers have become a popular first hammer for many beginner jewelers. The slightly convex side is great for light planishing and flattening, while the ball side is a perfect choice for creating a hammered texture. These hammers are made of chrome plated steel and cannot be polished when dents appear, however, cared for properly, these hammers should last a couple years. These hammers are about $14.
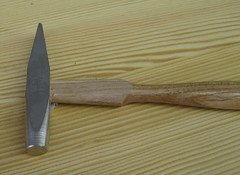
Riveting Hammer
This lightweight steel hammer is designed for spreading rivet heads but has countless other uses. One end is a thin cross peen used for riveting, while the flat, planishing end is for leveling the rivet and other general hammering tasks. Riveting hammers range in price from $5 - $20.

Goldsmith Hammer
This hammer is used for small scale forging and shaping. It features a round, slightly crowned planishing end for general purpose use. The opposite end is a cross peen, perfect for spreading rivet heads, forming and shaping. This hammer is also great for striking steel stamps. I, personally, love this hammer. So much so, I have two; one for stamping steel stamps and the other for small planishing and forming projects. The solid tool steel German goldsmith hammer is $33.50.

Silversmith Hammer
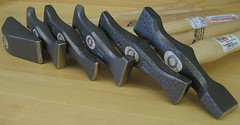
The Silversmith style hammers JFF carries are German-made Picard hammers. Picard hammers have superior forged steel heads for high performance and durability, all fitted with hickory handles. They are specially designed for all types of planishing, forging, raising and embossing. Widely used by jewelers and metalsmiths. Many times silversmithing hammers will need to be modified for your individual use. It is highly unusual to purchase a steel hammer and it be exactly what you need without any alteration. These hammers range in price from $43.75 to $57.75.
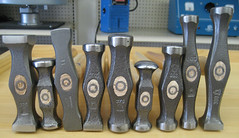
  • Planishing Hammers
The planishing hammer has a flat or slightly domed face. This hammer is great for not only smoothing hammer marks left from raising and sinking, it also flattens wire and sheet leaving little to no hammer marks behind. The face of a planishing hammer will stretch the metal in all directions.
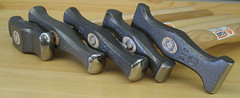
  • Raising Hammers
Raising hammers are distinguished as having a rounded, polished cross peen. The corners are rounded to prevent marring the metal. Raising hammers are most commonly used when raising a bowl or other vessels.

  • Forging Hammers
Forging hammers also have a polished cross peen, however, the face is slightly squarer and sharper. The sharp, rectangular shape of the face stretches the metal in one direction. Forging hammers are used when fold-forming, synclastic and anticlastic forming. This hammer is also popular for leaving a line texture.
  • Sinking or Embossing Hammers
These hammers are similar in size and weight to a planishing hammer, but has round, severely domed faces, think of the ball of a ball peen hammer. These hammers force silver down into a surface that is curved, cupped, domed or stretched. Embossing hammers are also used in repoussé work.

Texturing Hammer
Texturing hammers are the exception to the smooth, polished face rule for steel hammers. These hammers will have rounded divots, lines, and other specialty designs ground into the face of the hammer. Texture hammers are either purchased with the texture already in them, or are made by the jeweler for a specific job. The texture hammers JFF carries are double sided and are $19.95 each.
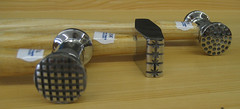
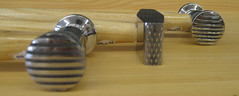


prices are subject to change without notice.


Please note: in the time since the article was written we carry Fretz Hammers and 1 lb. Brass Mallets

21 June 2010

Archives April 2009 : Tool of the Month

Tool of the Month:
GRS BenchMate™

In the past two tool of the month articles I have mentioned a the GRS BenchMate™. This month I thought it was only appropriate to focus on the BenchMate™. Please note, while there are tons of attachments I could mention, I am only going to mention a few.

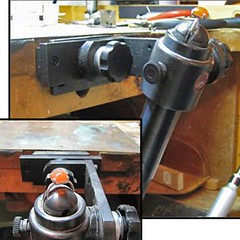
The whole of the BenchMate™ system begins with the fixed mounting plate. This steel plate is screwed to the edge of your bench top for mounting the various components of this system. Each attachment has a mounting bracket on the back that fits perfectly onto the mounting plate. Because the sides of the plate are beveled, BenchMate™ accessories can be easily removed by sliding them upward.

GRS BenchMate™ Bench Pin

The BenchMate™ bench pin attachment has a mounting bracket on the back that slides perfectly onto the mounting plate. The bench pin holder has one wing nut and a bolt on the bottom to lock in the bench pin for a more sturdy hold. (As pictured to the left)

The bench pin is made of hard wood and can be modified for individual needs. Because it is so easy to change out, some jewelers even have a bench pin attachment for each use, wax carving, sawing, filing, etc.. But don’t worry about a bench pin for bracing your ring clamp, the BenchMate™ Holder and ring clamp attachment has that covered.

GRS BenchMate™ Holder

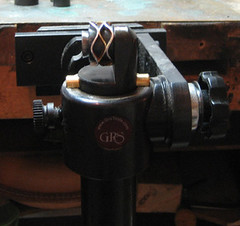
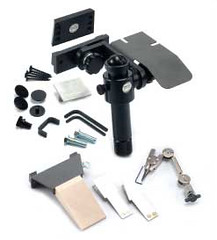
The BenchMate™ Holder or, as I like to call it, ring clamp attachment, is far superior to most other ring clamps because it is hands free. The holder will freely tilt and rotate in all directions and tightening the pivot knobs will lock the clamp solidly in any position or add selective resistance. The BenchMate™ Holder and ring clamp is sold in a basic kit that includes: the mounting plate with 5 wood screws, the BenchMate™ holder (ring clamp), shellac pad, ring channel bridge, extra plastic jaws, and 2 hex keys.

BenchMate™ and a few other companies have come up with attachments that fit into the holder, including a small pitch bowl and the Wolf Belt sander. Below right is the Wolf Belt Sander GRS attachment, simply remove the ring clamp and slide in the Wolf Belt Sander attachment into the holder. Below left is the pitch cup attachment, the pitch cup has a small tang on the bottom that can easily be held in the ring clamp itself. (The pitch cup is not a stocking item, however it is available upon special order.)

GRS BenchMate™ Inside Ring Holding Attachment

Many wide, delicate or unusual rings are difficult to hold with an outside clamp. This Inside Ring Holding attachment adds inside ring-holding capability to any BenchMate. The holder is perfect for channel, bead and bezel settings. The Inside Ring Holder comes with a set of seven collets ranging in ring sizes from 4-13. From the set of collets, you select the closest size that fits inside the ring. The screw expands the collet to hold the ring securely. These hard plastic collets won’t scratch or mark rings. With an extra collet set, you can double-stack the collets for extremely wide rings or hold several rings simultaneously for production work.

GRS BenchMate™ Double Third Hand Soldering Station

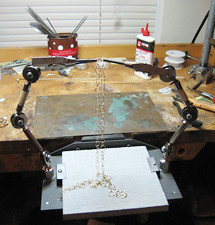
The BenchMate™ Double Third Hand Soldering Station is one of the most versatile attachments. Mounted on a metal base with a replaceable 6” non-asbestos working platform, the soldering station has two removable third hands. It has the dove tailed mounting bracket to fit on the BenchMate™ system and also has non-slipping rubber feet to sit directly on your work surface.

GRS BenchMate™ Engraving Vise Shelf

My favorite attachment is the Standard Engraving Vise Shelf (it does not include an engraving block). Which may sound funny to most, as I am not a hand engraver. But let me explain a few instances why this shelf is the coolest attachment for your BenchMate™.

My bench top is cluttered with projects, burs, saw blades, saw frames, pliers, hammers...well, I think you get the idea. I have no room to keep my handy Proxxon vise on my bench permanently, and to be quite honest I’m too lazy to screw and un-screw the c-clamp of the vise as I need it. The Standard Engraving Vise Shelf is perfect for that, I just slip my bench pin out of the way and slide the shelf with my vise already clamped in place onto the mounting bracket!

OR

I have always been told that you are supposed to be at eye level with your work. Sometimes, I need to be looking down on my work. I use the engraving vise shelf as a second, lower bench surface for this. I don’t have to change the height of my chair or stand for hours (if the project takes that long).

The GRS BenchMate™ can be quite overwhelming when you are first introduced to it, with multiple attachments and accessories, it looks like a serious tool for a serious jeweler. I had heard Dallas and some customers singing the praise of the GRS BenchMate™. To me it looked like a ring clamp on steroids that could be switched (seemingly like magic) into a bench pin, soldering station, engraving block, or pitch bowl. All the accessories really overwhelmed me, but upon Dallas’ suggestion I decided to start small with the bench pin attachment. If I never got any other attachments, I could at least have a nice bench pin that could easily be moved out of the way. But next thing I knew, I was using the ring clamp attachment, and then the engraving block shelf!

The GRS BenchMate™ Fixed Mounting Plate is $15.98.
The GRS BenchMate™ Bench Pin Kit is $23.95.
The GRS BenchMate™ Basic Kit (the BenchMate™ holder and ring clamp) is $198.00
The GRS BenchMate™ Pitch Cup (special order only) is $22.95.
The GRS BenchMate™ Wolf Belt Sander Adaptor (special order only) is $16. The Wolf Belt Sander, also special order only is $160.
The GRS BenchMate™ Inside Ring Holder is $69.00.
The GRS BenchMate™ Double Third Hand Soldering Station is $99.95.
The GRS BenchMate™ Engraving Vise Shelf is $36.95.


The BenchMate™ System and accessories are mostly sold individually, however, the BenchMate™ Deluxe kit is a practical way to start. The kit includes: the mounting plate with 5 wood screws, the BenchMate™ holder (ring clamp), shellac pad, ring channel bridge, extra plastic jaws, 2 hex keys, a third hand, 2 soldering clamps, and bench pin kit. This Deluxe Kit is $269.

Please note: some of the photos are of my home studio, please excuse the mess!

Prices are subject to change without notice.

08 June 2010

Archives March 2009 : Tool of the Month

Tool of the Month:
Ring Clamp

After writing last month's Tool of the Month on the Bench Pin, it only seemed appropriate to do March's tool of the Month on the Ring Clamp!

With a misleading name, ring clamps have a tough break. Traditionally used for holding rings when setting stones and and polishing, they are many times set in the back of your bench, collecting dust.

For the past three and a half years, my ring clamp laid unused in the back of a drawer. If I ever came across it I would think, "I don't need to use a ring clamp if I'm not making rings, right?" Wrong.

About six months ago, I was filing a small strip of metal, approximately 6 mm by 25 mm. I would lay the strip on my bench pin and hold the metal down with my fingers as I would file. But instead of filing the metal, I was filing my fingers as well. While I might need a manicure, at that rate I wasn't going to have anything left to manicure!

As I was looking around for something to hold the strip of metal, I found my ring clamp. It seemed that it just might work. So I decided to give it a shot. Not only did it hold my metal strip more stable, my fingers were also protected. Ah-ha moment: a ring clamp can be used for things other than rings!

With this revelation, I decided to try and use the ring clamp in other situations. For instance, when I'm polishing on my flex shaft or polishing motor and my project is getting WAY too hot, or drilling a hole in a small piece of metal that I can't keep from flying across the room. A ring clamp will hold the small piece stead and once again protect my fingers.

A ring clamp works hand-in-hand with your bench pin. By clamping something in the ring clamp and bracing against your bench pin for stability, this tool can't be beat! It gives you ultimate control and holding.

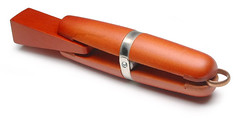
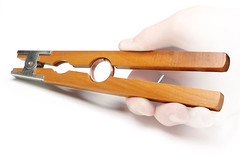
A standard ring clamp is traditionally made of hardwood. This double-ended, lever-action clamp uses a wooden wedge jammed into one end to close the other. Jaws are leather-lined to prevent marking the item secured in the clamp. Typically, one jaw is rounded and the other is squared off, making the clamp more versatile for different projects. JFF carries two standard ring clamps, a standard sized Hardwood Ring Clamp ($4.95), and the heavier duty Russian Style Ring Clamp ($6.75).


The Ring Polishing Clamp is made especially for holding rings. Sometimes when polishing the inside of rings, so much heat is produced it is difficult to hold the ring in your fingers. A very simple wooden lever-clamp holds the outside of the ring securely and safely, allowing access to polish the inside of the ring easily. The Ring Polishing Clamp is $4.95.The Pepe Deluxe Ring Clamp is modeled after the Swiss Ring Clamp, yet slightly more economical. Rather than opening at an angle, the Pepe ring clamp uses a parallel clamping action and operates by a knurled screw knob at the base. Coupled with non-marring leather jaws, the Pepe Ring Clamp provides a very secure grip. The Pepe Ring clamp is $23.70


This month, like last month I’m going to mention the GRS BenchMate™. While last month I discussed the bench pin attachment, this month I’m going to focus on the ring clamp attachment.
For those of you who did not get the last newsletter or missed it, let me tell you a little about the GRS BenchMate™. It is a versatile bench tool with various components that easily switch in and out. The BenchMate™ begins as a bench pin and quickly turns into a soldering station, then a ring clamp holder for stone setting, then can be switched to house an engraving block or pitch bowl. While I could spend hours talking about the BenchMate™, I’m going to focus on the ring clamp attachment and the BenchMate™ Basic Kit.

The whole of the BenchMate™ system begins with the fixed mounting plate. This steel plate is screwed to the edge of your bench top for mounting the various components of this system. Because the sides of the plate are beveled, BenchMate™ accessories can be easily removed by sliding them upward. The ring clamp attachment has a mounting bracket on the back that slides perfectly onto the mounting plate.

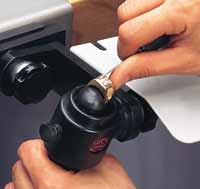
The BenchMate™ Holder and ring clamp attachment is far superior to most other ring clamps because it is hands free. The holder will freely tilt and rotate in all directions and tightening the pivot knobs will lock the clamp solidly in any position or add selective resistance.
The BenchMate™ holder, ring clamp attachment and mounting plate are all sold in a Basic Kit for $178.

26 January 2010

Archives February 2009 : Tool of the Month

Tool of the Month :
Bench Pin

A bench pin begins as a block of wood that is unremarkable, but as each mark, cut, grove, filing, hole, plane and texture appears, it is evidence of processes that have created something remarkable. Individual to each jeweler, these markings make the bench pin more comfortable and useful. Turning the bench pin into a version of your own trophy of the work you have produced.

Ok, so maybe not a “trophy” per se. Maybe it is an old, ugly, worn out piece of wood that just happens to brace your work as you need it, or has the perfect groove worn into it for sawing your tubing, or has the big hole in the back corner where you drill all your holes. Whatever you use your bench pin for, it is probably the most versatile tool on your bench and I’m sure you use yours all the time! But I’d be willing to bet the bench pin is one of the more underutilized tool on your bench as well. I am constantly finding new uses for my bench pin. Typically, when I’m in a bind, if I’m not using my bench pin, it is part of the answer that will get me out of that bind.

From sawing to stone setting, filing to wax carving, there are many different styles of bench pins that are made for your different needs and that can be modified for individual needs.
  • A stone setter’s bench pin has a large half-round scoop or wide “v” cut into which the jeweler can steady a pitch stick or ring clamp that holds a work piece.
  • For most sawing projects a bench pin will have a “v” cut with a circle, v-slot to saw between and brace the metal on both sides of the saw.
  • Using the flat side of the bench pin with no notch cut out works well for filing. Using the end of the bench pin as a guide for straight filing.
  • Creating deep notches, grooves, and indentations in your bench help with gripping small parts, bracing a prong while setting, holding round stock or tubing for controlled sawing and other tasks.
  • Some jewelers cut a well in their bench pin to hold burs, stones, or other small components.
  • The bench pin can also be used for drilling. However, drill holes can become an unwanted catch-all for small stones and pieces of metal.
  • It can also be used as a door stop in a pinch.
Jeweler’s benches typically come with a slot that fits a standard bench pin. The standard bench pin has a tongue on it that can be modified to fit into most benches and basically looks like a wedge of wood. Three widths are available and are fairly inexpensive. The standard bench pins are meant to be modified to the jeweler’s liking.
Small Bench Pin: $2.20*
Medium Bench Pin: $2.50*
Large Bench Pin: $2.90*

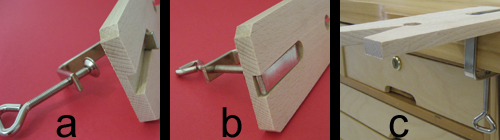
Because many of us don’t have a bench when we start out making jewelry, and the idea of cutting a hole in your dining room table is just out of the question, the bench pin with c-clamp is great to start out with. It has a v-slot cut out of the center for sawing, so there is little to no modification necessary. This bench pin is German made and has a groove cut out for the c-clamp to lay flush into the bench pin. Giving you a large flat surface and ultimate support when working. The clamp adjusts for benches up to 1-3/4" thick and the actual bench pin measures 6-3/4"long by 2-1/2"wide.

Diagram a: Unscrew the clamp so the opening is big. Insert the clamp (the squared off end) underneath the bench pin and up through the hole (the side that doesn’t have the cutout).
Diagram b: The squared-off clamp should fit into the top slot cutout in the pin.

Diagram c: The gap between the underside of the pin and the top of the screw part of the clamp attaches to the table. Tighten the clamp screw so it grips on the table and bench pin should be secure.
The bench pin with c-clamp is $6.85*.

The bench pin with anvil is another great option for the beginner jeweler. This is a two-in-one tool, with a bench pin that is secured under a flat bench block with a clamp. The main down side to this bench pin is the width, it is much narrower than most any other bench pin and limits the amount of support. The bench pin with anvil is available in two qualities, economy and European-made. The European-made bench pin with anvil is pictured above, it is $32*. The economy version is $14*.

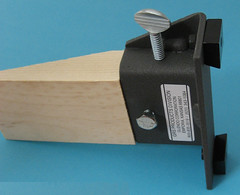
If you already have a bench or table dedicated to your jewelry making, a good option is a bench pin that mounts directly to the bench or table. The metal holder can easily be mounted onto the front of your bench with two screws. A wing nut locks in the bench pin. While this allows for the jeweler to easily switch bench pins for certain applications, the holder keeps the bench pin steady and supported.
The bench pin in holder is $10.20*.

The Bench Pin for Rings is a specialty bench pin for sizing rings. Made especially for holding rings secure while sawing, the bench pin is approximately 1/2” wide with a groove in the front. A thin channel running the length of the bench pin allows for the saw blade to glide through for cutting the rings. It attaches with a screw to the top of the bench.
The bench pin for rings is $2.65*.

The GRS BenchMate™ is no ordinary bench pin, with its various components that easily switch in and out. The BenchMate™ begins as a bench pin and quickly turns into a soldering station, then a bench pin holder for stone setting, then can be switched to house an engraving block or pitch bowl. While I could spend hours talking about the BenchMate™ and all of it’s attachments, for the sake of this article, I will stick to the bench pin for this month.

The whole of the BenchMate™ system begins with the fixed mounting plate. This steel plate is screwed to the edge of your bench top for mounting the various components of this system. Because the sides of the plate are beveled, BenchMate™ accessories can be easily removed by sliding them upward. The bench pin attachment has a mounting bracket on the back that slides perfectly onto the mounting plate. Like the bench pin with the metal holder mentioned above, the BenchMate™ version one wing nut and a bolt on the bottom to lock in the bench pin for a more sturdy hold.

The BenchMate™ fixed mounting plate is $13.95*. The BenchMate™ bench pin is $23.95*. The mounting plate and bench pin is also available in the BenchMate™ basic and deluxe kits, priced at $178* and $229*, respectively.

*prices may change without notice

21 January 2010

Archives January 2009 : Tool of the Month

Tool of the Month :
Torches

For my birthday this year, I got my second torch, an oxy propane set up. Which is shocking if you would have asked me about owning two torches, let alone one torch, a mere 4 years ago. I was afraid of holding something that would have a flame coming out of the end and having a bottle of gas sitting there so close to it! FORGET IT!

As I started taking jewelry classes and working more seriously at JFF, I started to realize that (1) torches are necessary for most jewelry making and (2) torches aren’t scary as long as you are smart and take safety seriously. I did some research, i.e. talked to Hans, Dallas and my teachers, and picked out the torch that worked best for me. My first torch was the Smith Acetylene-Air torch.

Before getting a torch it is important to decide which torch is best for you. As with most tools, we at JFF suggest to not only think about what you are doing today, but think about getting a torch that will be more versatile as your projects evolve.

The Prince Butane Torch is the most basic torch we have at JFF. It is the same torch used in cooking to caramelize sugar, think crème brule. This torch works well for soldering closed small jump rings made of silver and copper. However, this torch is very limiting as it doesn’t produce a large enough flame to do larger pieces, such as rings, bracelets, etc. The Prince Butane torch is $56.50* and sold without fuel. The butane refills are $5.95*.

The Whale Torch is a propane atmospheric (also known as propane-air) torch. An atmospheric torch uses the surrounding air to draw the necessary oxygen to mix with the gas to produce a hot flame. Therefore, a second tank of oxygen is not necessary. The Whale torch uses valves designed to fit either a disposable propane tank or a small refillable propane tank, lowering the cost of the torch. It works well for general purpose soldering and annealing of silver and copper.

The torch comes with three different sized tips for more defined or larger flames. While the Whale torch is a good option for a beginner, the propane-air mixture offers limitations as far as soldering larger pieces and soldering gold are concerned. The Whale torch is $113.25*, including the 3 tips, handle, hose, and valve for either a disposable or refillable propane tank**.

Acetylene-air torches are also atmospheric torches that produce a hotter flame than the propane-air torches. These torches by design can produce a more controlled, smaller flame for more precise work or a larger, bushy flame for larger vessels. The acetylene-air torches come with a regulator that fits on a B-sized Acetylene tank***. There are two popular acetylene air torches available, the Goss or the Smith.

The Goss torch is commonly used in jewelry making classes for its more economical price. It has a single gauge on the regulator, allowing you to know the fullness of the tank. However, the regulator does not have standard hose fittings, so if a second torch is in your future, you would need to purchase an adaptor for the hook up. The bulbous handle of the torch is made of plastic and has four torch tip sizes available. The Goss torch kit comes with a regulator, hose, the most popular sized torch tip, handle, tank key, and striker*** pricing in at $132*.

The Smith torch has a double gauge regulator with standard fittings and a warranty. The double gauge on the regulator allows you not only to know how full the tank is, but to control the pressure of the acetylene. This allows for the ability to have a hotter flame, greater control for fine flame adjustment and consistent fuel pressure. The Smith torch has a slim nickel plated handle with six available torch tips. This torch comes with a regulator, hose, the smallest torch tip, handle, tank key and striker***. The Smith kit is $204*.

Oxygen-Fuel torches are characterized by having two separate cylinders or tanks. One with oxygen and the other with a fuel, like propane or acetylene. These torches have a much hotter, smaller flame because of the combustion reaction from mixing the oxygen with the fuel. The most common fuel used in jewelry making is propane, the flame is hot enough for gold and even platinum**** and burns clean. However, some people choose to use acetylene, natural gas, or MAPP gas. When choosing an oxy fuel torch there are four torches to choose from depending on your soldering needs.

The Meco Midget Torch is built like a tank. The handle and tips are made out of solid brass and uses regular welding hoses. The Midget torch has three tips available. Although this torch lacks the bells and whistles of other oxy-fuel torches, this torch cannot be beat for its durability. The Meco Midget torch is sold with a handle, three tips and hose connectors***** for $170*.

The Hoke torch is least expensive oxy-fuel torch available. The torch body is made in China of cast steel and is nickel plated. The advantage of the Hoke torch is the tip size range. It not only has three standard size tips, but also has an adaptor kit that allows for the use of Micro tips. These tips quickly change in and out allowing for a much smaller precise flame. The Hoke torch is $47.90*, including the three standard tips and the torch handle*****. The adapter kit is $17.95*.
The Smith Little Torch is our best selling torch. This torch has an aluminum body and is light weight. It is the most ergonomic torch on the market. The Little Torch offers seven different sizes of tips and also has a rosebud tip that allows for casting and soldering larger pieces. The Little Torch is sold with hoses and five tips for $119*. JFF also stocks a complete torch set up including the Little Torch kit, two regulators, oxygen tank, propane tank**, and carrier for $495*.

The last torch is the casting torch. This torch has a larger mixing chamber in the handle, producing a larger flame with a higher volume of BTUs. The casting torch is sold in separate pieces, the handle is $98.45* and tips range in price from $30 to $60*.

*prices may change without warning
**The propane tanks are sold empty, JFF does not fill/refill propane.
***Acetylene tanks are sold separately for $135* initially, refills are available for $21*.
****The most popular torch for Platinum work is a Hydrogen Torch.
*****Hoses, regulators, and oxygen and gas cylinders can be purchased separately.