Q: Why does silver tarnish?
A: Tarnish is a thin layer or film that forms over copper, brass, silver, aluminum and other semi-reactive metals as their outermost surface undergoes a chemical reaction. While silver is almost completely resistant to oxygen, other chemicals in the air, such as sulfur, creates a chemical reaction forming Silver Sulfide on the surface. The reaction occurs slowly, first with a thin sulfide layer causing the surface to yellow. As time proceeds, the layer will turn a dull gray or black.
Tarnish will also appear when sterling objects are in direct contact with skin. While everyone's body chemistry varies. Sulfur is found in skin oils and also in many cosmetics causing the rate of tarnish to increase dramatically.
How do I prevent tarnish?
The only sure fire way is to exclude sulfur from reacting from the surface of the metal, which would include keeping the metal piece in an air tight case filled with an inert gas which is virtually impossible! But here are some more reasonable options:
Rhodium Plating: through an electrolytic process a thin layer of rhodium (an expensive member of the platinum family) is applied to the surface of the silver. This layer is super hard and super white in color, resembling chrome. The downsides to rhodium plating are:
1. The color difference. The rich, warm white color of silver is replaced by the cold blue-white color of rhodium.
2. The plating layer is very thin and will wear with time.
3. Besides the cost of equipment for plating, rhodium is an expensive solution.
Coating the surface with Lacquer or Wax: Using a Lacquer or wax to seal the polished metal surface from exposure to air is a reasonable option if the piece will not be worn or used. However, in cases of wear or use, the areas of exposure to the skin or abrasion will quickly rub off the protective layer.
Periodic Cleaning: I sell my jewelry and I offer purchase of a polishing cloth to keep jewelry clean. The polishing cloth has a polishing chemical imbedded in the fabric. Assuming the wearer uses the cloth on a consistent basis (ie weekly), tarnish will be prevented or the slight effects (yellowing) will be removed. However, if the cloth is washed, the chemical is removed from the fabric and is no longer useful. Other possibilities are gels with brushes; small, home ultrasonic machines and steam cleaners; polishing on buffing machines.
Tarnish Removers: These are chemicals that the jewelry can be dipped into to instantly remove the tarnish. While these work almost instantly, the way the chemical works is that it eats away at the surface, removing the tarnish. So keeping this in mind, the surface of the metal is being eaten away, so if the metal is left in too long, it will eventually ruin or disintegrate the piece. Keeping this in mind, any polishing compounds on the surface of the metal preventing tarnish are now removed and the silver will tarnish at a higher rate (sometimes within hours) if not polished with a polishing cloth or on a buff shortly thereafter.
Using Argentium Silver: Argentium Silver is a new sterling silver alloy made with germanium. Germanium oxidizes preferentially to the silver and copper in Argentium Silver, to form a transparent germanium oxide surface layer. The alloy is not completely resistant to tarnish, but will slow the process of tarnish. Germanium causes the silver to react differently than normal sterling silver; so if you choose to use this, make sure you do your research! (At this time JFF does not carry Argentium)
19 July 2010
16 July 2010
Archives October 2009 : Jeweler of the Month
Jeweler of the Month:
Atlanta Contemporary Jewelry Show Artists
Atlanta Contemporary Jewelry Show Artists
To keep you on your toes, this month we're doing this section a little different. Usually we focus only on one jeweler. But, this weekend is the Atlanta Contemporary Jewelry Show and because we have all this great talent coming to Atlanta, we thought it would be a great opportunity to focus on the jewelers in the show!
*this event has already past, however, the 4th anual ACJS show will be November 5 & 6, 2010
Bio
The Atlanta Contemporary Jewelry Show - fostering an understanding and appreciation of artist designed and made contemporary fine craft jewelry in Atlanta through the presentation of work by the country's most accomplished jewelry artists.
Founded in 2007 by jewelry artists Leigh Griffin and Debra Lynn Gold, the 3rd Annual Atlanta Contemporary Jewelry Show presents 25 world renown jewelry artists and their masterful works on November 6th and 7th at the Defoor Centre. Each artist is selected for their creations of unique, wearable art jewelry representing a wide range of styles, materials, and techniques. The work ranges from elegantly traditional to edgy, sculptural, one-of-a-kind pieces.
Don't miss this opportunity to attend the show and meet these artists from across the country here for two days ~ at one incredible show.
A Meet the Artists Wine Reception hosted by the Spruill Center for the Arts takes place Friday evening from 6 PM to 9 PM - included with admission.
Please visit the website for more information about the show and about each one of this years participating artists
www.AtlantaContemporaryJewelryShow.com
Location: The Defoor Centre, 1710 Defoor Avenue NW, Atlanta,
GA. 30318
Hours: Friday, November 6th 10 AM to 9 PM
(Meet the artists at a wine reception from 6 PM to 9 PM sponsored by Spruill Center for the Arts)
Saturday, November 7th 10:00 am to 6:00 pm
Tickets: $5.00 at the door


15 July 2010
Archives October 2009 : Tool of the Month
Tool of the Month:
Bench Block
Bench Block
A steel bench block, I must say is not the most exciting tool on the surface. No pun intended. The bench block is smooth, flat, usually square hunk of steel commonly used to hammer on. However, this little block can be a SUPER time saver. But before I share some of my time-saving secrets, let me tell you a little about steel blocks in general.
The traditional bench block or bench anvil, should have at least one polished surface and one crisp edge. It is useful to have one rounded edge, for projects not requiring a sharp angle. Basic tasks include flattening wire, bending, riveting, and general hammering. In proper use, the hammer never strikes the block directly, which would make a dent. If a blemish occurs, the block should be sanded a polished to its original state. (Which I must say is not a lot of fun!)
The steel quality of your bench block is very important. Tool steel is well-suited to be made into tools, as it has a distinctive hardness, resistance to abrasion, and its ability to hold a cutting edge. While tool steel is susceptible to rust, the hardness can't be beat! Stainless steel is a good alternative as it does not stain, corrode or rust as easily as ordinary steel (it stains less, but is not stain-proof). However, stainless steel is a softer steel alloy than tool steel and your standard silversmithing hammers. Meaning if the hammer slips and hits the bench block, you have a larger, more significant dent to remove in your bench block! To inhibit rust, store your bench block covered with a cloth soaked in a little oil.
JFF carries two styles of bench blocks.

The Utility Anvil is made of stainless steel on one side and has a nylon block on the opposite side. The steel side has a mirror finish. It has a rubber base to "soften" the hammer blow sound. These bench blocks are round and come in two different sizes:
- 2" diameter is $22.80
- 3 1/2" diameter is $34.45
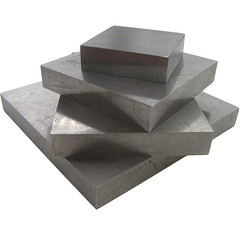 The Steel Bench Blocks are made of case-hardened tool steel. They are ground flat with all edges being sharp. These blocks are square and come in four sizes:
- 2 1/2" x 2 1/2" block is $12.95
- 4" x 4" block is $20.00
- 6" x 4" block is $27.00
- 6" x 6" block is $32.80
- Have you ever been trying to sand something flat and you just cant get it perfect? Place the sand paper on top of the bench block, grit surface facing up, and sand away.
- The flat surface is a great place to layout your work.
- Many times I have a couple projects going on at the same time on my bench. To keep organized I section off my bench block to keep the components separated but easily accessible.
- Are you trying to see if the edge you are filing is flat? Place the edge perpendicular to the block and look for any light between the metal and the block. If you see light, time to break back out the file!
- While I'm setting stones, I keep a small bench block with my stones on it. If I'm bezel setting, I have a flat surface to wrap my bezel around the stone. If I'm setting faceted stones, I keep them table side down and I can easily measure & remeasure my stones. As an extra bonus the raised surface keeps me from accidentally knocking the stones into my sweeps drawer.
- Do you have another useful tip for using your bench block? Please leave comments on our blog to share your bench block tips and tricks!
14 July 2010
Archives September 2009 : New Item
JFF New Item
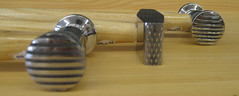
The tube wringer is an odd sort of tool that has recently stumbled into the jewelry industry. Designed to work on any tube, this tool will squeeze out the last drop of paint, caulk, glue, caviar, anchovy paste, resin, make-up, or tooth paste. If it comes in a tube, a tube wringer will get it out.
"Ok, so why is this at JFF Jeweler Supply?" you ask. Well, this is also great for creating corrugated sheet metal. The popularity of corrugated accents on jewelry has grown recently, and this makes it super easy to do! It works best with thin copper and sterling silver sheet, 24-30 gauge works best. The most obvious benefit of corrugating metal is the great texture; however, it also makes light-weight metal more structurally sound. The tube wringer/metal corrugator is $22.95.

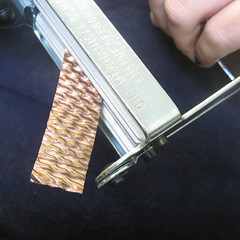 The corrugator is really easy to use. Just lay your metal between the two rollers and turn the crank. Depending on how hard you clamp down will determine how deep the corrugation will go.
To get the cross-hatched corrugated texture pictured to the right. Just pass the metal through one direction and then pass through a second time at a slight angle and with a lighter hold. Voila!
13 July 2010
Archives September 2009 : Jeweler of the Month
Jeweler of the Month:
Amy Rowe
Amy Rowe
Bio
Amy graduated from Auburn University in 1992, and put her Aerospace Engineering degree to good use at McDonnell Douglas. She was a diligent worker, but Amy soon discovered her passion was creating things, not calculating coefficients. After leaving the aerospace field, Amy began her own custom home building company at 22. As a top builder in the Atlanta market, she honed her creative skills while helping her clients express their personalities through the design of their living spaces.
While searching for additional ways to nourish her creative spirit, Amy discovered silversmithing, a medium that combines problem solving and artistic expression. Her first class was at Spruill Center for the Arts with Helen Blythe-Hart. Amy doesn't sketch or plan out her designs before she fires up her torch. Instead, she lets the materials guide her in the creation of each piece. This spontaneous and organic approach results in very special designs that are never repetitive.
 The signature rolled edge of an EllaKay piece is only one way in which Amy's work is unique. Her use of a variety of metals and stones ensures that each and every item she creates is more than just striking jewelry.
What was your first piece?
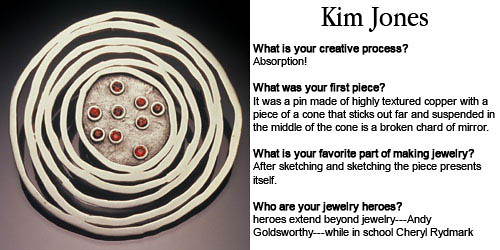
Her first piece of jewelry was a ring with purple glass that she still keeps and wears often.
What is your creative process?
I start with a stone and make a bezel with burned edges. There may be a total of 50 bezels made up with stones and from there I put them together to make large statement necklaces, pendants, cuffs or rings. I really enjoy working with sterling silver and have added bronze,copper and gold to some designs because of the warmth that it adds to the piece. My favorite part of jewelry making is putting the pieces together and coming up with a harmonious design. When the colors come together and they flow this is most exciting.
What is your favorite part of making jewelry?
The most favorite part of my jewelry are the juicy Nancy Antley Creation's stones. She has the most beautiful, bright, bold unusual stones.
Who are your jewelry heroes?
My jewelry hero is Helen Blythe-Hart because of her boldness in design and her attention to detail.
What is on your bench now?
What is on my bench now is a gorgeous necklace with bubble gum pink stones mixed with these crazy brownish pink graphic stones. I am anxiously awaiting an order of hot pink topaz to put with this piece.
Where does your design inspiration come from?
My inspiration comes from travel and shapes and colors in nature and architecture. One of my favorite architects is
 Gaudi from Spain and much inspiration was drawn from a 2 week trip with a girlfriend to Spain. Also, I enjoy the Southwest and the beach as well. After arriving home from a trip I go straight to my studio and start punching out ideas that have come from the awakening of the spirit that the trip has evoked.
What is your most indispensable tool?
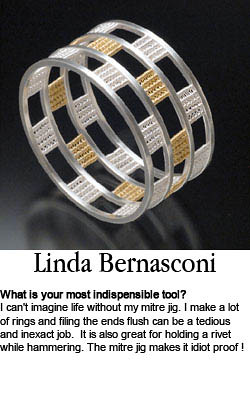
The most indispensable tool is a difficult question as these tools are all so wonderful and every time I go to JFF Dallas introduces something that is even better than the last. I would have to say that I love the mini torch though. It is so fun and liberating to fire it up and start sculpting.
12 July 2010
Archives September 2009 : Tool of the Month
Tool of the Month:
Escapement Files
Escapement Files
I have always loved cute, teeny, tiny, miniature things. Ever
 since I was a child, I would collect little trinkets that really had no use in life. Now that I'm a so-called adult, while I still love miniatures my mind always asks..."can you really use this?" And I attempt to resist, but I always end up with a lot of tiny things with no practical use. But when I saw the teeny-tiny size of escapement files, I had a million uses for them almost immediately. As soon as I brought them home I was using the small shapes and angles on anything and everything that I couldn't get a standard or needle file into.
Escapement files are generally narrower and shorter than standard needle files but follow the same fineness grading as needle and hand files. They were originally created for use in clock and watchmaking when forming the escapement, a part of a watch that controls the motion of the wheel-work and other parts. These files are used for the most delicate and precise filing requirements.
Escapement files have a square handle and are always 5-1/2" (14cm) long, from the file tip to handle end. Several types of escapement files are available in different cut lengths, for example, you can order a barrette escapement file in 40mm or 55mm. For escapement files, the mm measurement always refers to the cut length, not the tip to tip length. The image below displays the various file shapes that are available. (please note any files with an * are special order only, and are not kept in stock at JFF)

The files are available individually or in 12 piece sets, in either a #2 or #4 cut. Individually prices range from approximately $12 to $22 (price is dependent on the shape and cut of the file). The sets are approximately $170.
* please note: prices are subject to change without notice
09 July 2010
Archives July/August 2009 : Question and Answer
Q: How do you read a Vernier Caliper?
A: One of the most difficult parts of using a Vernier Caliper is reading it accurately. Before I explain how to do this, let me go over the parts of the Caliper first.
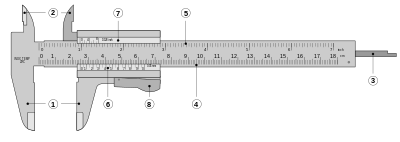
1. Outside jaws: used to measure external diameter or width of an object
2. Inside jaws: used to measure internal diameter of an object
3. Depth probe: used to measure depths of an object or a hole
4. Main scale: gives measurements of up to one decimal place(in cm).
5. Main scale: gives measurements in fraction(in inch)
6. Vernier gives measurements up to two decimal places(in cm)
7. Vernier gives measurements in fraction(in inch)
8. Retainer: used to block movable part to allow the easy transferring a measurement
Ok, now you know the parts of the caliper...so how do I use it?!
 First, find open the caliper and close down the outside jaws onto the item to be measured. Make sure the item side are on the same plane as the caliper, if it lays in wonky your measurement will be off.
Second, look for where the 0 mark of the sliding vernier scale lines up on the fixed main scale. In this case, it is before the 2.4 cm mark. So, the first reading is 2.4
cm.
Next, find the mark on the vernier scale that most closely lines up with one of the marks on the main scale. Here, 6.5 and 7.5 are very close, but 9.0 lines up exactly with one of the marks on the fixed scale. This value is the number of
hundredths of centimeters (or tenths of millimeters). So, the second reading is 0.070 cm.
Finally, add the two values together to get the total reading: 2.4 cm + 0.070 cm = 2.470 cm.
A: One of the most difficult parts of using a Vernier Caliper is reading it accurately. Before I explain how to do this, let me go over the parts of the Caliper first.
1. Outside jaws: used to measure external diameter or width of an object
2. Inside jaws: used to measure internal diameter of an object
3. Depth probe: used to measure depths of an object or a hole
4. Main scale: gives measurements of up to one decimal place(in cm).
5. Main scale: gives measurements in fraction(in inch)
6. Vernier gives measurements up to two decimal places(in cm)
7. Vernier gives measurements in fraction(in inch)
8. Retainer: used to block movable part to allow the easy transferring a measurement
Ok, now you know the parts of the caliper...so how do I use it?!
First, find open the caliper and close down the outside jaws onto the item to be measured. Make sure the item side are on the same plane as the caliper, if it lays in wonky your measurement will be off.Second, look for where the 0 mark of the sliding vernier scale lines up on the fixed main scale. In this case, it is before the 2.4 cm mark. So, the first reading is 2.4
cm.
Next, find the mark on the vernier scale that most closely lines up with one of the marks on the main scale. Here, 6.5 and 7.5 are very close, but 9.0 lines up exactly with one of the marks on the fixed scale. This value is the number of
hundredths of centimeters (or tenths of millimeters). So, the second reading is 0.070 cm.
Finally, add the two values together to get the total reading: 2.4 cm + 0.070 cm = 2.470 cm.
08 July 2010
Archives July/August : New Items
JFF New Items
Liver of Sulfur Gel
$14.95 - 4oz jar
So my excitement about this new form of Liver of Sulfur might compare to someone from an infomercial selling Sham-Wow or Oxi-Clean.
How many times have to gone to use your dry form liver of sulfur and its gone bad? Dry liver of sulfur is very unstable and degrades with exposure to light and air, so sensitive that the instant you leave the lid off for too long or if you don't have a completely air tight container, it's no longer usable. Liver of sulfur in liquid form is even more unstable and loses potency by the second.
Many people have switched to Jax Silver Blackener, a liquid that has been formulated to blacken silver. While it is easy to use, as it is already mixed, and reusable, Jax Silver Black does not leave a true black patina. Also, Jax Silver Blackener is flammable and cannot be shipped without hazardous shipping fees.
Recently, a new product has been released on the market, a Liver of Sulfur Gel. It is a stabilized form that does not degrade in light and air. Even if the lid has been left open, it will remain fresh and usable. It can be used either in its concentrated gel form with a paint brush or mix a small droplet into water for a weaker solution. The Liver of Sulfur Gel also allows for color patinas to occur on silver also, like dry liver of sulfur. This gel is also non-flammable and safe for shipping anywhere!
I have gone back and forth between using Jax Silver Blackener and Dry Liver of Sulfur, my preference switching all along. I have been very stringent with keeping my Dry Liver of Sulfur sealed tight away from light and air, so I have been lucky to never had a problem with my liver of sulfur going bad. However, when I read all the hype about the Liver of Sulfur gel I had to try it. It is so easy to use. If I am wanting a small section of a surface super black, I just dip my paint brush in the gel and glob some on, instantly it turns black. If I am trying to get an all over patina, I heat up a cup of water and mix in 2-3 drops of the gel into the solution and drop my project in the solution. I have yet to try the gel with getting the colored patinas, but in my research, I have heard that it does work.
07 July 2010
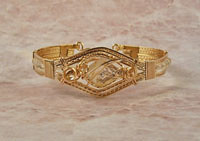
Jeweler of the Month:
Heather Trundle
Heather Trundle

Bio
In April of 2001, a fateful trip to the Georgia Renaissance Festival awakened a creative fire that has been burning ever since....
My name is Heather Trundle and I am a wire jewelry artist. I grew up an Army Brat and have spent my life traveling from place to place...living in different states and different countries. I have always been creative, but focusing mainly on threadwork and yarns. Seven years ago, a trip to the Georgia Renaissance Festival ended with a trip to a craft store for my first set of pliers and a coil of cheap aluminum wire. I soon found out that wire is an extension of thread and yarn and the ability to create a beautiful piece of wearable art came naturally.
 During the day, I wear a lab coat and am the Senior Research and Development Chemist for Plaid Enterprises, Inc. During the evening, after the children are in bed and night has fallen, I am a wire jewelry artist. I learned my art through videos, books, and trial and error with a lot of scrap wire. After one year of creating jewelry, I realized that I need to stop making jewelry or start selling it...Moonlight Creations was born. In 2009 I decided I needed a facelift and re-branded myself as Moonlight Wrapture - Expressing Your Wrapture in Style.
I design unique wire sculpted jewelry using Sterling Silver and 14kt Gold filled wire. My creations incorporate stone cabochons, faceted gemstone, pearls, shells, and any other item that I believe can be fashioned into a unique piece of jewelry. I create pendants, necklaces, earrings, bracelets, and more.
Not only do I have the pleasure of creating and selling my wearable art; but for the last three years, I have had the satisfaction of teaching my art to others.
What was your first piece?
The first piece I ever created was a pair of earrings from the cheap gold colored aluminum wire that I bought with my first set of round nose pliers.
What is your creative process?
The muse hits me at all times and places. My ideas come from every aspect of my life and the world around me. I have an accordian file full of personal drawings and pictures. If I ever get blocked...I just rifle through my creative file and new ideas come to mind. I was at a stop light the other day and there was a white truck in front of me with black scroll work designs on the tail gate. I loved the look and quickly sketched out a similar pattern that should look great in wire...maybe for earrings or part of a necklace.
There are times that I can sit down with a stone cabochon and see the finished piece in my head. Then there are times that I just get some wire out and start wrapping the piece and am usually delighted what starts to take shape.
 What is your favorite part of making jewelry?
I have two parts...
The moment a piece is polished and shines for the first time. There are still times that I look at a piece and can't believe that I just created that beautiful piece of jewelry.
The second favorite part is when I client puts on a piece and their eyes shine with delight. When I know that specific creation has just found a loving home with someone who will appreciate and wear it.
Who are your jewelry heroes?
I have to give a big thanks to Preston Reuther...he started me on this path eight years ago with his videos. But there are many artists who I have admired and learned from...Betty Baxter, Dale Armstrong, and Jessie Donnan to name a few.
What is on your bench now?
A lot of Red, White and Blue! I am finishing some work for the Museum of
 Patriotism in downtown Atlanta for 4th of July weekend. I am collaborating with a glass artist friend in creating one of a kind jewelry pieces for my "Freedom Collection".
What is your most indispensable tool?
My chain nose pliers. Though I am a tool junkie....I have to have on of my two favorite pairs of chain nose pliers with me on the bench whenever I start a new piece!
06 July 2010
Archives July/August 2009 : Tool of the Month
Tool of the Month:
Vernier Caliper
Many times customers will purchase wire and sheet and ask how will they know what gauge the metal is, if it were to get mixed up. While the Browne & Sharpe Gauge (also known as the "gauge gauge") is made especially for measuring the thickness of wire and sheet, vernier calipers are a great alternative. While most are a bit more pricey than the B&S gauge, they are much more versatile.
Calipers are a basic measuring tool used in MANY different fields, from a machinists precision tool to a device used to measure body fat in a doctor's office. Calipers are a kind of device used to measure the distance between two opposing sides. The tips of the caliper are adjusted to fit across the points to be measured, the caliper is then removed and the distance read by measuring between the tips with a measuring tool, such as a ruler.
Vernier calipers are a specialized type of caliper that includes not only the measuring tool built into the caliper but a vernier scale for a more precise measurement. A vernier scale is a sliding secondary scale that is used to indicate where the measurement lies when it is in between two of the marks on the main scale.
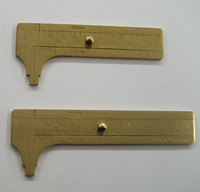
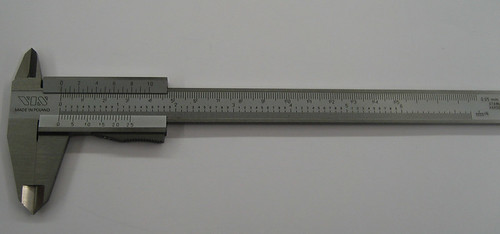
Brass Sliding Caliper
The most basic vernier caliper used in jewelry is the brass sliding gauge. This brass caliper measures external dimensions in metric only (millimeters), and is slightly less precise than a proper vernier caliper. But it is inexpensive and quick to use, therefore handy for general use and great for your first caliper. It also can be used to check for rightness of an angle. The brass millimeter gauge has a small knob on the main sliding scale for easy sliding when measuring. They come in two different lengths, 60mm and 80mm, priced at $9.40 and $11.50, respectively.
Vernier Caliper
Other than measuring external dimensions, the standard vernier caliper has a few more measuring capabilities than the brass sliding gauge. They have an upper jaw to measure internal dimensions (like the inside diameter of tubing) and a slender depth probe, attached to the moveable head and slides along the center of the body of the caliper, that will measure deep groves and areas that would prove difficult to measure otherwise. The standard vernier caliper also includes both metric and inch measurements on the upper and lower part of the scale. It also has a locking feature to easily set your measurement and then scribe a measured line onto your project. The Vernier Caliper that JFF carries is a steel bodied caliper with a smooth track, made in Poland. It is priced at $69.75.
Dial Caliper
An improvement to the Vernier Caliper is a Dial Caliper. The dial measures in small increments for precision measuring. Usually only in one scale, inch or metric. However, the dial is much easier to read and has the same measuring capabilities as the Vernier Caliper. The Dial Caliper has a hard plastic body and is made in Switzerland, priced at $38.70. This caliper in particular does not have a locking mechanism, as the hard plastic body is not enough to leave a scribe line.

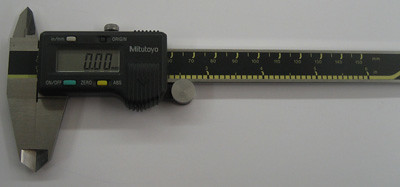
Digital Caliper
The easiest to read, and most accurate caliper is the Digital Caliper. This caliper has replaced most all other measuring tools in my jewelry studio (except of course a ruler). The Digital Caliper is the bees knees and the "Rolls Royce" of calipers. While it has a large digital screen for reading the measurement, it also has the capability to switch from inches to millimeters with the press of a button. The Digital Caliper has all the same measuring and locking features at the Vernier Calipers, but takes out the guess work of accurate measuring. The Mitutoyo Digital Caliper is made in Japan with a steel body and measures to the 0.01mm and 0.0005", making this the most precise Caliper. The Mitutoyo comes in two different sizes, 4" (100mm) and 6" (150mm), priced at $129 and $139, respectively.
02 July 2010
Archives June 2009 : Question and Answer
Q: How to find center of a circle?
A: Finding the center of a circle or disc you have punched out can be quite a task. However, using your divider is an easy way to tackle this challenge.
Begin with your circle and your divider. Just eyeballing it, find the approximate center of the circle with your divider. Set your divider to that distance and bracing against the outside of the circle with one leg, draw three intersecting lines using the other leg. If the three lines intersect at a point, you have found exact center! Otherwise, the lines will create a triangle, and some point in the middle of the triangle is your center. Continue making adjustments and drawing lines until you have the exact center.
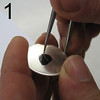
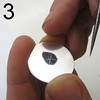

Please note: the black sharpie mark is not necessary for this process, it is only used for purposes of photography.
A: Finding the center of a circle or disc you have punched out can be quite a task. However, using your divider is an easy way to tackle this challenge.
Begin with your circle and your divider. Just eyeballing it, find the approximate center of the circle with your divider. Set your divider to that distance and bracing against the outside of the circle with one leg, draw three intersecting lines using the other leg. If the three lines intersect at a point, you have found exact center! Otherwise, the lines will create a triangle, and some point in the middle of the triangle is your center. Continue making adjustments and drawing lines until you have the exact center.
Please note: the black sharpie mark is not necessary for this process, it is only used for purposes of photography.
01 July 2010
Archives June 2009 : New Items
JFF NEW ITEMS!
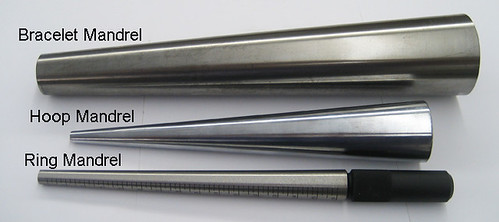 Hoop Mandrel
$19.95
Made of cast steel, this mandrel is 11 3/4” tall and ranges in diameter from 3/8” at the smallest point to 2”. The hoop mandrel is great for making hoop earrings, large jump rings, baby bracelets, etc..
30 June 2010
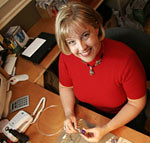
Archives June 2009 : Jeweler of the Month
Jeweler of the Month:
Dawn Muscio
Bio
I knew from an early age that I wanted to be an artist and was fortunate to have parents that supported my passion. I have been in the business nearly 20 years. I attended Pratt Institute in Brooklyn, New York where I received my BFA in 1991. My original major was graphic design/illustration, but I soon found my true calling in an elective jewelry course.
I was truly inspired on my first day of art school when our drawing professor told us that out of 30 of us, only 3 would be able to call themselves professional artists… meaning your livelihood was your art. Today I can truly call myself a professional artist.
 After college I received my real training in a fine art jewelry gallery in upstate New York from 1991 to 1999, under my protégé, Albert Paley. I started out at the bottom as a repair jeweler and finisher but quickly was allowed to design pieces to be sold in the store and then began doing custom work for customers of the store and quickly gained a following.
Then in 1999 I relocated to Atlanta, GA where I worked for several stores and trade shops trying to find my place. Finally, in August of 2005 I opened D. Muscio fine jewelry studio and have been specializing in custom, unique pieces ever since. We also sell signature designer pieces, designed and crafted in-house, as well as provide services to the trade, including: hand carved wax models, hand fabrication/finishing and CAD/CAM.
What was your first piece?
The first piece of jewelry I ever made was in high school my junior year. Our first project was a lesson in saw piercing. I made a piano. I have the piece framed and hanging in my studio’s private consultation room, as a reminder of where I began and where I am going. Our clients love to hear the story behind it.
What is your creative process?
The creative process always starts on paper for me. Sketching opens up my creativity, and gets my mind working in 3-D. That first sketch leads to more concepts until I have a concrete idea. I use this process for signature pieces as well as private client commissions. The sketch is my road map, but as the idea transfers from concept to actual 3-dimensions what I thought would work sometimes leads to another avenue and solution. It is this problem solving and thought generation process that leads to our unique and personalized designs. I do not know what I would do if I could not sketch. My work is all about evolution – both as an artist over time as well as my process… it is always evolving.
What is your favorite part of making jewelry?
I take a lot of design cues from architecture and geometry, but it can be an everyday object that gives me inspiration, like the handle on a tea cup for a shank profile. I consider my work miniature sculpture and take into account every surface as an opportunity to be creative and innovative to try something I have not tried or seen before.
Who are your jewelry heroes?
The Germans -- for their mastery of technique and precision.
What is your favorite part of making jewelry?
The journey I take with my clients from consultation to finished piece.
What is on your bench now?
An heirloom diamond remount for a private client that is in its final stages of finishing. The project was to preserve her mother’s original wedding band, and combine it with her engagement diamond and give it a timeless and updated look.
What is your most indispensable tool?
That is the toughest question, because as Dallas knows I love tools! So I will narrow it down to my top 3. My dividers, micrometer and loupe. It is all about precision and quality for me.

29 June 2010
Archives June 2009 : Tool of the Month
Tool of the Month:
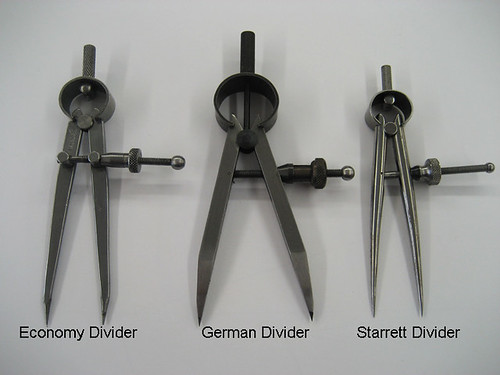
Divider
Divider
This month I am kicking off a series on precision tools, beginning with the divider. Although, a lot of us don’t like to say what we do is precise or measured. A lot of the time, no matter how organic or random the design, jewelry really is tedious and precise. From setting stones to measuring the size of a ring, jewelry-making is an exact procedure.
Dividers, often called spring dividers, spring calipers and divider calipers, are a style of caliper. Calipers are a kind of device used to measure the distance between two opposing sides. The tips of the caliper are adjusted to fit across the points to be measured, the caliper is then removed and the distance read by measuring between the tips with a measuring tool, such as a ruler. While a divider can measure distance, it is most often used to mark metal. The divider has two sharpened legs held in tension with a spring with a threaded rod that controls the distance between the tips.
When I first learned of dividers, I was in a jewelry class at Spruill and I was thoroughly confused by the name. I did recognize the tool but I knew it as a compass from my trigonometry class in high school. Or was it geometry? I don’t remember, but it was a math class none the less!
Unlike my compass with a steel pointed
 end and a pencil on the other, the divider had two steel pointed ends. My confusion continued as we used the tool, not to draw a circle, but to draw a straight line. Using a small steel ruler to find the exact width, the divider was set and locked into that distance. Guiding along the edge of the metal with one side of the divider, a precisely measures parallel line was lightly scribed into the surface of the metal. The line was then used to guide the saw blade along and cut (to the best of your ability) a straight line. AND if your sawing skills weren’t quite straight the lightly scribed line was still there to use as a guide to file away excess metal. INGENIOUS! No more using a ruler to make small tick marks in pencil/pen/sharpie that are hopefully parallel to then draw a (cross your fingers) straight line. Which then you will saw along the straight line only to find your sweaty fingers from the nerve-wrackingly tedious procedure, has wiped away your line!
Dividers have multitudes of other uses:
- quickly measuring the size of a bur compared to the size of a stone
- finding center on a circle
- drawing a precise circle
- drawing layouts with arcs
- holding a measurement
- creating a grid pattern for tight stone setting, i.e. pavé
- scribing a straight line on round wire
- compare sizes from one object to another
- drawing a straight line for layout when stamping
- marking lines for mitered corners on boxes and settings
- layout for wax work
- inscribing a line as a guide for filing
JFF carries three choices for dividers, while they are all 3”, their price, quality, and leg size set them apart. The economy divider is made Indian made. The stainless steel legs are thin and rectangular at the top and round down to a small point at the tip. The economy divider has a small adjustment wheel to lock the legs in place. They are $6.95, making them the perfect option for a beginner metalsmith.
The German made dividers are a very sturdy square leg construction, made of tool steel. They have a smoother action adjustment than the economy divider. However the legs are quite wide and bulky causing them less useful in tight spaces. However, the German divider has a quick change feature unique to itself. When tension is released from the setting wheel, the legs can be quickly adjusted to the approximate position desired. The setting wheel can then be slid back into place for fine tuning and locking the legs into the precise location. These dividers are $11.25.
The Starrett is an American made, tool steel divider. Starrett is known for their quality precision tools, and this 3” divider is proof. The finish on the thin, round legs is top notch. The fully round legs lend themselves to many small applications. They are especially great for wax work, as the legs will not scrape the wax as the square legs will. They also have a smooth action adjustment with no wobble and the legs line up true when fully together. The Starrett dividers are $54.15.
28 June 2010
Archives May 2009 : Question and Answer
Q: What does it mean to "dress" a hammer?
A: Dressing a tool involves grinding and sanding away any sharp edges or rough spots on the face and following up the process by polishing to a high shine. Essentially dressing your hammer is a fancy way of saying modifying. There are many different ways to go about this; by hand, with a flex shaft, on a buffing machine, etc.
Many times the hammer will be highly polished but have sharp edges that will leave marks on your metal, the whole point of having your hammers polished is so you don’t have to go back and grind away weird textures and lines left behind. Dressing your hammer will clean up these edges and give you much less work in the long run. You can also modify your hammer to have a more pointed face, like with a cross peen hammer, or give the flat side of your planishing hammer a more crowned face.
Modifying by hand is very time consuming, mounting the hammer in a vise and using various grits of sand paper to remove the edges and then polish the surface. Using a belt sander can speed up the process, but there is still the hand polishing for the final steps.
The flex shaft and buffing machine use a similar process, while the buffing machine is much faster and easier. Begin by using a stone wheel, like a mizzy wheel. This will remove the edges quickly, leaving behind a rough surface. Follow up with a silicone grinding wheel, like the Artifex wheel, to clean up the rough surface. If you don’t have a lot of material to remove, start with the Artifex wheel. Finally, follow up with a tripoli and a rouge. I will typically use bobbing compound as my Tripoli and green rouge as my final high shine polish.
25 June 2010
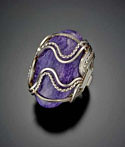
Archives May 2009 : Jeweler of the Month
Jeweler of the Month:
Lisa Barth
Bio
I grew up in Minnesota where many wonderful stones could be found pretty easily, so I became a junior "rock hound" by the age of four. Lake Superior agates and geodes found on the shores of the Mississippi were my favorites. My love for stones was established early in my life.
I was a graphic design major in college and the design principles I learned there have come in to play in many areas of my life but it wasn't until I was in my forties that I came back to my roots
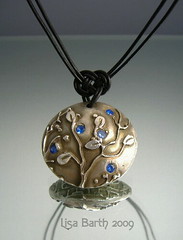 with the love of stones. I was attending a home jewelry party, looking over their products when I just knew somehow I could do this better than the costume jewelry that was presented. I dove in head first and set out to learn all I could. I started out with wire jewelry, then moved on to traditional metal work and Metal Clay. I have earned level one certification in metal clay and this summer will earn my Senior certification. Next summer I plan to go for my Master Cert. I am teaching wire work and Metal Clay in my home studio and truly enjoy sharing the passion I feel for this art.
What was your first piece?
My first piece was a funky, hard wired necklace of jasper and catseye with wire wings going off in two directions and held the stones in the middle. Very strange but it did catch people's attention.
What is your creative process?
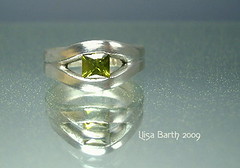
My creative process is very organic in nature in that it grows as I go. I start with a stone that somehow moves me. I take my color cues and placement of wire or metal by the form, shape and color of the stone. It is my intention to create something that enhances what is already going on in the stone, to compliment and highlight what I think is beautiful. This process often takes me on some wild rides.
What is your favorite part of making jewelry?
My favorite part of this process is exploring the possibilities and pinning down the elements and placing them in a harmonious way that makes my heart sing in response to the piece. It is challenging but also very gratifying when it all comes together.
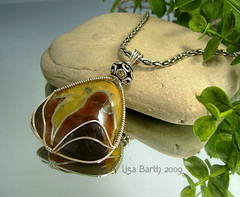
What is on your bench now?
Right now I am working on a woven bezel in sterling wire that incorporates seed beads and small gem stones for color. It is interesting to combine the two in one bezel.
What is your most indispensable tool?
My most indispensable tool is my Lindstrom chain nose pliers. Give me some wire and my pliers and I can wrap up anything.
24 June 2010
Archives May 2009 : Tool of the Month
Tool of the Month:
Hammers & Mallets
Anyone who has talked to me in JFF knows how much I LOVE hammers. When I first started making jewelry, I tried out different hammers and played with the different effects they made on metal. But I didn’t know the difference from a steel embossing hammer and a cross peen hammer. This article will hopefully help to describe the different hammers and explain what each does. And maybe even help with purchasing your first, second or twentieth hammer!
When shopping for a new hammer it helps to know what the desired effect you are looking for. Hammers and mallets are made from different materials and come in various shapes. The material will determine whether you are
1. hardening the metal without stretching or thinning it out.
2. moving the metal with the intent to change the thickness and shape.
The different shape and head sizes of hammers will determine the direction the metal will move and stretch and how quickly this will occur.
Before I go into detail about the different kind of hammers, I want to define a few words that will be used throughout.
Peening: hammering with the purpose of spreading the surface of the metal. Also hardening the surface in the process.
Sinking: also known as embossing, doming, dishing or dapping. This process forces silver down into a surface that is curved, cupped, domed or stretched.
Raising: sheet metal is formed into a bowl or other hollow object by repeated sequences of hammering on a stake, stretching the metal over the stake to create the desired convex shape.
Planishing: after a piece of metal has been roughly formed by techniques such as sinking or raising, the surface will have irregular indentations and bumps. To remove these imperfections, the piece is hammered between a flat or slightly curved hammer and a steel block or planishing stake.
Cross Peen hammer: this is a category of hammers. Many of the hammers I will describe have a cross peen face, meaning it has a wedge-shaped surface that is perpendicular to the handle of the hammer.
Mallets
Mallets are great for shaping and forming metal around a mandrel without stretching or leaving behind hammer marks on the surface of the metal. This is possible because they are made of a softer material than the metal you are hammering. The face of a mallet will have a flat or slightly convex striking surface on both sides.
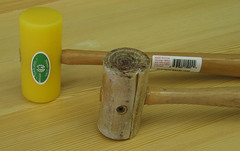
Plastic & Rawhide Mallets
Traditionally, a mallet is made of wood, but have since been replaced by the longer lasting and somewhat heavier plastic and rawhide mallets. A rawhide or plastic mallet is an endlessly useful hammer and is essential in your arsenal of jewelry tools. The plastic mallet is $15.45 and the rawhide mallet is $18.45.
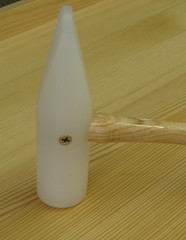 Horn & Nylon Forming Mallet
Another traditional mallet was made of the solid end of a cow’s horn. The natural conical shape of the horn was great for general forming with the larger flat end and more specific shaping and bending with the blunt point on the other end. As you can imagine obtaining a horn mallet is rather difficult these days, but plastic versions are more readily available today. The nylon forming mallet has a round, slightly convex face for normal striking on one end, the other face is a cross peen. This replaces a steel cross peen hammer and is great for raising and sinking when stretching and marking the metal is not the desired effect. The nylon forming mallet is $10.50.
Dead Blow Mallet

Dead blow mallets have become a popular in jewelry-making in the past few years. The head of these hammers are commonly hollow and filled with sand or shot, which absorbs the impact of a strike, reducing the bounce-back. This also produces a stronger, more powerful blow that will move the metal much faster. The mallet is constructed of polyurethane, which will minimize marring and marking on the surface of the metal. Dead blow mallets come in 10oz and 18oz weights, priced at $23.50 and $28.50 respectively.
Brass Mallet
Striking a steel hammer on a steel tool will eventually balloon out the top of the tool, which is not usually a desired effect when you spend $100+ on the tool. Therefore, a brass mallet is really the ticket. The brass is softer than the steel and will not damage the tool. When using a brass mallet for this task a 1-2 lb weight is good.
Brass mallets are also used by repair jewelers to shape and resize a ring, typically when the plastic or rawhide mallet is not enough. The brass will slightly mark the metal (less than a steel hammer) while stretching and forming quicker than the plastic or rawhide mallets. These hammers are much lighter than the ones mentioned above and are priced at $7.10.
Steel Hammers
There are a variety of different size, shape, and weight of steel hammers. Steel hammers are a valuable tool in jewelry-making, the quality, weight and shape of the hammer will determine what it is best suited for. Care of your steel hammers is also imperative.
Good quality steel hammers are made of hardened tool steel, making them an easy target for rust. While stainless steel seems like the obvious fix because it doesn’t rust, the alloys that make stainless create a softer steel than tool steel. Therefore, taking care of your hammers by oiling them and protecting them from moisture while not in use is very important. To store my hammers, I wipe oil on the faces of the hammer and store them in old socks.
If you decide to use a steel hammer to strike your steel tools, keep those hammers separate from the hammers that come in direct contact with your metal. Steel is much stronger than the metals jewelers use (silver, gold, brass, copper, etc), transferring any pits, marks, or dull spots that are on the surface hammer to the metal. Keeping your steel hammers that come into contact with your metal polished and smooth will leave you with less clean up.
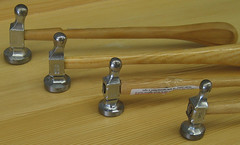
 Ball Peen Hammer
A jeweler’s ball peen hammer looks just like any other hardware store ball peen hammer, however it’s usually slightly smaller. These hammers have one flat, planishing end and one round, sinking end. Ball peen hammers are used for flattening, shaping or removing dents. Ball peen hammers come in two different quality ranges, the economical chrome plated hammers range in price from $4-$8, while the solid steel Vaughan hammers, pictured to the left are $16.75 for 4oz and $17.75 for 8oz.
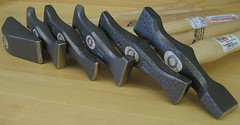
Chasing Hammer
Chasing hammers were originally made for chasing and repoussé. The hammer has one large smooth, flat, planishing face that is used for striking the chasing tool, and a small round, embossing end for riveting or peening. Chasing hammers offer two different types of handles, a rounded-style or pistol-style handle. The difference in handles is more essential in chasing and repoussé work, as the ratio of weight of the hammer head to the handle is important for balance.
 The idea being that while chasing, the hammer should make an easy rhythm or bounce with the chasing tool, the wrist working as a pivot point creating little to no added work to the jeweler. The rounded handle balances smaller hammer heads, where as the pistol style handle balances a larger head. These German chasing hammers are priced between $33 and $50.
Lightweight, inexpensive chasing hammers have become a popular first hammer for many beginner jewelers. The slightly convex side is great for light planishing and flattening, while the ball side is a perfect choice for creating a hammered texture. These hammers are made of chrome plated steel and cannot be polished when dents appear, however, cared for properly, these hammers should last a couple years. These hammers are about $14.
 Riveting Hammer
This lightweight steel hammer is designed for spreading rivet heads but has countless other uses. One end is a thin cross peen used for riveting, while the flat, planishing end is for leveling the rivet and other general hammering tasks. Riveting hammers range in price from $5 - $20.
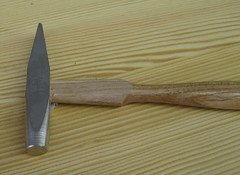
Goldsmith Hammer

This hammer is used for small scale forging and shaping. It features a round, slightly crowned planishing end for general purpose use. The opposite end is a cross peen, perfect for spreading rivet heads, forming and shaping. This hammer is also great for striking steel stamps. I, personally, love this hammer. So much so, I have two; one for stamping steel stamps and the other for small planishing and forming projects. The solid tool steel German goldsmith hammer is $33.50.
Silversmith Hammer
The Silversmith style hammers JFF carries are German-made Picard hammers. Picard hammers have superior forged steel heads for high performance and durability, all fitted with hickory handles. They are specially designed for all types of planishing, forging, raising and embossing. Widely used by jewelers and metalsmiths. Many times silversmithing hammers will need to be modified for your individual use. It is highly unusual to purchase a steel hammer and it be exactly what you need without any alteration. These hammers range in price from $43.75 to $57.75.
- Planishing Hammers
The planishing hammer has a flat or slightly domed face. This hammer is great for not only smoothing hammer marks left from raising and sinking, it also flattens wire and sheet leaving little to no hammer marks behind. The face of a planishing hammer will stretch the metal in all directions.
- Raising Hammers
Raising hammers are distinguished as having a rounded, polished cross peen. The corners are rounded to prevent marring the metal. Raising hammers are most commonly used when raising a bowl or other vessels.
- Forging Hammers
Forging hammers also have a polished cross peen, however, the face is slightly squarer and sharper. The sharp, rectangular shape of the face stretches the metal in one direction. Forging hammers are used when fold-forming, synclastic and anticlastic forming. This hammer is also popular for leaving a line texture.
- Sinking or Embossing Hammers
These hammers are similar in size and weight to a planishing hammer, but has round, severely domed faces, think of the ball of a ball peen hammer. These hammers force silver down into a surface that is curved, cupped, domed or stretched. Embossing hammers are also used in repoussé work.
Texturing Hammer
Texturing hammers are the exception to the smooth, polished face rule for steel hammers. These hammers will have rounded divots, lines, and other specialty designs ground into the face of the hammer. Texture hammers are either purchased with the texture already in them, or are made by the jeweler for a specific job. The texture hammers JFF carries are double sided and are $19.95 each.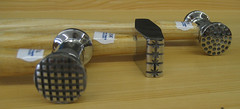
prices are subject to change without notice.
Please note: in the time since the article was written we carry Fretz Hammers and 1 lb. Brass Mallets
Subscribe to:
Posts (Atom)