Q: Why does silver tarnish?
A: Tarnish is a thin layer or film that forms over copper, brass, silver, aluminum and other semi-reactive metals as their outermost surface undergoes a chemical reaction. While silver is almost completely resistant to oxygen, other chemicals in the air, such as sulfur, creates a chemical reaction forming Silver Sulfide on the surface. The reaction occurs slowly, first with a thin sulfide layer causing the surface to yellow. As time proceeds, the layer will turn a dull gray or black.
Tarnish will also appear when sterling objects are in direct contact with skin. While everyone's body chemistry varies. Sulfur is found in skin oils and also in many cosmetics causing the rate of tarnish to increase dramatically.
How do I prevent tarnish?
The only sure fire way is to exclude sulfur from reacting from the surface of the metal, which would include keeping the metal piece in an air tight case filled with an inert gas which is virtually impossible! But here are some more reasonable options:
Rhodium Plating: through an electrolytic process a thin layer of rhodium (an expensive member of the platinum family) is applied to the surface of the silver. This layer is super hard and super white in color, resembling chrome. The downsides to rhodium plating are:
1. The color difference. The rich, warm white color of silver is replaced by the cold blue-white color of rhodium.
2. The plating layer is very thin and will wear with time.
3. Besides the cost of equipment for plating, rhodium is an expensive solution.
Coating the surface with Lacquer or Wax: Using a Lacquer or wax to seal the polished metal surface from exposure to air is a reasonable option if the piece will not be worn or used. However, in cases of wear or use, the areas of exposure to the skin or abrasion will quickly rub off the protective layer.
Periodic Cleaning: I sell my jewelry and I offer purchase of a polishing cloth to keep jewelry clean. The polishing cloth has a polishing chemical imbedded in the fabric. Assuming the wearer uses the cloth on a consistent basis (ie weekly), tarnish will be prevented or the slight effects (yellowing) will be removed. However, if the cloth is washed, the chemical is removed from the fabric and is no longer useful. Other possibilities are gels with brushes; small, home ultrasonic machines and steam cleaners; polishing on buffing machines.
Tarnish Removers: These are chemicals that the jewelry can be dipped into to instantly remove the tarnish. While these work almost instantly, the way the chemical works is that it eats away at the surface, removing the tarnish. So keeping this in mind, the surface of the metal is being eaten away, so if the metal is left in too long, it will eventually ruin or disintegrate the piece. Keeping this in mind, any polishing compounds on the surface of the metal preventing tarnish are now removed and the silver will tarnish at a higher rate (sometimes within hours) if not polished with a polishing cloth or on a buff shortly thereafter.
Using Argentium Silver: Argentium Silver is a new sterling silver alloy made with germanium. Germanium oxidizes preferentially to the silver and copper in Argentium Silver, to form a transparent germanium oxide surface layer. The alloy is not completely resistant to tarnish, but will slow the process of tarnish. Germanium causes the silver to react differently than normal sterling silver; so if you choose to use this, make sure you do your research! (At this time JFF does not carry Argentium)
Showing posts with label question and answer. Show all posts
Showing posts with label question and answer. Show all posts
19 July 2010

09 July 2010
Archives July/August 2009 : Question and Answer
Q: How do you read a Vernier Caliper?
A: One of the most difficult parts of using a Vernier Caliper is reading it accurately. Before I explain how to do this, let me go over the parts of the Caliper first.
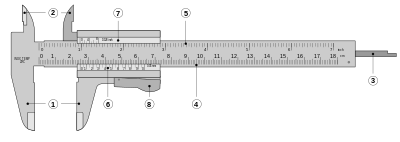
1. Outside jaws: used to measure external diameter or width of an object
2. Inside jaws: used to measure internal diameter of an object
3. Depth probe: used to measure depths of an object or a hole
4. Main scale: gives measurements of up to one decimal place(in cm).
5. Main scale: gives measurements in fraction(in inch)
6. Vernier gives measurements up to two decimal places(in cm)
7. Vernier gives measurements in fraction(in inch)
8. Retainer: used to block movable part to allow the easy transferring a measurement
Ok, now you know the parts of the caliper...so how do I use it?!
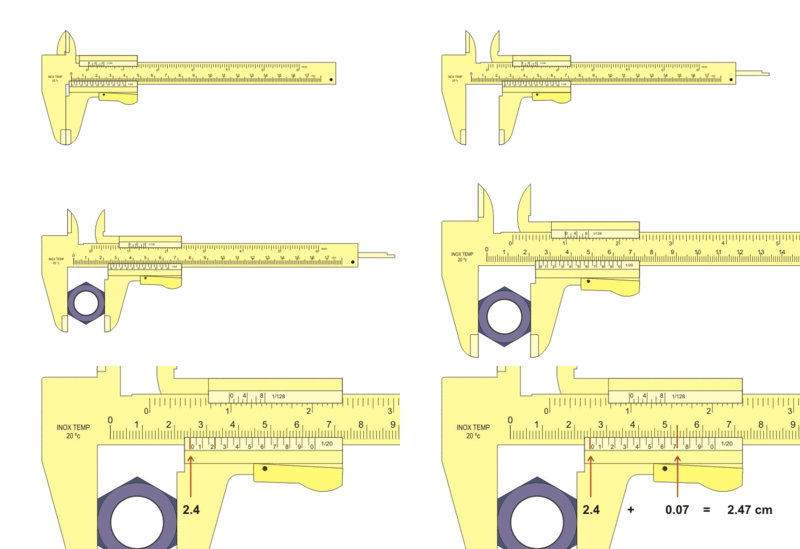 First, find open the caliper and close down the outside jaws onto the item to be measured. Make sure the item side are on the same plane as the caliper, if it lays in wonky your measurement will be off.
Second, look for where the 0 mark of the sliding vernier scale lines up on the fixed main scale. In this case, it is before the 2.4 cm mark. So, the first reading is 2.4
cm.
Next, find the mark on the vernier scale that most closely lines up with one of the marks on the main scale. Here, 6.5 and 7.5 are very close, but 9.0 lines up exactly with one of the marks on the fixed scale. This value is the number of
hundredths of centimeters (or tenths of millimeters). So, the second reading is 0.070 cm.
Finally, add the two values together to get the total reading: 2.4 cm + 0.070 cm = 2.470 cm.
A: One of the most difficult parts of using a Vernier Caliper is reading it accurately. Before I explain how to do this, let me go over the parts of the Caliper first.
1. Outside jaws: used to measure external diameter or width of an object
2. Inside jaws: used to measure internal diameter of an object
3. Depth probe: used to measure depths of an object or a hole
4. Main scale: gives measurements of up to one decimal place(in cm).
5. Main scale: gives measurements in fraction(in inch)
6. Vernier gives measurements up to two decimal places(in cm)
7. Vernier gives measurements in fraction(in inch)
8. Retainer: used to block movable part to allow the easy transferring a measurement
Ok, now you know the parts of the caliper...so how do I use it?!
First, find open the caliper and close down the outside jaws onto the item to be measured. Make sure the item side are on the same plane as the caliper, if it lays in wonky your measurement will be off.Second, look for where the 0 mark of the sliding vernier scale lines up on the fixed main scale. In this case, it is before the 2.4 cm mark. So, the first reading is 2.4
cm.
Next, find the mark on the vernier scale that most closely lines up with one of the marks on the main scale. Here, 6.5 and 7.5 are very close, but 9.0 lines up exactly with one of the marks on the fixed scale. This value is the number of
hundredths of centimeters (or tenths of millimeters). So, the second reading is 0.070 cm.
Finally, add the two values together to get the total reading: 2.4 cm + 0.070 cm = 2.470 cm.
02 July 2010
Archives June 2009 : Question and Answer
Q: How to find center of a circle?
A: Finding the center of a circle or disc you have punched out can be quite a task. However, using your divider is an easy way to tackle this challenge.
Begin with your circle and your divider. Just eyeballing it, find the approximate center of the circle with your divider. Set your divider to that distance and bracing against the outside of the circle with one leg, draw three intersecting lines using the other leg. If the three lines intersect at a point, you have found exact center! Otherwise, the lines will create a triangle, and some point in the middle of the triangle is your center. Continue making adjustments and drawing lines until you have the exact center.
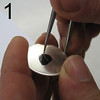
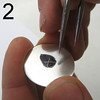
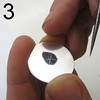

Please note: the black sharpie mark is not necessary for this process, it is only used for purposes of photography.
A: Finding the center of a circle or disc you have punched out can be quite a task. However, using your divider is an easy way to tackle this challenge.
Begin with your circle and your divider. Just eyeballing it, find the approximate center of the circle with your divider. Set your divider to that distance and bracing against the outside of the circle with one leg, draw three intersecting lines using the other leg. If the three lines intersect at a point, you have found exact center! Otherwise, the lines will create a triangle, and some point in the middle of the triangle is your center. Continue making adjustments and drawing lines until you have the exact center.
Please note: the black sharpie mark is not necessary for this process, it is only used for purposes of photography.
28 June 2010
Archives May 2009 : Question and Answer
Q: What does it mean to "dress" a hammer?
A: Dressing a tool involves grinding and sanding away any sharp edges or rough spots on the face and following up the process by polishing to a high shine. Essentially dressing your hammer is a fancy way of saying modifying. There are many different ways to go about this; by hand, with a flex shaft, on a buffing machine, etc.
Many times the hammer will be highly polished but have sharp edges that will leave marks on your metal, the whole point of having your hammers polished is so you don’t have to go back and grind away weird textures and lines left behind. Dressing your hammer will clean up these edges and give you much less work in the long run. You can also modify your hammer to have a more pointed face, like with a cross peen hammer, or give the flat side of your planishing hammer a more crowned face.
Modifying by hand is very time consuming, mounting the hammer in a vise and using various grits of sand paper to remove the edges and then polish the surface. Using a belt sander can speed up the process, but there is still the hand polishing for the final steps.
The flex shaft and buffing machine use a similar process, while the buffing machine is much faster and easier. Begin by using a stone wheel, like a mizzy wheel. This will remove the edges quickly, leaving behind a rough surface. Follow up with a silicone grinding wheel, like the Artifex wheel, to clean up the rough surface. If you don’t have a lot of material to remove, start with the Artifex wheel. Finally, follow up with a tripoli and a rouge. I will typically use bobbing compound as my Tripoli and green rouge as my final high shine polish.
A: Dressing a tool involves grinding and sanding away any sharp edges or rough spots on the face and following up the process by polishing to a high shine. Essentially dressing your hammer is a fancy way of saying modifying. There are many different ways to go about this; by hand, with a flex shaft, on a buffing machine, etc.
Many times the hammer will be highly polished but have sharp edges that will leave marks on your metal, the whole point of having your hammers polished is so you don’t have to go back and grind away weird textures and lines left behind. Dressing your hammer will clean up these edges and give you much less work in the long run. You can also modify your hammer to have a more pointed face, like with a cross peen hammer, or give the flat side of your planishing hammer a more crowned face.
Modifying by hand is very time consuming, mounting the hammer in a vise and using various grits of sand paper to remove the edges and then polish the surface. Using a belt sander can speed up the process, but there is still the hand polishing for the final steps.
The flex shaft and buffing machine use a similar process, while the buffing machine is much faster and easier. Begin by using a stone wheel, like a mizzy wheel. This will remove the edges quickly, leaving behind a rough surface. Follow up with a silicone grinding wheel, like the Artifex wheel, to clean up the rough surface. If you don’t have a lot of material to remove, start with the Artifex wheel. Finally, follow up with a tripoli and a rouge. I will typically use bobbing compound as my Tripoli and green rouge as my final high shine polish.
23 June 2010
Archives April 2009 : Question and Answer
Q: What is the difference between reticulation silver and sterling silver?
A: It’s funny how the question of the month comes about...usually a customer will ask a question, something that isn’t very common, then it all of a sudden it snowballs and becomes the question everyone asks. And thus, the question of the month is born! So keep it up, we love your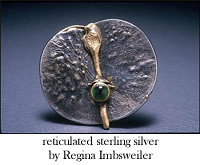 questions!
Reticulation is a process by which metal sheet, usually silver, is heated to almost melting temperature and the surface draws up to make ridges and valleys, leaving a unique wrinkled texture.
Reticulation begins with depletion gilding. A process that involves annealing a sheet of gold or silver to oxidize the copper at the surface, and then pickling to remove the oxide, leaving a thin layer of pure metal on the surface. This causes the surface to have a higher melting temperature than the alloy within and is ready to reticulate. Once the sheet is gilded, it is heated to just below the flow point. The alloy in the interior flows before the surface of the metal does causing a surface to wrinkle. The number of anneals, the size of the flame, and the ratio of copper to silver cause variations in the texture of the reticulated surface.
Silver is the metal most commonly used for reticulation. Sterling silver (92.5% fine silver and 7.5% copper) works fairly well, but the wrinkled texture is fairly subtle. (See Regina’s reticulated sterling silver pendant, above right.) Silver alloyed with a higher proportion of copper gives a more dramatic pattern. A commercially manufactured reticulation silver is now produced with 80-83% fine silver and 20-17% copper. (See Judy’s reticulated 80/20 earrings, above left.)
Sterling Silver is only defined as having 92.5% fine silver and 7.5% copper, therefore reticulation silver cannot be marked as sterling. If you buy reticulation silver, mark the sheets immediately and keep all scraps separate from your sterling silver. When selling jewelry made with reticulation silver and sterling, be sure the customer understands that the piece is not entirely sterling.
A: It’s funny how the question of the month comes about...usually a customer will ask a question, something that isn’t very common, then it all of a sudden it snowballs and becomes the question everyone asks. And thus, the question of the month is born! So keep it up, we love your
questions!Reticulation is a process by which metal sheet, usually silver, is heated to almost melting temperature and the surface draws up to make ridges and valleys, leaving a unique wrinkled texture.
Reticulation begins with depletion gilding. A process that involves annealing a sheet of gold or silver to oxidize the copper at the surface, and then pickling to remove the oxide, leaving a thin layer of pure metal on the surface. This causes the surface to have a higher melting temperature than the alloy within and is ready to reticulate. Once the sheet is gilded, it is heated to just below the flow point.
The alloy in the interior flows before the surface of the metal does causing a surface to wrinkle. The number of anneals, the size of the flame, and the ratio of copper to silver cause variations in the texture of the reticulated surface.Silver is the metal most commonly used for reticulation. Sterling silver (92.5% fine silver and 7.5% copper) works fairly well, but the wrinkled texture is fairly subtle. (See Regina’s reticulated sterling silver pendant, above right.) Silver alloyed with a higher proportion of copper gives a more dramatic pattern. A commercially manufactured reticulation silver is now produced with 80-83% fine silver and 20-17% copper. (See Judy’s reticulated 80/20 earrings, above left.)
Sterling Silver is only defined as having 92.5% fine silver and 7.5% copper, therefore reticulation silver cannot be marked as sterling. If you buy reticulation silver, mark the sheets immediately and keep all scraps separate from your sterling silver. When selling jewelry made with reticulation silver and sterling, be sure the customer understands that the piece is not entirely sterling.
18 June 2010
Archives March 2009 : Question & Answers
Q: Can you solder gold-filled?
A: The quick and easy answer is “yes.” But as many of you know, the question and answer section is never a cut and dry answer.
Let me begin by explaining what gold-filled is. Like many of our tools in jewelry making the name is misleading, gold filled is not “filled with gold.” It is a thin layer of gold filled with a core of another less expensive material. Usually a copper-rich material like brass or bronze. The layer of gold is attached to the base metal core through a process called alloy diffusion. Allowing for a much thicker layer of gold than plating can produce.
Alloy diffusion begins with quickly heating and welding the two metals in a high heat furnace and then removing and immediately pressing the composite in a hydraulic press. The process continues by rolling in a rolling mill. Combined with annealing, the welded bond between the gold layer and base metal is further enhanced. The resulting weld is so strong that the finished gold filled sheet stock can be formed, fabricated and soldered without any risk of delamination.
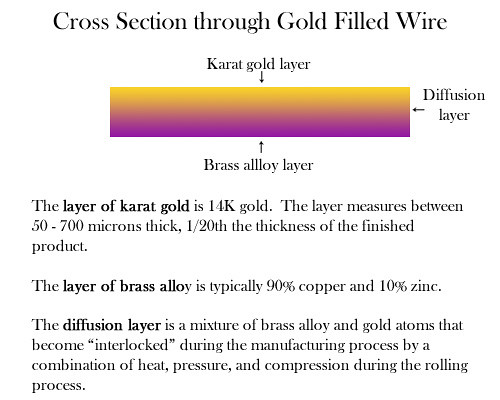 Gold filled materials are used in many finished products; watchcases, cigarette lighters, high fashion jewelry, etc. In practice, most gold filled products utilize an outer layer of gold that is between 10 karat and 18 karat in fineness. Depending on the usage, the thickness of the gold sheet varies. All items designated and sold commercially as "gold filled" must comply with the trade rules set forth by the Federal Trade Commission (FTC). The total gold content for an object designated gold filled must equal 1/20th of the total weight of the finished item. Therefore, the gold filled wire JFF carries is 1/20th 14K gold filled.
Now, back to the question at hand. Can you solder gold filled? Two big red flags cause a problem when soldering gold-filled: the copper-rich core and the thin layer of gold on the surface. When heated, the copper will raise to the surface, much like soldering silver. This causes a pinkish color after pickling, much like rose gold. Which is not a problem if you don’t mind the color, but if you want yellow gold, not good. The copper core also presents an increased risk of firescale. The first inclination to deal with firescale and/or the color change is to file, grind, and polish.
This is where the thin layer of gold on the surface creates the next hurdle. The surface does not have enough gold to with stand grinding away the firescale without taking all of the gold off with it. Thus leaving the brass or bronze core exposed, which will tarnish while the gold will not.
Ok, so how are you supposed to deal with these problems?
A: The quick and easy answer is “yes.” But as many of you know, the question and answer section is never a cut and dry answer.
Let me begin by explaining what gold-filled is. Like many of our tools in jewelry making the name is misleading, gold filled is not “filled with gold.” It is a thin layer of gold filled with a core of another less expensive material. Usually a copper-rich material like brass or bronze. The layer of gold is attached to the base metal core through a process called alloy diffusion. Allowing for a much thicker layer of gold than plating can produce.
Alloy diffusion begins with quickly heating and welding the two metals in a high heat furnace and then removing and immediately pressing the composite in a hydraulic press. The process continues by rolling in a rolling mill. Combined with annealing, the welded bond between the gold layer and base metal is further enhanced. The resulting weld is so strong that the finished gold filled sheet stock can be formed, fabricated and soldered without any risk of delamination.
Gold filled materials are used in many finished products; watchcases, cigarette lighters, high fashion jewelry, etc. In practice, most gold filled products utilize an outer layer of gold that is between 10 karat and 18 karat in fineness. Depending on the usage, the thickness of the gold sheet varies. All items designated and sold commercially as "gold filled" must comply with the trade rules set forth by the Federal Trade Commission (FTC). The total gold content for an object designated gold filled must equal 1/20th of the total weight of the finished item. Therefore, the gold filled wire JFF carries is 1/20th 14K gold filled.Now, back to the question at hand. Can you solder gold filled? Two big red flags cause a problem when soldering gold-filled: the copper-rich core and the thin layer of gold on the surface. When heated, the copper will raise to the surface, much like soldering silver. This causes a pinkish color after pickling, much like rose gold. Which is not a problem if you don’t mind the color, but if you want yellow gold, not good. The copper core also presents an increased risk of firescale. The first inclination to deal with firescale and/or the color change is to file, grind, and polish.
This is where the thin layer of gold on the surface creates the next hurdle. The surface does not have enough gold to with stand grinding away the firescale without taking all of the gold off with it. Thus leaving the brass or bronze core exposed, which will tarnish while the gold will not.
Ok, so how are you supposed to deal with these problems?
- Boric Acid and Denatured Alcohol Solution: dipping the pieces to be soldered in a saturated solution of boric acid and denatured alcohol is a traditional bench jeweler’s technique to prevent firescale on gold. By burning the alcohol off, a protective coat of boric acid is left all over the gold filled. Flux, solder and pickle as you would normally afterward.
- Charcoal Block: the charcoal block removes much of the oxygen from the flame which will decrease your chances of having firescale.
- Depletion Gilding: a process of heating to annealing temperature, pickling and brass brushing, and repeating 5-7 times. After soldering and pickling the piece, the process of depletion gilding will remove the pink color on the surface of the gold filled. However, this is a time intensive process and rather difficult when working on a link necklace.
- Use gold solder, preferably a 14K easy solder.
- Pick solder, thus controlling the amount of solder used and decrease the amount of solder clean-up needed.
- Solder quickly, the less time you heat the piece, the lower your chance of having firescale.
29 January 2010
Archives February 2009 : Question & Answer
Q :
When I solder copper with silver solder, the seam is silver. Is there a copper solder I can use or something to fix this?A :
Yes, there is such a thing as copper solder that plumbers use. You can purchase it at some hardware stores and online. It is called copper phosphate. Upon research, I found many people had a hard time using the solder and getting it to flow. Best results were found using an oxy-acetylene torch. Color matching was also a problem, so seems are still visible.
There is another, easier option: Create a copper plating solution out of your pickle.
The first step is to solder your copper with silver solder. Continue to make your piece, hammering, filing, sanding, polishing, etc until the piece is finished to your liking, except for the silver solder seam(s).
To make your seam copper color, you will use your pickle solution to copper plate the piece. Simply place a nail or any other object that is steel or iron in your pickle. And you’re done!
So how does this work exactly? When you use your pickle, normally, it is taking off the black oxidation (copper) off the surface of the soldered piece. Tiny copper ions are then in the pickle solution. When steel or iron is introduced, it creates a reaction making the copper ions swimming in your pickle want to attach to anything in the pickle. Thus, copper plating whatever is in the pickle. The copper ions are so small that any filing, polishing or any other surface treatment will come off once the piece is plated. But because they are so small they imitate the surface that they are plated onto.
If you do this, be sure not to use any iron or steel that has rust on it, it will forever contaminate that batch of pickle. That being said, if the iron or steel is clean, your pickle is reusable, so make sure to take the nail or other object out of your pickle before you use it again. Also, the more you have used your pickle the better this process will work. A new pickle solution will not have any copper ions in the solution to plate the piece.
20 January 2010
Archives December 2008 : Question & Answer
Q:
Does everyone who works at JFF make jewelry?A:
Most everyone at JFF has some sort of background in jewelry.
Hans started out as a hand engraver in Germany. He moved to America to open a jewelry store with his partner, Otto (Which is how JFF began). Hans has a vast background in engraving, plating, and steamers, just to name a few categories! However, he no longer does hand engraving.
Dallas, has worked in jewelry supply stores since he was 14. He has worked extensively in casting, but also in stone setting, gold and platinum. Today, Dallas keeps busy with his four children, but will sometimes play with his tools in his work room.
Christina grew up working at JFF, but never made jewelry until recently. She mostly works in silver and gold.
Mary has worked at JFF for about 20 years, but has yet to catch the jewelry making bug! We are still trying to get her to the dark side :)!
13 January 2010
Archives November 2008 : Question & Answer
Q :
A:
What is the difference between soft, half hard, and full hard wire?
A:
All metals have a property called hardness. Hardness is the characteristic of the metal that resists bending. Soft metals are pliable and easy to bend. Hard metals are stiff and hard to bend. The hardness of metals can be changed by heat treating the metal in a process called annealing or by simply bending the wire in a process called work hardening.
Wire, like all metals, will have this same hardness property. Historically, numbers (0, 1, 2, 3, or 4) were used as labels to define the hardness of the wire. The numbers correlated to the number of times that the wire was pulled through the draw plate. The wire becomes harder or stiffer after each time it is drawn through the drawplate. A hardness of 0 meant that the wire was drawn only one time and was as soft and pliable as possible. A hardness of 4 meant that the wire was drawn five or more times and the wire was as stiff and hard as possible.
Currently the designations 0, 1, 2, 3, and 4 no longer correlate to the number of times that the wire was drawn because the hardness of the wire can be changed by heat treating the wire. Practically, most jewelry wire is sold now as either dead soft, half-hard, or hard, with dead soft being wire manufactured with a hardness of 0, half-hard being wire manufactured with a hardness of 2, and fully hardened wire being wire with a hardness of 4.
Dead soft wire can be easily bent and is excellent for making rounded shapes including a spiral. The disadvantage of using soft wire is that the finished piece can be bent out of shape if not properly handled. Soft metal is best when soldering, as the heat from soldering process will anneal the metal and will soften the temper.
Half-hard wire is slightly stiffer than dead soft wire. It is excellent for making tight, angular bends, for making loops in wire, and for wrapping wire around itself. Finished pieces made with half-hard wire are often more permanent than pieces made with soft wire. Half-hard wire is good for handmade ear wires, wire wrapped jewelry and wire sculpture.
Hard wire is very stiff and tends to spring back after being bent. This can make it harder to work with when using a jig. Although the wire components made out of hard wire are difficult to make, they will be very permanent. Hard wire is good for making springs and pins.
As mentioned above, the hardness of the metal can be changed. Many times the various processes of jewelry making will harden or soften the metal. Hardening the metal can be accomplished by bending, hammering, coiling, twisting, tumbling, or by any other manipulations to the metal. This process is called work hardening. Work hardening is an actual physical change to the molecular structure of the metal. The molecules move closer and closer together becoming more and more brittle, eventually breaking the metal.
Heat treating or annealing the metal will soften the temper of the metal and prevent the metal from breaking, ultimately relaxing the molecules. During the annealing process, the metal is uniformly heated to a temperature that is lower than the melting point or soldering temperature. Therefore, soldering will anneal the metal as well.
08 January 2010
Archives October 2008 : Questions & Answers
Q :
What do the sizes of the sawblades signify? How do I know what size blade I need?
A :
Saw blades are sized by the teeth per inch, the more teeth per inch, the finer the blade. Furthermore, standard saw blades are codified in a simple numbering system, the lower the number, the finer the blade and the more teeth per inch. For example, a #5 is finer than a #7.
The numbering for jeweler's saw blades is based off of the standard code; however, they are so fine compared to other types of saw blades, the numbering continues by counting the number of zeros. The finer the blade, the more zeros. The sizes from fine to coarse are as follows : 8/0, 7/0, 6/0, 5/0, 4/0, 3/0, 2/0, 0, 1, 2, 3, 4, 5, 6, 7, and 8. The fraction blade sizes, such as 3/0 are spoken "three oh," three zero," or "three ought."
Because the jewelers saw blades are so fine, they tend to break rather easily. While correct sawing form is very important, choosing the appropriate size blade for the job will help reduce the number of broken blades. Ideally, you should choose a blade that has 2 1/2 teeth per the thickness of the metal you plan to cut. Since it is very difficult to measure the teeth against the edge of sheet metal or wire, many charts are made to help, like the one below. Keep in mind the chart lists the largest blade for the gauge of metal, if you are sawing an intricate design you may want to use a finer blade.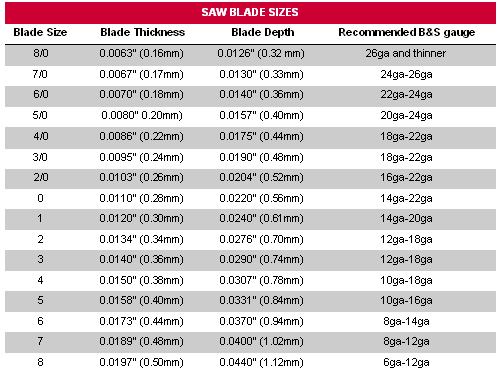
What do the sizes of the sawblades signify? How do I know what size blade I need?
A :
Saw blades are sized by the teeth per inch, the more teeth per inch, the finer the blade. Furthermore, standard saw blades are codified in a simple numbering system, the lower the number, the finer the blade and the more teeth per inch. For example, a #5 is finer than a #7.
The numbering for jeweler's saw blades is based off of the standard code; however, they are so fine compared to other types of saw blades, the numbering continues by counting the number of zeros. The finer the blade, the more zeros. The sizes from fine to coarse are as follows : 8/0, 7/0, 6/0, 5/0, 4/0, 3/0, 2/0, 0, 1, 2, 3, 4, 5, 6, 7, and 8. The fraction blade sizes, such as 3/0 are spoken "three oh," three zero," or "three ought."
Because the jewelers saw blades are so fine, they tend to break rather easily. While correct sawing form is very important, choosing the appropriate size blade for the job will help reduce the number of broken blades. Ideally, you should choose a blade that has 2 1/2 teeth per the thickness of the metal you plan to cut. Since it is very difficult to measure the teeth against the edge of sheet metal or wire, many charts are made to help, like the one below. Keep in mind the chart lists the largest blade for the gauge of metal, if you are sawing an intricate design you may want to use a finer blade.
05 January 2010
Archives September 2008 : Question and Answer
Q :
What is the story of JFF Jeweler Supply?A :
Once upon a time, two men named Otto and Hans, a repair jeweler and a hand engraver from Germany, decided to open a jewelry repair shop called Jeweler's Services in downtown Atlanta. But one day, two very bad men came in with guns and help Otto's young son up at gun point and stole a lot of very expensive jewelry and diamonds.
Otto and Hans decided it was time to move the store to Doraville and change the name. But they didn't know what to name the store! Otto's son was selling magic tricks at the front of the store, calling his business, "Just for Fun." The two men, liked this name and decided to use it for the repair store.
For many years, Just for Fun operated as just a repair shop for jewelers and jewelry stores, but more and more jewelers were asking Otto and Hans to carry a few jeweler tools and supplies on the side. The two men, decided it would be a great investment to start carrying tools. They started with a shelf with tools. The small shelf grew into a suite in the building, and then before they knew it, the supply end had taken over the shop! Hans and Otto decided that the tool side of the business would be Just For Fun and the repair side would be Cohen Co.
Soon, Hans started recieving many phone calls for companies that offered "Just for Fun" in areas other than jeweler supplies. So in 2000, when Otto decided it was time to retire, Hans took full ownership of the store. The repair shop was closed and the name was changed to JFF Jeweler Supply! An they lived happily ever after!
Archives August 2008 : Question and Answer
Q:
Does JFF take gold and silver scrap?A:
No, we do not. However; there are some refineries (local and not) that are taking scrap gold and some are taking scrap silver and platinum.
NTR Metals, LLC
3871 Oakcliff Industrial Court
Doraville, GA 30340
770-441-8035
www.ntrmetals.com
98% spot gold price
gold, silver, platinum
Pease & Curren
75 Pennsylvania Ave.
Warwick, RI 02888
800-343-0906
www.peaseandcurren.com
gold, silver, platinum, palladium
11 December 2009
Archives July 2008 : Question & Answers
Q: Why are the measurements on a ring mandrel different than a finger sizer?
A: Ring mandrels are typically engraved with the sizes and then hardened. The hardening process causes the steel to expand and shrink along the mandrel, so that the engraved sizes are no longer 100% accurate. Unfortunately, the engraving cannot occur after the hardening process. And if the ring mandrel is not hardened, any hammering that occurs on it will change the shape and size of the mandrel as well.
To deal with this problem, it is always best to have a finger sizer along with a ring mandrel and check the sizes on your ring mandrel with your finger sizer for comparison.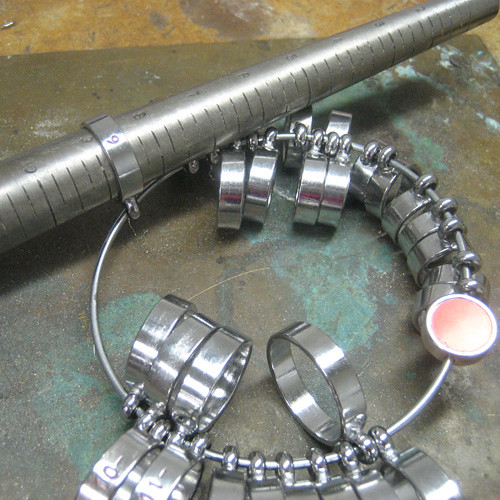
A: Ring mandrels are typically engraved with the sizes and then hardened. The hardening process causes the steel to expand and shrink along the mandrel, so that the engraved sizes are no longer 100% accurate. Unfortunately, the engraving cannot occur after the hardening process. And if the ring mandrel is not hardened, any hammering that occurs on it will change the shape and size of the mandrel as well.
To deal with this problem, it is always best to have a finger sizer along with a ring mandrel and check the sizes on your ring mandrel with your finger sizer for comparison.
Subscribe to:
Posts (Atom)