go back to JFF

12 July 2010

Archives September 2009 : Tool of the Month

Tool of the Month:
Escapement Files

I have always loved cute, teeny, tiny, miniature things. Ever since I was a child, I would collect little trinkets that really had no use in life. Now that I'm a so-called adult, while I still love miniatures my mind always asks..."can you really use this?" And I attempt to resist, but I always end up with a lot of tiny things with no practical use. But when I saw the teeny-tiny size of escapement files, I had a million uses for them almost immediately. As soon as I brought them home I was using the small shapes and angles on anything and everything that I couldn't get a standard or needle file into.

Escapement files are generally narrower and shorter than standard needle files but follow the same fineness grading as needle and hand files. They were originally created for use in clock and watchmaking when forming the escapement, a part of a watch that controls the motion of the wheel-work and other parts. These files are used for the most delicate and precise filing requirements.

Escapement files have a square handle and are always 5-1/2" (14cm) long, from the file tip to handle end. Several types of escapement files are available in different cut lengths, for example, you can order a barrette escapement file in 40mm or 55mm. For escapement files, the mm measurement always refers to the cut length, not the tip to tip length. The image below displays the various file shapes that are available. (please note any files with an * are special order only, and are not kept in stock at JFF)


The files are available individually or in 12 piece sets, in either a #2 or #4 cut. Individually prices range from approximately $12 to $22 (price is dependent on the shape and cut of the file). The sets are approximately $170.

* please note: prices are subject to change without notice

09 July 2010

Archives July/August 2009 : Question and Answer

Q: How do you read a Vernier Caliper?

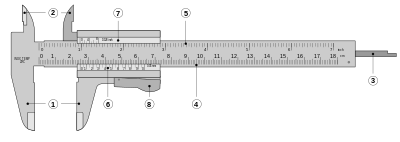
A: One of the most difficult parts of using a Vernier Caliper is reading it accurately. Before I explain how to do this, let me go over the parts of the Caliper first.


1. Outside jaws: used to measure external diameter or width of an object
2. Inside jaws: used to measure internal diameter of an object
3. Depth probe: used to measure depths of an object or a hole
4. Main scale: gives measurements of up to one decimal place(in cm).
5. Main scale: gives measurements in fraction(in inch)
6. Vernier gives measurements up to two decimal places(in cm)
7. Vernier gives measurements in fraction(in inch)
8. Retainer: used to block movable part to allow the easy transferring a measurement


Ok, now you know the parts of the caliper...so how do I use it?!


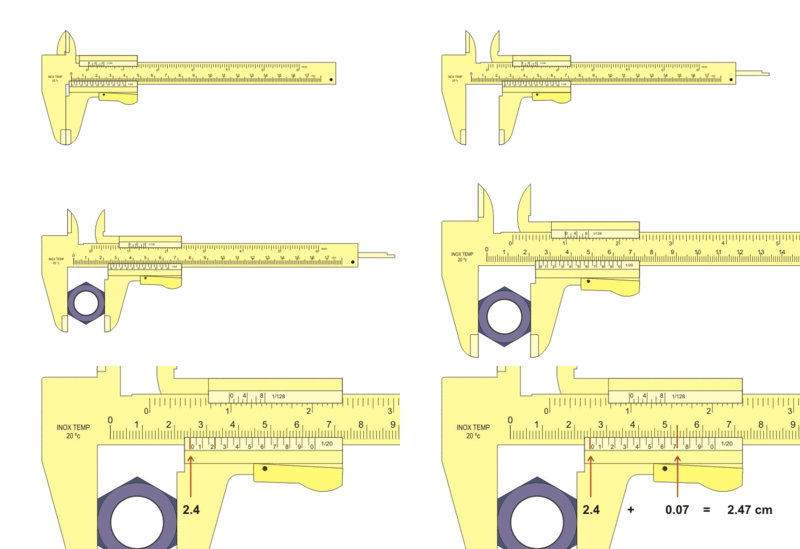
First, find open the caliper and close down the outside jaws onto the item to be measured. Make sure the item side are on the same plane as the caliper, if it lays in wonky your measurement will be off.

Second, look for where the 0 mark of the sliding vernier scale lines up on the fixed main scale. In this case, it is before the 2.4 cm mark. So, the first reading is 2.4
cm.

Next, find the mark on the vernier scale that most closely lines up with one of the marks on the main scale. Here, 6.5 and 7.5 are very close, but 9.0 lines up exactly with one of the marks on the fixed scale. This value is the number of
hundredths of centimeters (or tenths of millimeters). So, the second reading is 0.070 cm.

Finally, add the two values together to get the total reading: 2.4 cm + 0.070 cm = 2.470 cm.

08 July 2010

Archives July/August : New Items

JFF New Items

Liver of Sulfur Gel

$14.95 - 4oz jar
So my excitement about this new form of Liver of Sulfur might compare to someone from an infomercial selling Sham-Wow or Oxi-Clean.

How many times have to gone to use your dry form liver of sulfur and its gone bad? Dry liver of sulfur is very unstable and degrades with exposure to light and air, so sensitive that the instant you leave the lid off for too long or if you don't have a completely air tight container, it's no longer usable. Liver of sulfur in liquid form is even more unstable and loses potency by the second.

Many people have switched to Jax Silver Blackener, a liquid that has been formulated to blacken silver. While it is easy to use, as it is already mixed, and reusable, Jax Silver Black does not leave a true black patina. Also, Jax Silver Blackener is flammable and cannot be shipped without hazardous shipping fees.

Recently, a new product has been released on the market, a Liver of Sulfur Gel. It is a stabilized form that does not degrade in light and air. Even if the lid has been left open, it will remain fresh and usable. It can be used either in its concentrated gel form with a paint brush or mix a small droplet into water for a weaker solution. The Liver of Sulfur Gel also allows for color patinas to occur on silver also, like dry liver of sulfur. This gel is also non-flammable and safe for shipping anywhere!

I have gone back and forth between using Jax Silver Blackener and Dry Liver of Sulfur, my preference switching all along. I have been very stringent with keeping my Dry Liver of Sulfur sealed tight away from light and air, so I have been lucky to never had a problem with my liver of sulfur going bad. However, when I read all the hype about the Liver of Sulfur gel I had to try it. It is so easy to use. If I am wanting a small section of a surface super black, I just dip my paint brush in the gel and glob some on, instantly it turns black. If I am trying to get an all over patina, I heat up a cup of water and mix in 2-3 drops of the gel into the solution and drop my project in the solution. I have yet to try the gel with getting the colored patinas, but in my research, I have heard that it does work.

07 July 2010

Jeweler of the Month:
Heather Trundle

Bio
In April of 2001, a fateful trip to the Georgia Renaissance Festival awakened a creative fire that has been burning ever since....

My name is Heather Trundle and I am a wire jewelry artist. I grew up an Army Brat and have spent my life traveling from place to place...living in different states and different countries. I have always been creative, but focusing mainly on threadwork and yarns. Seven years ago, a trip to the Georgia Renaissance Festival ended with a trip to a craft store for my first set of pliers and a coil of cheap aluminum wire. I soon found out that wire is an extension of thread and yarn and the ability to create a beautiful piece of wearable art came naturally.
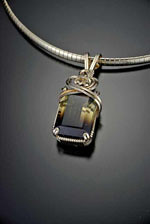
During the day, I wear a lab coat and am the Senior Research and Development Chemist for Plaid Enterprises, Inc. During the evening, after the children are in bed and night has fallen, I am a wire jewelry artist. I learned my art through videos, books, and trial and error with a lot of scrap wire. After one year of creating jewelry, I realized that I need to stop making jewelry or start selling it...Moonlight Creations was born. In 2009 I decided I needed a facelift and re-branded myself as Moonlight Wrapture - Expressing Your Wrapture in Style.

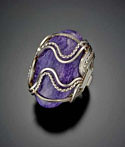
I design unique wire sculpted jewelry using Sterling Silver and 14kt Gold filled wire. My creations incorporate stone cabochons, faceted gemstone, pearls, shells, and any other item that I believe can be fashioned into a unique piece of jewelry. I create pendants, necklaces, earrings, bracelets, and more.

Not only do I have the pleasure of creating and selling my wearable art; but for the last three years, I have had the satisfaction of teaching my art to others.

What was your first piece?
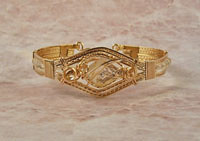
The first piece I ever created was a pair of earrings from the cheap gold colored aluminum wire that I bought with my first set of round nose pliers.

What is your creative process?
The muse hits me at all times and places. My ideas come from every aspect of my life and the world around me. I have an accordian file full of personal drawings and pictures. If I ever get blocked...I just rifle through my creative file and new ideas come to mind. I was at a stop light the other day and there was a white truck in front of me with black scroll work designs on the tail gate. I loved the look and quickly sketched out a similar pattern that should look great in wire...maybe for earrings or part of a necklace.

There are times that I can sit down with a stone cabochon and see the finished piece in my head. Then there are times that I just get some wire out and start wrapping the piece and am usually delighted what starts to take shape.
What is your favorite part of making jewelry?
I have two parts...

The moment a piece is polished and shines for the first time. There are still times that I look at a piece and can't believe that I just created that beautiful piece of jewelry.

The second favorite part is when I client puts on a piece and their eyes shine with delight. When I know that specific creation has just found a loving home with someone who will appreciate and wear it.

Who are your jewelry heroes?
I have to give a big thanks to Preston Reuther...he started me on this path eight years ago with his videos. But there are many artists who I have admired and learned from...Betty Baxter, Dale Armstrong, and Jessie Donnan to name a few.

What is on your bench now?
A lot of Red, White and Blue! I am finishing some work for the Museum of Patriotism in downtown Atlanta for 4th of July weekend. I am collaborating with a glass artist friend in creating one of a kind jewelry pieces for my "Freedom Collection".
What is your most indispensable tool?
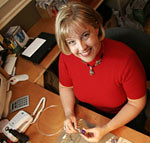
My chain nose pliers. Though I am a tool junkie....I have to have on of my two favorite pairs of chain nose pliers with me on the bench whenever I start a new piece!

06 July 2010

Archives July/August 2009 : Tool of the Month

Tool of the Month:
Vernier Caliper

Many times customers will purchase wire and sheet and ask how will they know what gauge the metal is, if it were to get mixed up. While the Browne & Sharpe Gauge (also known as the "gauge gauge") is made especially for measuring the thickness of wire and sheet, vernier calipers are a great alternative. While most are a bit more pricey than the B&S gauge, they are much more versatile.

Calipers are a basic measuring tool used in MANY different fields, from a machinists precision tool to a device used to measure body fat in a doctor's office. Calipers are a kind of device used to measure the distance between two opposing sides. The tips of the caliper are adjusted to fit across the points to be measured, the caliper is then removed and the distance read by measuring between the tips with a measuring tool, such as a ruler.

Vernier calipers are a specialized type of caliper that includes not only the measuring tool built into the caliper but a vernier scale for a more precise measurement. A vernier scale is a sliding secondary scale that is used to indicate where the measurement lies when it is in between two of the marks on the main scale.

Brass Sliding Caliper
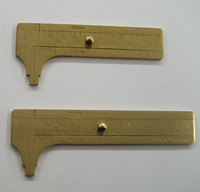
The most basic vernier caliper used in jewelry is the brass sliding gauge. This brass caliper measures external dimensions in metric only (millimeters), and is slightly less precise than a proper vernier caliper. But it is inexpensive and quick to use, therefore handy for general use and great for your first caliper. It also can be used to check for rightness of an angle. The brass millimeter gauge has a small knob on the main sliding scale for easy sliding when measuring. They come in two different lengths, 60mm and 80mm, priced at $9.40 and $11.50, respectively.

Vernier Caliper
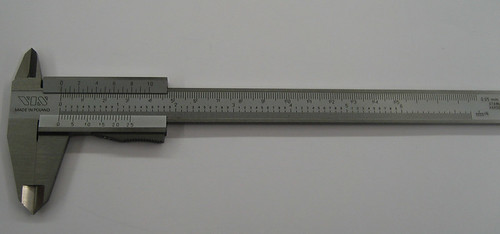
Other than measuring external dimensions, the standard vernier caliper has a few more measuring capabilities than the brass sliding gauge. They have an upper jaw to measure internal dimensions (like the inside diameter of tubing) and a slender depth probe, attached to the moveable head and slides along the center of the body of the caliper, that will measure deep groves and areas that would prove difficult to measure otherwise. The standard vernier caliper also includes both metric and inch measurements on the upper and lower part of the scale. It also has a locking feature to easily set your measurement and then scribe a measured line onto your project. The Vernier Caliper that JFF carries is a steel bodied caliper with a smooth track, made in Poland. It is priced at $69.75.


Dial Caliper
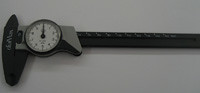
An improvement to the Vernier Caliper is a Dial Caliper. The dial measures in small increments for precision measuring. Usually only in one scale, inch or metric. However, the dial is much easier to read and has the same measuring capabilities as the Vernier Caliper. The Dial Caliper has a hard plastic body and is made in Switzerland, priced at $38.70. This caliper in particular does not have a locking mechanism, as the hard plastic body is not enough to leave a scribe line.


Digital Caliper
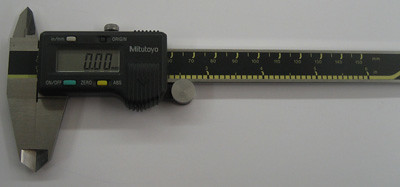
The easiest to read, and most accurate caliper is the Digital Caliper. This caliper has replaced most all other measuring tools in my jewelry studio (except of course a ruler). The Digital Caliper is the bees knees and the "Rolls Royce" of calipers. While it has a large digital screen for reading the measurement, it also has the capability to switch from inches to millimeters with the press of a button. The Digital Caliper has all the same measuring and locking features at the Vernier Calipers, but takes out the guess work of accurate measuring. The Mitutoyo Digital Caliper is made in Japan with a steel body and measures to the 0.01mm and 0.0005", making this the most precise Caliper. The Mitutoyo comes in two different sizes, 4" (100mm) and 6" (150mm), priced at $129 and $139, respectively.

02 July 2010

Archives June 2009 : Question and Answer

Q: How to find center of a circle?

A: Finding the center of a circle or disc you have punched out can be quite a task. However, using your divider is an easy way to tackle this challenge.

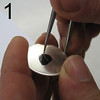
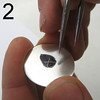
Begin with your circle and your divider. Just eyeballing it, find the approximate center of the circle with your divider. Set your divider to that distance and bracing against the outside of the circle with one leg, draw three intersecting lines using the other leg. If the three lines intersect at a point, you have found exact center! Otherwise, the lines will create a triangle, and some point in the middle of the triangle is your center. Continue making adjustments and drawing lines until you have the exact center.


Please note: the black sharpie mark is not necessary for this process, it is only used for purposes of photography.

01 July 2010

Archives June 2009 : New Items

JFF NEW ITEMS!

Hoop Mandrel
$19.95
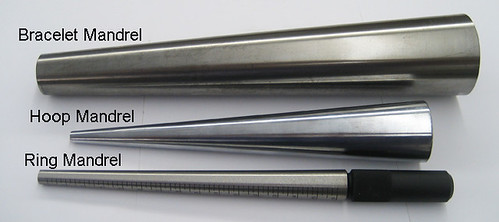
Ring mandrels, bezel mandrels, bracelet mandrels...at this point you think you have mandrels coming out of your ears! But this little treasure is great for those in-between jobs that are between the largest diameter of the ring mandrel (7/8”) and the smallest diameter of the bracelet mandrel (1 1/2”).

Made of cast steel, this mandrel is 11 3/4” tall and ranges in diameter from 3/8” at the smallest point to 2”. The hoop mandrel is great for making hoop earrings, large jump rings, baby bracelets, etc..