go back to JFF

23 June 2010

Archives April 2009 : Question and Answer

Q: What is the difference between reticulation silver and sterling silver?

A: It’s funny how the question of the month comes about...usually a customer will ask a question, something that isn’t very common, then it all of a sudden it snowballs and becomes the question everyone asks. And thus, the question of the month is born! So keep it up, we love your questions!

Reticulation is a process by which metal sheet, usually silver, is heated to almost melting temperature and the surface draws up to make ridges and valleys, leaving a unique wrinkled texture.

Reticulation begins with depletion gilding. A process that involves annealing a sheet of gold or silver to oxidize the copper at the surface, and then pickling to remove the oxide, leaving a thin layer of pure metal on the surface. This causes the surface to have a higher melting temperature than the alloy within and is ready to reticulate. Once the sheet is gilded, it is heated to just below the flow point. The alloy in the interior flows before the surface of the metal does causing a surface to wrinkle. The number of anneals, the size of the flame, and the ratio of copper to silver cause variations in the texture of the reticulated surface.

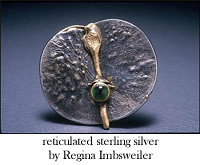
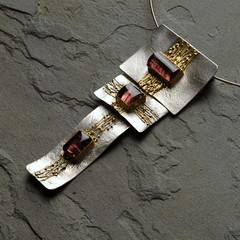
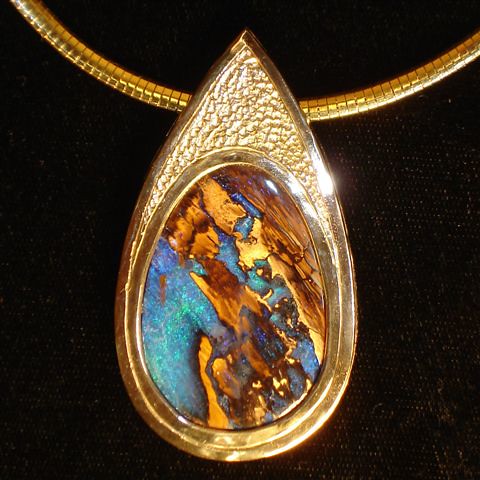
Silver is the metal most commonly used for reticulation. Sterling silver (92.5% fine silver and 7.5% copper) works fairly well, but the wrinkled texture is fairly subtle. (See Regina’s reticulated sterling silver pendant, above right.) Silver alloyed with a higher proportion of copper gives a more dramatic pattern. A commercially manufactured reticulation silver is now produced with 80-83% fine silver and 20-17% copper. (See Judy’s reticulated 80/20 earrings, above left.)

Sterling Silver is only defined as having 92.5% fine silver and 7.5% copper, therefore reticulation silver cannot be marked as sterling. If you buy reticulation silver, mark the sheets immediately and keep all scraps separate from your sterling silver. When selling jewelry made with reticulation silver and sterling, be sure the customer understands that the piece is not entirely sterling.

22 June 2010

Archives April 2009 : Jeweler of the Month

Jeweler of the Month:
Regina Imbsweiler

Bio
I decided to become a jeweler about one year after finishing high school when I realized that my first career choice, engineering, was not what I really wanted. I was inspired by traveling craftspeople and imagined that it was a free and independent life style, and that I could be my own boss.

From 1974 to 1976 I attended the Goldschmiedeschule in Pforzheim, followed by a one year apprenticeship with a master goldsmith, Herbert Munsteiner. This training was technically rigorous and led to my certification as a goldsmith through Handwerkskammer Karlsruhe in 1977. I am still grateful for this thorough training even though I have gone on about my work in a more artistic way.

I started marketing my own work in 1980, while still working for a jewelry company in Germany. 1985 I started showing at US Galleries, among them Geode in Atlanta.

My family moved here in 1991, and I started Goldsmiths Gallery, with the help of my then-apprentices Leigh Griffin and David Vrooman who are both accomplished jewelers now.
In 1998 I moved to Irvindale Studios in Chamblee, mostly working for galleries and occasionally participating in retail shows.

My teaching experience includes two years as an instructor at Chastain Arts Center and training numerous apprentices. One of them, Vickie Cole, is now an instructor herself.
In 2009 I will have a trunk show at By Hand South, Decatur, during the Decatur Arts Festival and will be part of the Atlanta Contemporary Jewelry Show in November which I also help organize.

What was your first piece?
My first piece was a replication of an ancient Roman bracelet that I had seen in the Jewelry Museum in Pforzheim. It had a carnelian cabochon in the center and two links made out of wires on each side, connecting in the back.

What is your creative process?
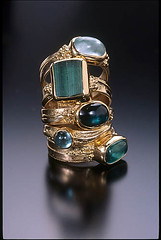
My favorite process is combining silver and gold, creating different textures and surfaces. Within my "vocabulary" there are more classical and more free-flowing forms. I sometimes use fusion, and often 22k gold wire and gold balls. Occasionally I have prototypes cast and use them in variations for my production pieces. Tourmalines are definitely my favorite stones because of their most amazing color variations and their "inner life".

Who are your jewelry heroes?
I am strongly attached to the European art jewelry of the 70s and 80s. Some names: Paul Preston, Herman Juenger, Michael Zobel.

Among American jewelers: Harold O'Connor

Where do you find design inspiration?
This is a hard question. True inspiration is intuitive, which means you don't know where it comes from. I pick up bits and pieces of imagery from nature (like almost everyone), microbiology, and geology. One way to get inspired is to look at my stones, and the stuff that is on my bench, and put them together in ways that just happen, spontaneously.

What is your favorite part of making jewelry?
I could be on the torch all day! I am very passionate about fire.

What is on your bench now?
About 8 large rings and a couple of necklaces for my next show at Edgewood Orchard Galleries.

What is your most indispensable tool?
A small curved burnisher which I use to open up bezels when I size rings.

21 June 2010

Archives April 2009 : Tool of the Month

Tool of the Month:
GRS BenchMate™

In the past two tool of the month articles I have mentioned a the GRS BenchMate™. This month I thought it was only appropriate to focus on the BenchMate™. Please note, while there are tons of attachments I could mention, I am only going to mention a few.

The whole of the BenchMate™ system begins with the fixed mounting plate. This steel plate is screwed to the edge of your bench top for mounting the various components of this system. Each attachment has a mounting bracket on the back that fits perfectly onto the mounting plate. Because the sides of the plate are beveled, BenchMate™ accessories can be easily removed by sliding them upward.

GRS BenchMate™ Bench Pin

The BenchMate™ bench pin attachment has a mounting bracket on the back that slides perfectly onto the mounting plate. The bench pin holder has one wing nut and a bolt on the bottom to lock in the bench pin for a more sturdy hold. (As pictured to the left)
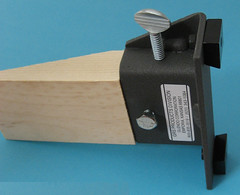
The bench pin is made of hard wood and can be modified for individual needs. Because it is so easy to change out, some jewelers even have a bench pin attachment for each use, wax carving, sawing, filing, etc.. But don’t worry about a bench pin for bracing your ring clamp, the BenchMate™ Holder and ring clamp attachment has that covered.

GRS BenchMate™ Holder
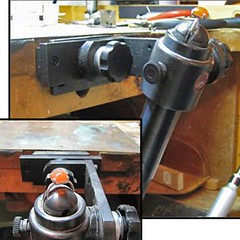
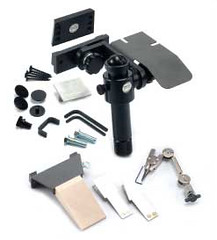
The BenchMate™ Holder or, as I like to call it, ring clamp attachment, is far superior to most other ring clamps because it is hands free. The holder will freely tilt and rotate in all directions and tightening the pivot knobs will lock the clamp solidly in any position or add selective resistance. The BenchMate™ Holder and ring clamp is sold in a basic kit that includes: the mounting plate with 5 wood screws, the BenchMate™ holder (ring clamp), shellac pad, ring channel bridge, extra plastic jaws, and 2 hex keys.

BenchMate™ and a few other companies have come up with attachments that fit into the holder, including a small pitch bowl and the Wolf Belt sander. Below right is the Wolf Belt Sander GRS attachment, simply remove the ring clamp and slide in the Wolf Belt Sander attachment into the holder. Below left is the pitch cup attachment, the pitch cup has a small tang on the bottom that can easily be held in the ring clamp itself. (The pitch cup is not a stocking item, however it is available upon special order.)
GRS BenchMate™ Inside Ring Holding Attachment

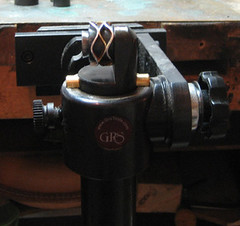
Many wide, delicate or unusual rings are difficult to hold with an outside clamp. This Inside Ring Holding attachment adds inside ring-holding capability to any BenchMate. The holder is perfect for channel, bead and bezel settings. The Inside Ring Holder comes with a set of seven collets ranging in ring sizes from 4-13. From the set of collets, you select the closest size that fits inside the ring. The screw expands the collet to hold the ring securely. These hard plastic collets won’t scratch or mark rings. With an extra collet set, you can double-stack the collets for extremely wide rings or hold several rings simultaneously for production work.
GRS BenchMate™ Double Third Hand Soldering Station

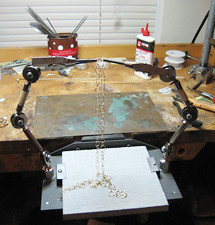
The BenchMate™ Double Third Hand Soldering Station is one of the most versatile attachments. Mounted on a metal base with a replaceable 6” non-asbestos working platform, the soldering station has two removable third hands. It has the dove tailed mounting bracket to fit on the BenchMate™ system and also has non-slipping rubber feet to sit directly on your work surface.

GRS BenchMate™ Engraving Vise Shelf

My favorite attachment is the Standard Engraving Vise Shelf (it does not include an engraving block). Which may sound funny to most, as I am not a hand engraver. But let me explain a few instances why this shelf is the coolest attachment for your BenchMate™.

My bench top is cluttered with projects, burs, saw blades, saw frames, pliers, hammers...well, I think you get the idea. I have no room to keep my handy Proxxon vise on my bench permanently, and to be quite honest I’m too lazy to screw and un-screw the c-clamp of the vise as I need it. The Standard Engraving Vise Shelf is perfect for that, I just slip my bench pin out of the way and slide the shelf with my vise already clamped in place onto the mounting bracket!

OR

I have always been told that you are supposed to be at eye level with your work. Sometimes, I need to be looking down on my work. I use the engraving vise shelf as a second, lower bench surface for this. I don’t have to change the height of my chair or stand for hours (if the project takes that long).

The GRS BenchMate™ can be quite overwhelming when you are first introduced to it, with multiple attachments and accessories, it looks like a serious tool for a serious jeweler. I had heard Dallas and some customers singing the praise of the GRS BenchMate™. To me it looked like a ring clamp on steroids that could be switched (seemingly like magic) into a bench pin, soldering station, engraving block, or pitch bowl. All the accessories really overwhelmed me, but upon Dallas’ suggestion I decided to start small with the bench pin attachment. If I never got any other attachments, I could at least have a nice bench pin that could easily be moved out of the way. But next thing I knew, I was using the ring clamp attachment, and then the engraving block shelf!

The GRS BenchMate™ Fixed Mounting Plate is $15.98.
The GRS BenchMate™ Bench Pin Kit is $23.95.
The GRS BenchMate™ Basic Kit (the BenchMate™ holder and ring clamp) is $198.00
The GRS BenchMate™ Pitch Cup (special order only) is $22.95.
The GRS BenchMate™ Wolf Belt Sander Adaptor (special order only) is $16. The Wolf Belt Sander, also special order only is $160.
The GRS BenchMate™ Inside Ring Holder is $69.00.
The GRS BenchMate™ Double Third Hand Soldering Station is $99.95.
The GRS BenchMate™ Engraving Vise Shelf is $36.95.


The BenchMate™ System and accessories are mostly sold individually, however, the BenchMate™ Deluxe kit is a practical way to start. The kit includes: the mounting plate with 5 wood screws, the BenchMate™ holder (ring clamp), shellac pad, ring channel bridge, extra plastic jaws, 2 hex keys, a third hand, 2 soldering clamps, and bench pin kit. This Deluxe Kit is $269.
Please note: some of the photos are of my home studio, please excuse the mess!

Prices are subject to change without notice.

18 June 2010

Archives March 2009 : Question & Answers

Q: Can you solder gold-filled?

A: The quick and easy answer is “yes.” But as many of you know, the question and answer section is never a cut and dry answer.

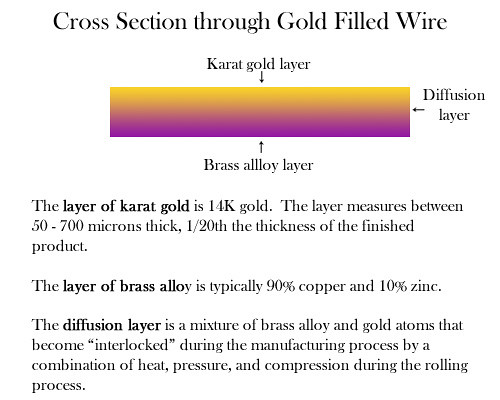
Let me begin by explaining what gold-filled is. Like many of our tools in jewelry making the name is misleading, gold filled is not “filled with gold.” It is a thin layer of gold filled with a core of another less expensive material. Usually a copper-rich material like brass or bronze. The layer of gold is attached to the base metal core through a process called alloy diffusion. Allowing for a much thicker layer of gold than plating can produce.

Alloy diffusion begins with quickly heating and welding the two metals in a high heat furnace and then removing and immediately pressing the composite in a hydraulic press. The process continues by rolling in a rolling mill. Combined with annealing, the welded bond between the gold layer and base metal is further enhanced. The resulting weld is so strong that the finished gold filled sheet stock can be formed, fabricated and soldered without any risk of delamination.

Gold filled materials are used in many finished products; watchcases, cigarette lighters, high fashion jewelry, etc. In practice, most gold filled products utilize an outer layer of gold that is between 10 karat and 18 karat in fineness. Depending on the usage, the thickness of the gold sheet varies. All items designated and sold commercially as "gold filled" must comply with the trade rules set forth by the Federal Trade Commission (FTC). The total gold content for an object designated gold filled must equal 1/20th of the total weight of the finished item. Therefore, the gold filled wire JFF carries is 1/20th 14K gold filled.

Now, back to the question at hand. Can you solder gold filled? Two big red flags cause a problem when soldering gold-filled: the copper-rich core and the thin layer of gold on the surface. When heated, the copper will raise to the surface, much like soldering silver. This causes a pinkish color after pickling, much like rose gold. Which is not a problem if you don’t mind the color, but if you want yellow gold, not good. The copper core also presents an increased risk of firescale. The first inclination to deal with firescale and/or the color change is to file, grind, and polish.

This is where the thin layer of gold on the surface creates the next hurdle. The surface does not have enough gold to with stand grinding away the firescale without taking all of the gold off with it. Thus leaving the brass or bronze core exposed, which will tarnish while the gold will not.
Ok, so how are you supposed to deal with these problems?
  1. Boric Acid and Denatured Alcohol Solution: dipping the pieces to be soldered in a saturated solution of boric acid and denatured alcohol is a traditional bench jeweler’s technique to prevent firescale on gold. By burning the alcohol off, a protective coat of boric acid is left all over the gold filled. Flux, solder and pickle as you would normally afterward.
  2. Charcoal Block: the charcoal block removes much of the oxygen from the flame which will decrease your chances of having firescale.
  3. Depletion Gilding: a process of heating to annealing temperature, pickling and brass brushing, and repeating 5-7 times. After soldering and pickling the piece, the process of depletion gilding will remove the pink color on the surface of the gold filled. However, this is a time intensive process and rather difficult when working on a link necklace.
Other helpful tips include:
  • Use gold solder, preferably a 14K easy solder.
  • Pick solder, thus controlling the amount of solder used and decrease the amount of solder clean-up needed.
  • Solder quickly, the less time you heat the piece, the lower your chance of having firescale.
A mixture of some or all of these tips and tricks will provide you with the best results possible. Best of luck!

10 June 2010

Archives March 2009 : New Items

New Item
Pepe 4” Guillotine Shear $249.00

This new miniature 4” guillotine shear is a great value and quality tool from Pepe. A guillotine shear has a table to lay the metal on while making straight cuts with a lever arm that lowers a sharp blade. This makes cutting precise lengths of sheet metal quick and easy, without curling the edges like Joyce Chens or other shears often do.

The Pepe 4" precision guillotine shear cuts non-ferrous (gold, silver, copper, brass, aluminum and similar metals) sheet metal up to 16 gauge (1.2mm) thick and 4" wide. It has an adjustable ruler with cutting guide for cutting exact lengths of metal up to 4" long (remove guide for cutting longer lengths) which makes measuring lengths a snap. Pepe has added an angle guide for making precise angled cuts with markings for 15, 30 and 45 degree cuts. You can also use the angle guide for making degreed cuts from any angle between 0 and 45.

Like all Pepe guillotine shears, the innovative design restricts access to the cutting blade, minimizing the possibility of injury. The high carbon steel blades are precision ground and hardened, and Pepe claims you can make 10,000 cuts before they require sharpening. This shear is not for use with stainless steel heat treated hardened metal(s), but it will cut mild steel up to 16 gauge, a remarkable achievement for such a small shear. Like any other shear, repeated use at its maximum capabilities will necessitate adjustment of the cutting blades.

09 June 2010

Archives March 2009 : Jeweler of the Month

Jeweler of the Month:
Herb West

Bio
I moved my family to Atlanta in 1962 to establish my medical practice. In 1963 when I inquired what my wife might like for an up-coming gift-giving occasion, she said she would like an Opal ring. Funds were short then so I sought help in finding a stone from a friend who in his retirement made jewelry. He obtained a very nice Mexican fire opal for me. When I asked about mounting the stone, he responded that I could do it under his supervision. I did, and the ring was a success, and I was hooked. I signed up for classes of jewelry making. As I accomplished what was offered in one class I would move to another and another advanced class. I was tutored by individual artists – Susan Zimmerman for wax work, Chris Litwin (who later moved to work with “Harry Winston”), Patrick Baylor (a ‘Swiss master jeweler’), Ken Lawrence and others. All had a contributing hand in my becoming proficient in this art form.

After years of making jewelry for the family, I began creating custom pieces for friends, one of whom is an actress who asked me for two different necklaces for her Hollywood Premier events.
I had been participating in local craft shows and then when I retired from medicine, I exhibited in national juried shows. It is a fun experience. We enjoy the ambience of different cities, the association with talented vendors, and the sincere interest of the attendees of the show. I have received top awards at shows on a number of occasions.

My preference is gem quality opal and gold. For choice stones I travel to the mines in Australia, Mexico and Africa and I attend the Tucson Gem Show. My sources are competent, trustworthy people who know and seek out the size and kind of opals I buy. My work is available in galleries both local and in Santa Fe, N.M.

Before deciding how I am going to do a project, I study and ponder each individual stone to come up with a design that will accentuate that particular opal. Diamonds or colored stones may be chosen to compliment the main stone.

I also work with silver and a variety of colored stones. I gain much pleasure and satisfaction from making beautiful adornments with magnificent gifts from nature.

What was your first piece?
The Mexican Fire Opal Ring I made for my wife.

Where do you find design inspiration?
Most of the time I buy the stone because I like it. The stone will sit until in the middle of the night, while I’m sleeping at 3 am the idea pops into my head.

What is your favorite part of making jewelry?
I enjoy the whole process. Honestly, if no one wanted to buy my jewelry, I would still make the jewelry. I enjoy it, it’s fun.

What is on your bench now?
An opal and silver necklace and an opal and gold necklace that I am working.

What is your most indispensable tool?
I can’t single out any one tool. The most indispensable tool is the one that I need at that time.

08 June 2010

Archives March 2009 : Tool of the Month

Tool of the Month:
Ring Clamp

After writing last month's Tool of the Month on the Bench Pin, it only seemed appropriate to do March's tool of the Month on the Ring Clamp!

With a misleading name, ring clamps have a tough break. Traditionally used for holding rings when setting stones and and polishing, they are many times set in the back of your bench, collecting dust.

For the past three and a half years, my ring clamp laid unused in the back of a drawer. If I ever came across it I would think, "I don't need to use a ring clamp if I'm not making rings, right?" Wrong.

About six months ago, I was filing a small strip of metal, approximately 6 mm by 25 mm. I would lay the strip on my bench pin and hold the metal down with my fingers as I would file. But instead of filing the metal, I was filing my fingers as well. While I might need a manicure, at that rate I wasn't going to have anything left to manicure!

As I was looking around for something to hold the strip of metal, I found my ring clamp. It seemed that it just might work. So I decided to give it a shot. Not only did it hold my metal strip more stable, my fingers were also protected. Ah-ha moment: a ring clamp can be used for things other than rings!

With this revelation, I decided to try and use the ring clamp in other situations. For instance, when I'm polishing on my flex shaft or polishing motor and my project is getting WAY too hot, or drilling a hole in a small piece of metal that I can't keep from flying across the room. A ring clamp will hold the small piece stead and once again protect my fingers.

A ring clamp works hand-in-hand with your bench pin. By clamping something in the ring clamp and bracing against your bench pin for stability, this tool can't be beat! It gives you ultimate control and holding.

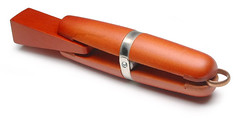
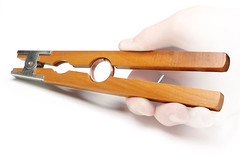
A standard ring clamp is traditionally made of hardwood. This double-ended, lever-action clamp uses a wooden wedge jammed into one end to close the other. Jaws are leather-lined to prevent marking the item secured in the clamp. Typically, one jaw is rounded and the other is squared off, making the clamp more versatile for different projects. JFF carries two standard ring clamps, a standard sized Hardwood Ring Clamp ($4.95), and the heavier duty Russian Style Ring Clamp ($6.75).


The Ring Polishing Clamp is made especially for holding rings. Sometimes when polishing the inside of rings, so much heat is produced it is difficult to hold the ring in your fingers. A very simple wooden lever-clamp holds the outside of the ring securely and safely, allowing access to polish the inside of the ring easily. The Ring Polishing Clamp is $4.95.The Pepe Deluxe Ring Clamp is modeled after the Swiss Ring Clamp, yet slightly more economical. Rather than opening at an angle, the Pepe ring clamp uses a parallel clamping action and operates by a knurled screw knob at the base. Coupled with non-marring leather jaws, the Pepe Ring Clamp provides a very secure grip. The Pepe Ring clamp is $23.70


This month, like last month I’m going to mention the GRS BenchMate™. While last month I discussed the bench pin attachment, this month I’m going to focus on the ring clamp attachment.
For those of you who did not get the last newsletter or missed it, let me tell you a little about the GRS BenchMate™. It is a versatile bench tool with various components that easily switch in and out. The BenchMate™ begins as a bench pin and quickly turns into a soldering station, then a ring clamp holder for stone setting, then can be switched to house an engraving block or pitch bowl. While I could spend hours talking about the BenchMate™, I’m going to focus on the ring clamp attachment and the BenchMate™ Basic Kit.

The whole of the BenchMate™ system begins with the fixed mounting plate. This steel plate is screwed to the edge of your bench top for mounting the various components of this system. Because the sides of the plate are beveled, BenchMate™ accessories can be easily removed by sliding them upward. The ring clamp attachment has a mounting bracket on the back that slides perfectly onto the mounting plate.

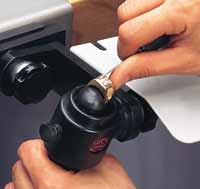
The BenchMate™ Holder and ring clamp attachment is far superior to most other ring clamps because it is hands free. The holder will freely tilt and rotate in all directions and tightening the pivot knobs will lock the clamp solidly in any position or add selective resistance.
The BenchMate™ holder, ring clamp attachment and mounting plate are all sold in a Basic Kit for $178.